Have you ever scrolled through an online store and noticed how some products just pop off the screen while others look dull or messy? The difference often comes down to one thing: the background. In professional product photography is the practice of capturing images of products for commercial use, focusing on clarity, detail, and aesthetic appeal., a clean, distraction-free environment isn't just nice to have-it's essential. This is where seamless backgrounds come into play.
A seamless background is exactly what it sounds like: a continuous surface with no visible seams, edges, or distractions. Typically made from thick, non-reflective paper rolls ranging from 4.5 to 9 feet (1.4 to 2.8 meters) in width, these backdrops create a smooth canvas that lets your product take center stage. Whether you're shooting for Amazon, building a brand identity, or creating portfolio work, mastering seamless backgrounds gives you control over every pixel of your image.
Why Seamless Backgrounds Matter More Than You Think
You might wonder why not just use a wall or a table. The problem with everyday surfaces is inconsistency. Walls have textures, tables have grain, and corners create hard lines that distract the eye. A seamless paper backdrop is a large roll of thick, non-reflective paper designed to provide a smooth, uniform surface for photography without visible edges or seams. eliminates those variables entirely.
The real magic happens when you consider light interaction. Standard surfaces reflect light unpredictably, casting unwanted shadows or color tints onto your subject. Seamless paper is engineered to be non-reflective, which means it absorbs light rather than bouncing it around. This reduces glare and prevents color spill-especially important when using saturated colors like red or deep blue near your product.
According to industry standards, e-commerce giants like Amazon require pure white seamless backgrounds for product listings. But beyond compliance, these backgrounds build trust. Clean imagery signals professionalism. It tells customers, "This brand pays attention to detail." And in a world where first impressions happen in milliseconds, that matters more than you think.
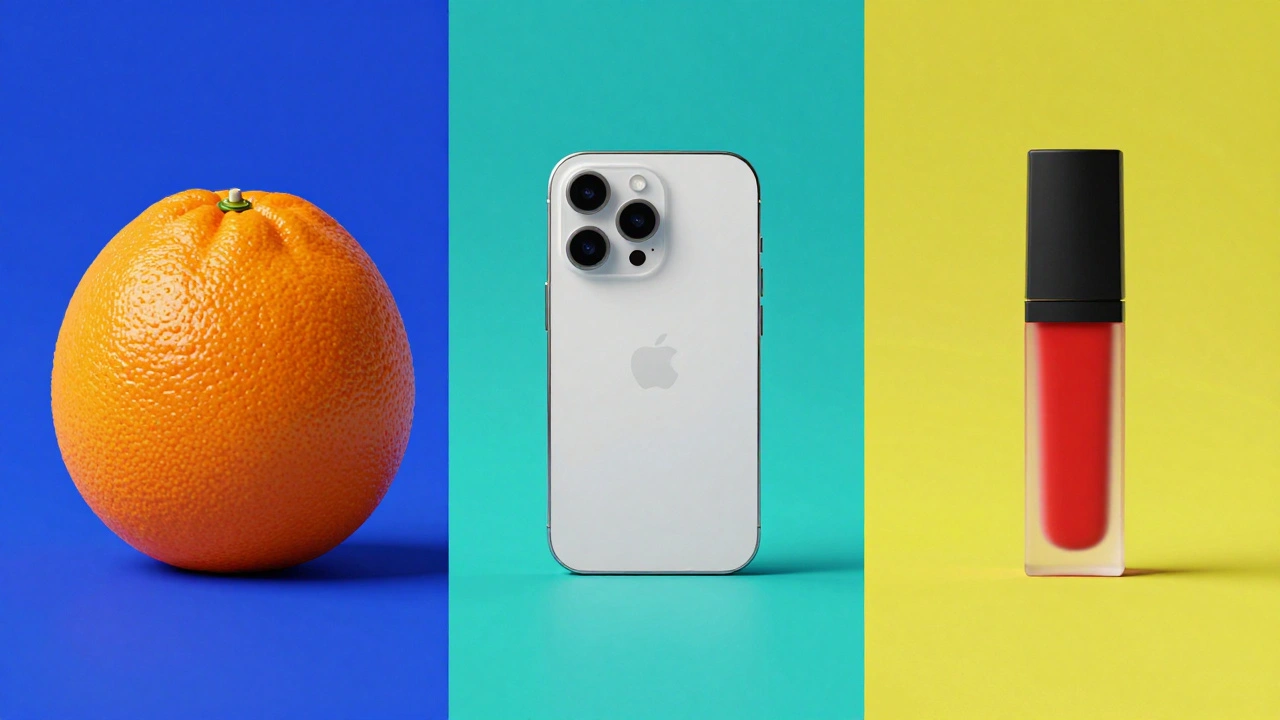
Choosing the Right Color: Beyond Just White
White is the most common choice, but it’s far from the only option. The right color can enhance your product’s features, evoke emotion, or align with your brand palette. However, picking a backdrop color isn’t about personal preference-it’s about strategic contrast.
Start by understanding three basic color relationships:
- Complementary colors sit opposite each other on the color wheel (like blue and orange). They create high contrast, making your product stand out sharply.
- Analogous colors are neighbors on the wheel (like teal and green). They produce harmony and a soft, unified feel.
- Triadic colors are evenly spaced around the wheel (like red, yellow, and blue). They offer balanced contrast without overwhelming intensity.
If you’re just starting out, don’t buy a rainbow of options. Invest in three to five versatile rolls instead. A solid foundation includes:
- One warm neutral (such as Pecan or Mocha)
- One bold primary or secondary color (like True Blue or Plum)
- One classic tone (white or medium gray)
Remember, lighting changes everything. A single roll of paper can yield ten different looks depending on how you light it. Warm lights deepen tones; cool lights lighten them. So before buying more colors, master how light interacts with what you already own.
| Color Type | Best For | Lighting Tip |
|---|---|---|
| White | E-commerce listings, minimalist brands | Use even, diffused light to avoid hotspots |
| Gray | Tech products, modern aesthetics | Add side lighting to create depth |
| Bold Colors | Lifestyle shots, emotional branding | Keep distance between subject and backdrop to prevent color spill |
| Warm Neutrals | Food, beauty, organic products | Use natural window light during golden hour |
Setting Up Your Space: No Studio Required
You don’t need a professional studio to get great results. In fact, many successful photographers start with DIY setups. Here’s how to build a functional seamless background station at home:
- Support Structure: Use two sturdy stands or even cardboard boxes. Attach your paper backdrop securely so it hangs smoothly from top to bottom.
- Extend the Surface: Let the paper flow from the vertical backdrop onto the floor. This creates a curved transition that eliminates horizon lines-the dreaded "tide line" effect.
- Positioning Matters: Place your product at least 3-5 feet away from the backdrop. This distance prevents light reflected from the background from washing out your subject.
- Add Fill Light: If your main light source casts harsh shadows, place a white card or reflector on the opposite side to bounce light back gently.
For extra polish, try placing a sheet of plexiglass under your product. It reflects subtle highlights and adds a premium feel without complicating your setup. Just make sure it’s clean-fingerprints show up fast!
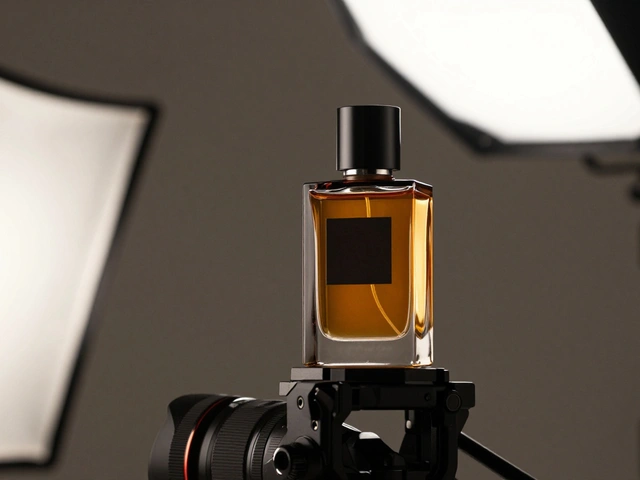
Lighting Like a Pro: Control Every Shadow
Lighting is the backbone of seamless background photography. Get this wrong, and even the best backdrop won’t save your shot. Get it right, and you’ll achieve studio-quality results with minimal gear.
The golden rule? Light the background and subject independently. This means using separate light sources for each. Why? Because controlling them separately gives you full tonal range over the backdrop without affecting your product’s exposure.
Here’s a simple approach:
- Main Light: Position your key light at a 45-degree angle from the front-left or front-right of your product. This avoids flat, shadowless images and adds dimension.
- Background Light: Use a second light aimed directly at the backdrop. Adjust its intensity to make the background brighter or darker than your subject.
- Diffusion is Key: Harsh light creates hard shadows. Soften it with diffusion panels, umbrellas, or even sheer fabric. Natural sunlight through a window works well if positioned correctly.
Avoid direct midday sun. Instead, shoot during early morning or late afternoon when light is softer. If you’re indoors, turn off overhead lights-they often cast inconsistent tones across the room.
Watch out for the "tide line"-those horizontal bands of uneven brightness on your backdrop. This happens when light falls unevenly across the paper. To fix it, move your background light closer to the center or add a second fill light to balance the exposure.

Post-Processing: When Less Is More
Even with perfect lighting, minor imperfections creep in. Wrinkles, dust spots, or slight color shifts are normal. That’s where post-processing steps in-not to redo the shot, but to refine it.
In Photoshop, you can recreate a flawless backdrop by masking the subject and painting over the background layer. Tools like the Clone Stamp or Healing Brush remove wrinkles and blemishes quickly. For advanced users, adding custom shadows beneath the product enhances realism, making the composite look naturally lit rather than digitally manipulated.
Amazon requires pure white (#FFFFFF) backgrounds. If your physical backdrop isn’t perfectly white due to lighting conditions, adjust levels in Lightroom or Photoshop until you hit that exact shade. Always check against a reference swatch to ensure consistency across multiple product images.
Don’t over-edit. The goal is enhancement, not transformation. Keep adjustments subtle so your final image feels authentic and trustworthy.
Common Mistakes to Avoid
New photographers often fall into predictable traps. Here’s how to sidestep them:
- Placing the product too close to the backdrop: This causes color spill and reflection issues. Step back-at least 3 feet minimum.
- Using undiffused flash: Hard light creates harsh shadows and blown-out highlights. Always diffuse your light source.
- Ignoring white balance: Indoor lighting skews colors toward yellow or blue. Set your camera’s white balance manually or correct it in post.
- Neglecting cleanliness: Dust, lint, and fingerprints ruin otherwise perfect shots. Wipe down your product and backdrop before every session.
Another overlooked issue? Overcomplicating your setup. Start simple. Master one light source and one backdrop before adding complexity. Simplicity breeds consistency-and consistency builds confidence.
What size seamless background do I need for small products?
A 4.5-foot wide roll is sufficient for most small products like jewelry, cosmetics, or electronics. Ensure the paper extends far enough behind and below the product to eliminate any visible edges in your frame.
Can I use seamless backgrounds outdoors?
Yes, but wind and ambient light make it challenging. Secure the backdrop tightly with weights or clips, and use reflectors to block stray sunlight. Indoor controlled environments are generally preferred for consistent results.
How do I prevent color spill from a colored backdrop?
Increase the distance between your product and the backdrop. Use negative fill (black foam boards) on the sides facing the backdrop to absorb stray colored light. Alternatively, shoot against a neutral backdrop and change the color in post-production.
Is natural light enough for seamless background photography?
Natural light can work well, especially during overcast days or indirect window light. However, it lacks control. For consistent results, combine natural light with artificial fill lights and reflectors to manage shadows and exposure.
Do I need expensive equipment to start?
No. A smartphone with good camera capabilities, a $20 seamless paper roll, two clothespins, and a lamp with diffusion can produce professional-looking results. Upgrade gear gradually as your skills grow.