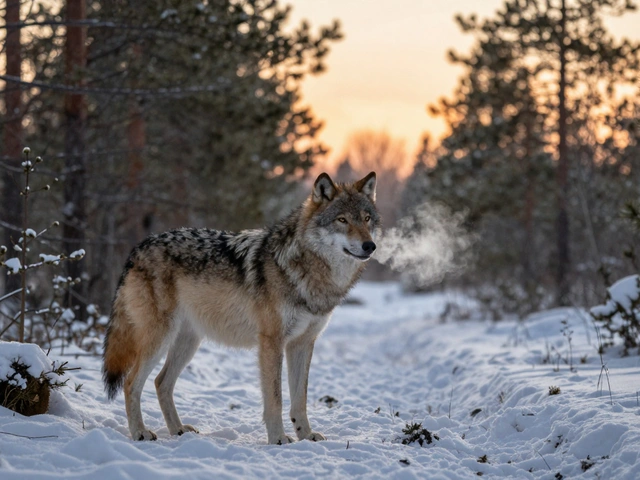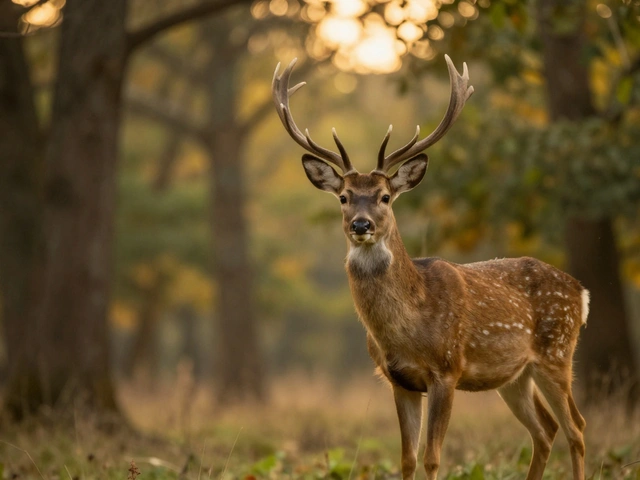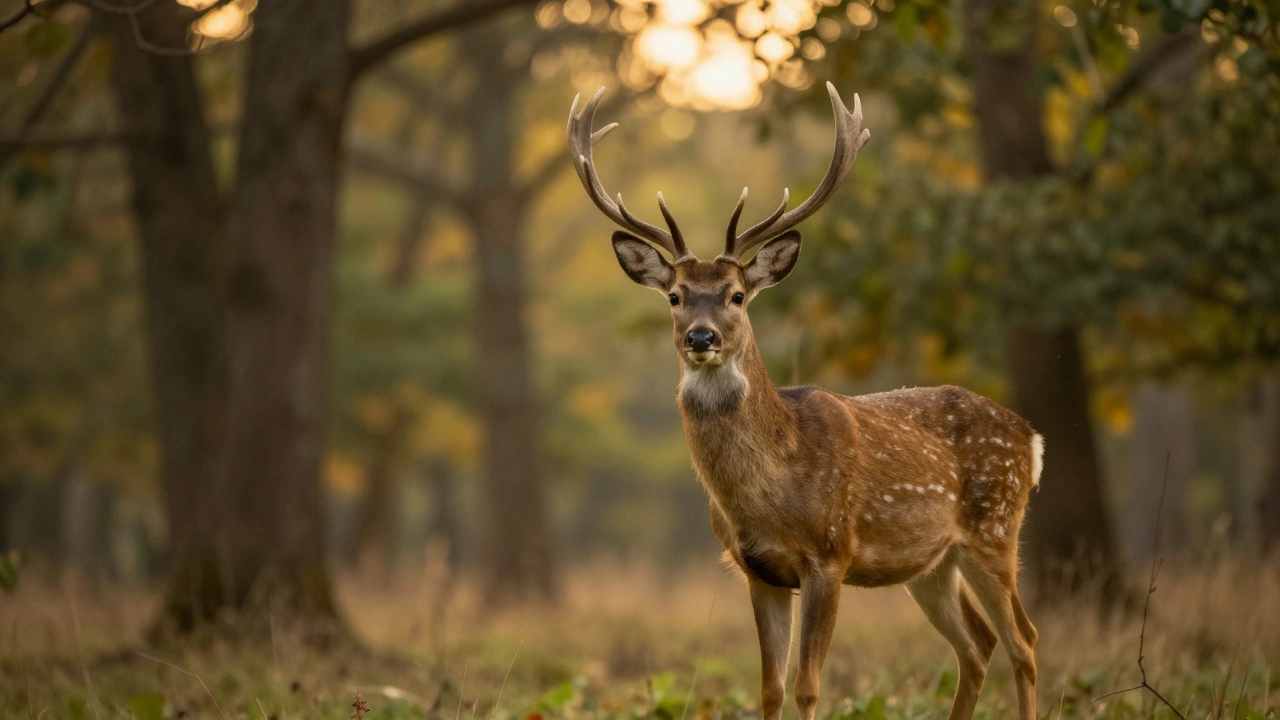
When you're out in the wild, camera in hand, and you finally spot that deer standing still under the trees - your heart skips a beat. You raise your lens, press the shutter, and... the photo looks cluttered. Branches stick out like arms. A bright patch of sky cuts through the animal's neck. The background is a chaotic mess. You didn’t miss the shot. You just didn’t control the background.
Wildlife photography isn’t just about catching the moment. It’s about isolating the moment. The difference between a good photo and a great one often comes down to one thing: how well you separate your subject from its surroundings. That’s where background control comes in. And the two most powerful tools you have? Bokeh and distance.
What Is Bokeh, Really?
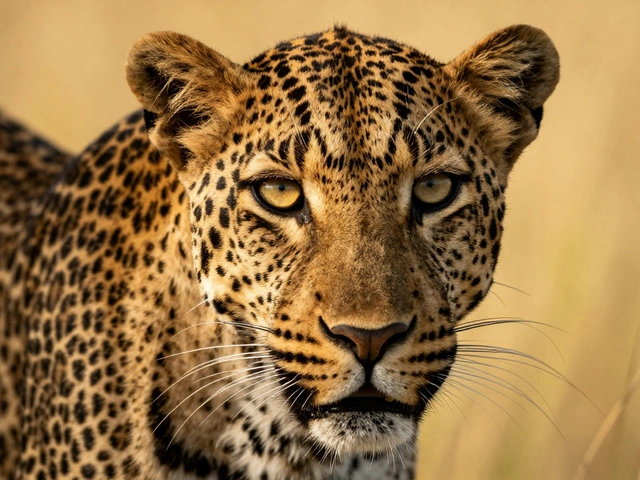
Bokeh isn’t just "blur." It’s the quality of the blur. A good bokeh doesn’t look muddy or harsh. It melts away distractions gently - like soft watercolor. A bad bokeh? It’s chunky, busy, and still distracting. The key to great bokeh lies in three things: aperture, focal length, and how far your subject is from the background.
Start with your aperture. The lower the f-number, the wider the opening, and the more the background melts. Shooting at f/2.8 gives you dramatically softer blur than f/8. Many wildlife photographers swear by lenses with f/2.8 or f/4 maximum apertures. A 600mm f/4 lens doesn’t just bring distant animals closer - it also turns a tangled forest into a smooth, creamy wash of color.
But aperture alone won’t fix everything. Try shooting a bird at f/2.8 with a 400mm lens - if the branch behind it is only two feet away, it’s still sharp. That’s where distance becomes critical.
Distance: The Silent Game-Changer
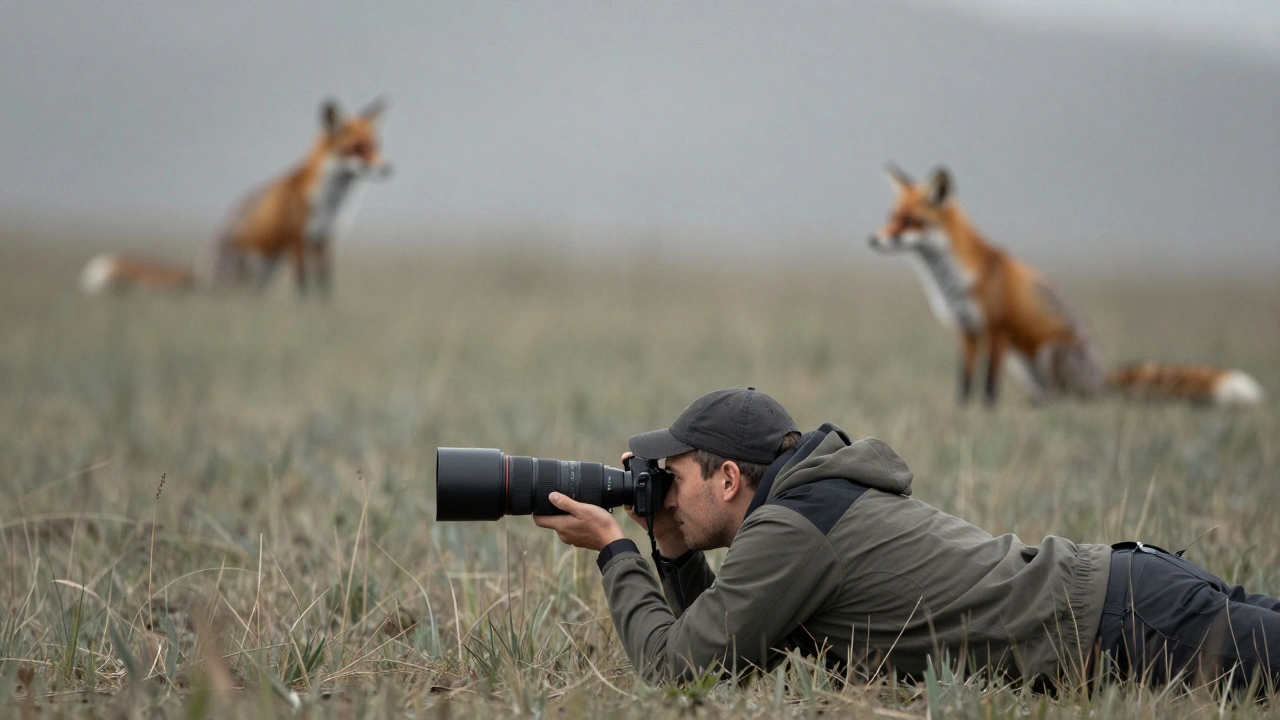
Most beginners think they need a bigger lens to get better background blur. But the real secret? Distance between your subject and its background.
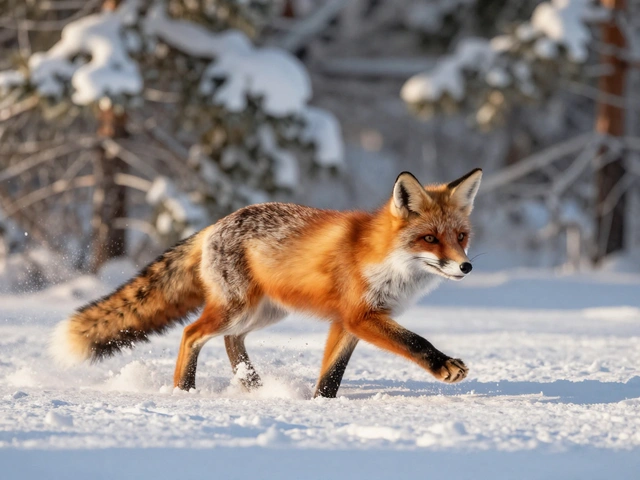
Imagine a fox sitting on a hill. Behind it, there’s a patch of tall grass. If the grass is only 10 feet behind the fox, even f/2.8 won’t fully blur it. But if you move your position so the grass is now 100 feet behind the fox? Suddenly, it disappears. That’s not magic - it’s physics. The farther the background is from the subject, the more it falls out of focus, even with moderate apertures.
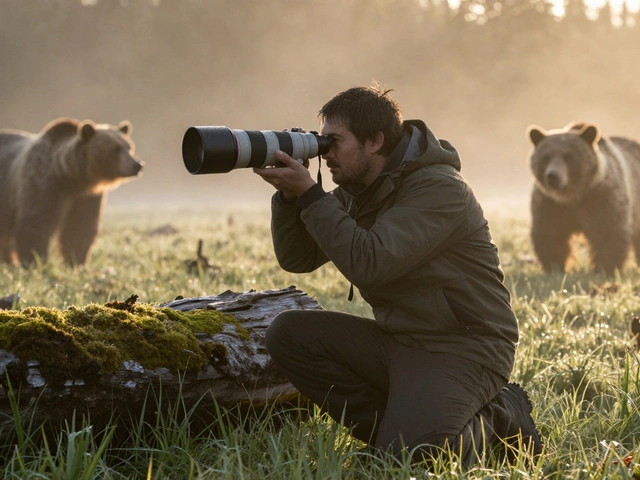
This is why the best wildlife photographers don’t just wait for the animal to come to them - they move. They crawl. They climb. They walk 20 yards left or right. A shift of just a few feet can turn a cluttered background into a clean canvas. As one photographer put it: "Get closer by using your feet - not just your zoom."
And here’s the kicker: you don’t need to get closer to the animal. You need to get closer to the right angle. Sometimes, stepping back 10 feet and tilting your camera down gives you a cleaner line of sight - and pushes the background farther away.
Angle and Position: Your Hidden Tools
Your camera’s position changes everything. Shooting from eye level with a deer? You get a natural perspective - and a background that falls away naturally below and above. Shooting from ground level? You might get a sky or distant treetops behind the animal - clean, soft, and uncluttered.
Try this next time: lie flat on your stomach. Now look through your viewfinder. Notice how the horizon line drops below the animal? That’s not an accident. Lowering your camera removes distracting horizon lines that cut through the subject’s body. A horizon slicing through a bird’s chest? It looks like the bird is floating mid-air. A horizon below its belly? It looks grounded. Natural. Real.
Horizontal shifts matter too. Move a few inches left or right. That bright leaf? Gone. That broken branch? Hidden. That patch of sunlight hitting the background? Now it’s just a soft glow. Long lenses amplify these tiny movements - a 2-inch shift at 600mm can completely change the background.
Color, Contrast, and Light
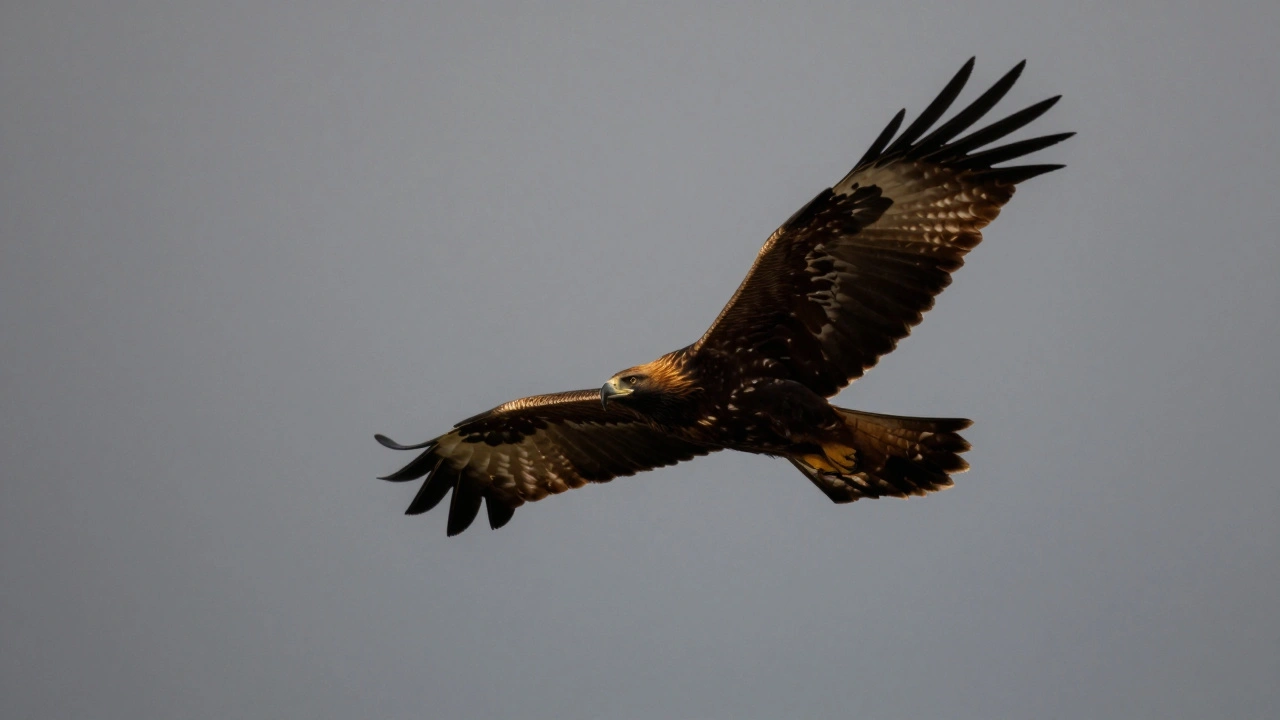
Blur helps - but if the background is the same color as the animal? You’ve got problems. A dark owl against a dark tree trunk? The beak vanishes. A golden eagle against a sunlit cliff? The feathers blend into the rock.
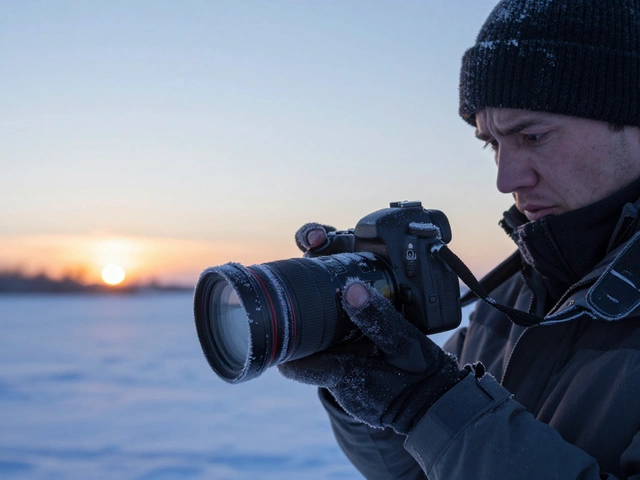
That’s why timing matters. Overcast days are gold. Soft, even light doesn’t create harsh highlights or shadows in the background. It turns everything into a neutral tone - perfect for letting the subject pop. Even better? Shoot when the sun is low. The light is warm, the shadows are long, and the background falls into deeper, richer tones.
Look for solid color backgrounds. A patch of deep green moss. A stretch of gray stone. A quiet stretch of blue sky. These are your best friends. Avoid busy patterns - stripes, spots, bright flowers. Even if they’re blurred, they still draw the eye away from the animal.
And here’s a trick: use the subject to block the background. If you’re photographing a heron standing in tall reeds, wait for it to turn slightly. Now the body of the bird hides the messy reeds behind it. No editing needed.
Composition: Framing the Background
Vertical shots (portrait mode) are underrated in wildlife photography. They naturally push the background up and down - away from the center. A standing elk? A soaring hawk? A tall flamingo? Vertical framing makes them feel more powerful. It also gives you more room to let the background fade without competing with the subject.
Zoom in. Don’t just rely on your lens. Use your feet to get closer, then zoom in further. The longer the focal length, the more compressed the background becomes. Trees that were spread out now stack neatly behind the animal. It’s not just blur - it’s organization.
And don’t forget: sometimes, the best background is no background at all. Wait for the animal to move into a clear space. A deer stepping into an open field. A bear walking into a patch of mist. That’s not luck - that’s patience. And patience is a skill.
Advanced Tricks: Exposure and Light
Want to turn a messy background into art? Try exposure tricks.
Overexpose slightly - let the background blow out to white. Now your dark subject stands out like a silhouette. Works great for birds against bright skies. Underexpose - let the background go dark. Now that bright patch of sunlight behind the fox? It’s gone. Just a deep, rich shadow. You’ve turned a flaw into a mood.
Backlighting? It’s a game-changer. Shoot with the sun behind the animal. The fur glows. The edges light up. The background? It’s dark, soft, and dramatic. A little underexposure helps. No need to fight the light - use it.
Putting It All Together
No single trick works alone. Change your aperture? It helps. Move your position? It helps. Wait for overcast light? It helps. But when you combine them? That’s when magic happens.
Here’s the formula:
- Use the widest aperture your lens allows (f/2.8, f/4, f/5.6)
- Get as close to the subject as safely possible
- Position yourself so the background is at least 50-100 feet behind the animal
- Lower your camera - shoot at eye level or lower
- Move sideways a few feet to eliminate distractions
- Wait for soft, even light - overcast or golden hour
- Use composition to let the subject block the clutter
It’s not about having the most expensive gear. It’s about understanding how space, light, and angle work together. A 300mm lens with smart positioning beats a 600mm lens with a messy background every time.
Final Thought: See Before You Shoot
The best wildlife photographers don’t just react. They predict. They look at a scene and think: "Where is the background? How far is it? What color is it? Will it blend with the animal?" They don’t wait for the animal to pose. They position themselves so the world around the animal becomes a frame - not a mess.
Next time you’re out there, don’t just take the shot. Build it. Control the background. Let the animal shine. Because in wildlife photography, the subject isn’t just in the frame - it should own it.
What aperture setting gives the best background blur in wildlife photography?
For maximum background blur, use the widest aperture your lens allows - typically f/2.8, f/4, or f/5.6. Lower f-numbers create shallower depth of field, which softens the background. However, aperture alone isn’t enough. Combining it with distance and positioning makes the biggest difference.
Does a longer lens always mean better background blur?
Longer lenses (like 400mm, 500mm, or 600mm) compress the background and make blur appear more dramatic, but they don’t automatically create better bokeh. A 600mm lens at f/8 can still have a busy background if the subject is too close to clutter. The real advantage is that longer lenses let you stand farther away while filling the frame - which naturally increases the distance between subject and background, enhancing blur.
How far should the background be from the subject for clean blur?
For noticeable background separation, aim for at least 30-100 feet of distance between the subject and the background. The farther away the background is, the more it falls out of focus - even with moderate apertures. In practice, this often means moving your position rather than just changing lens settings.
Why does shooting from a low angle help with background control?
Shooting from a low angle lowers the horizon line, removing distracting elements like tree branches or sky patches that cut through the animal. It also changes the background composition - instead of a chaotic mix of leaves and branches, you often get smoother elements like grass, earth, or sky. Plus, eye-level shots create more natural, engaging compositions.
Can I fix a bad background in post-processing?
You can soften or darken backgrounds in editing, but you can’t magically create blur that wasn’t captured. If the background is too close or too detailed, editing tools like blur filters will look artificial. The best results come from getting it right in-camera - using aperture, distance, and positioning to naturally isolate the subject.