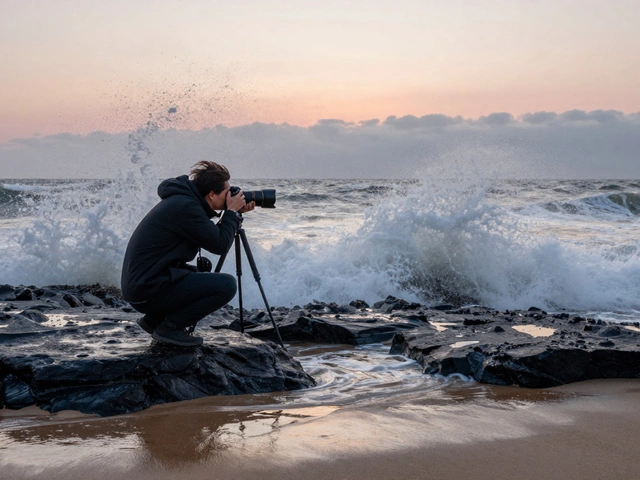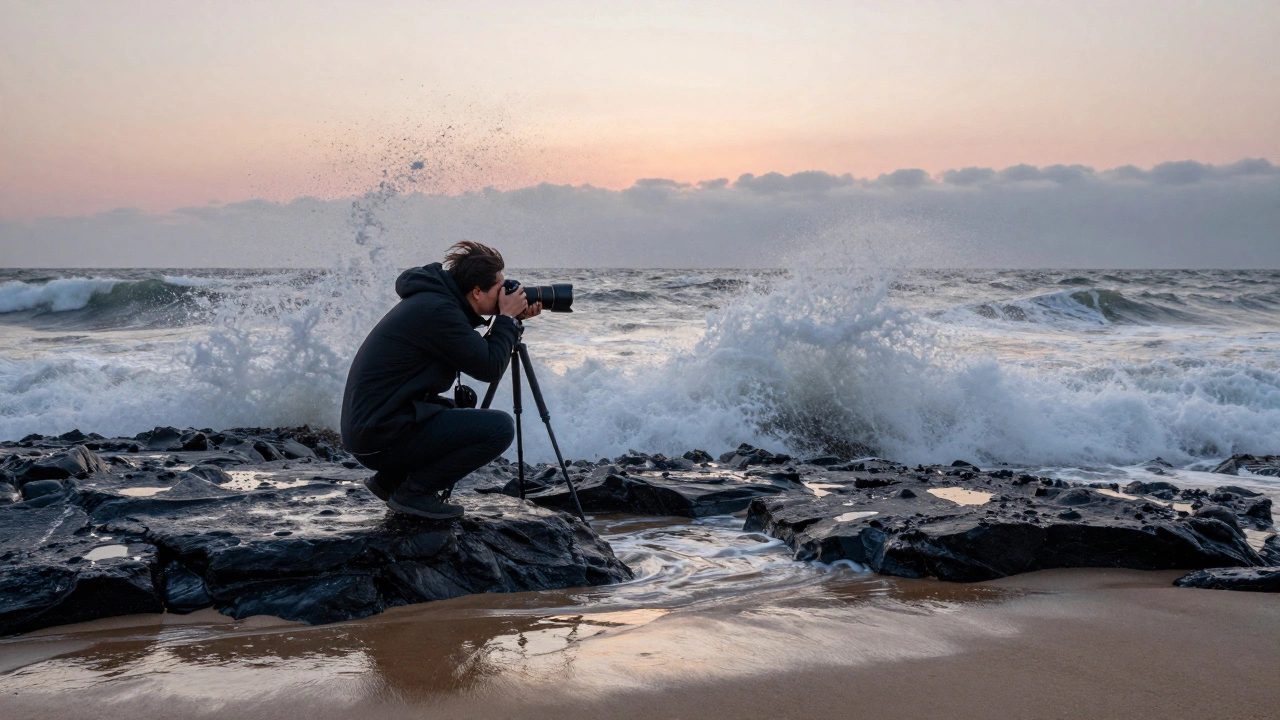
There’s something raw and real about standing on a rocky shore at dawn, wind biting your cheeks, salt spray stinging your skin, and the ocean pulling back just as the light hits the water. You don’t need a fancy camera to feel it. But if you want to capture it-to freeze that moment when a wave crashes against black basalt and the spray hangs in the air like glass-you need to understand the rhythm of the coast. Not just how to point your lens, but how to listen to the tide, read the rocks, and respect the sea spray.
Why Tides Are Your Best Friend (and Your Worst Enemy)
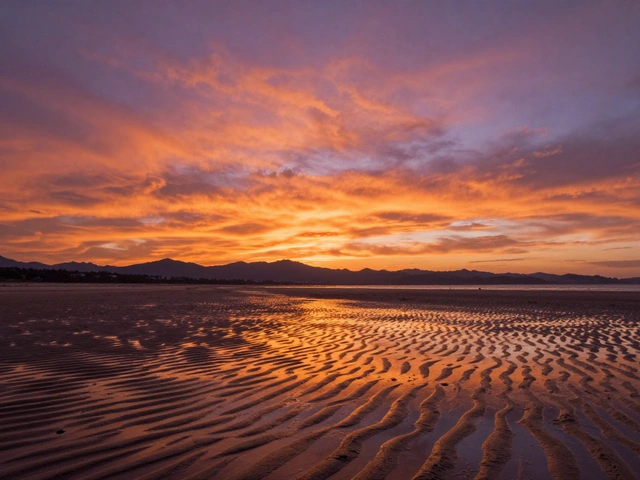
Tides aren’t just water rising and falling. They’re the heartbeat of coastal photography. Low tide reveals tide pools, wet sand mirrors the sky, and hidden rock formations emerge like ancient statues. High tide turns those same rocks into islands, with waves crashing over them in white fury. The difference between a dull photo and a powerful one? Timing.You don’t need a tide app to know this: if you show up at noon on a sunny day, you’ll likely see flat, boring water. But if you arrive two hours before low tide, you’ll have an hour to shoot the wet sand reflecting clouds, then another hour to catch the water rushing back in. That’s your window.
Here’s what works: Plan around low tide. Most coastal photographers shoot within two hours before and after low tide. That’s when the beach is exposed, the rocks are wet, and the light hits just right. Use free tools like Tide Graph or Windy to check local tides. Don’t just look at the time-look at the height. A 1-foot tide change won’t do much. A 6-foot drop? That’s gold.
And never forget safety. Rocks are slippery. Waves can sneak up. Always keep an eye on the horizon. If the water’s coming faster than you expected, you’re already too close.
Rocks Aren’t Just Background-They’re the Story
Rocks tell time. They’ve been shaped by centuries of salt, wind, and water. In photography, they’re not just things you stand on-they’re anchors for your composition.Look for patterns. Jagged basalt columns, smoothed granite curves, layered sandstone ledges. These create natural lines that lead the eye into your frame. A single dark rock in the foreground, framed by waves, gives depth. A line of rocks stretching toward the horizon? That’s a path your viewer will follow.
Shoot from low angles. Get down on your knees. Let the rock fill the bottom third of your frame. The water will rush around it, creating swirls and foam that contrast with its stillness. Use a wide-angle lens-16mm to 24mm-to include both the rock and the ocean’s motion. Don’t just photograph the rock. Photograph what the water does to it.
At sunrise or sunset, the light skims across the surface. That’s when textures come alive. A wet rock glows. A dry one turns dark and moody. The difference is subtle, but it’s everything. Shoot in RAW. You’ll need the extra data to recover highlights in the foam and shadows in the crevices.
Sea Spray Isn’t a Problem-It’s the Magic
Salt spray is what makes coastal photos feel alive. It’s not just mist-it’s motion frozen in time. But most beginners treat it like a nuisance. They wipe it off. They curse it. They avoid shooting in windy conditions.Stop doing that.
Sea spray is your secret weapon. When wind pushes water into the air, you get those delicate, hair-thin strands that catch the light. They look like lace. They glow. They add energy. To capture them, you need two things: speed and contrast.
Use a fast shutter speed-1/500s or faster. That freezes each droplet like a tiny crystal. But don’t stop there. Pair that with a polarizing filter. It cuts the glare off wet rocks and water, making the spray stand out even more. You’ll see colors deepen-the blue of the sea, the gray of the clouds, the white of the foam.
And yes, spray gets everywhere. Your lens. Your filter. Your camera body. That’s why you need protection. Use a lens hood. It’s not just for shade-it blocks sideways spray. Keep a microfiber cloth in your pocket. Wipe your lens after every shot. Don’t wait. Salt crystals are like sandpaper. One dry wipe can scratch your glass.
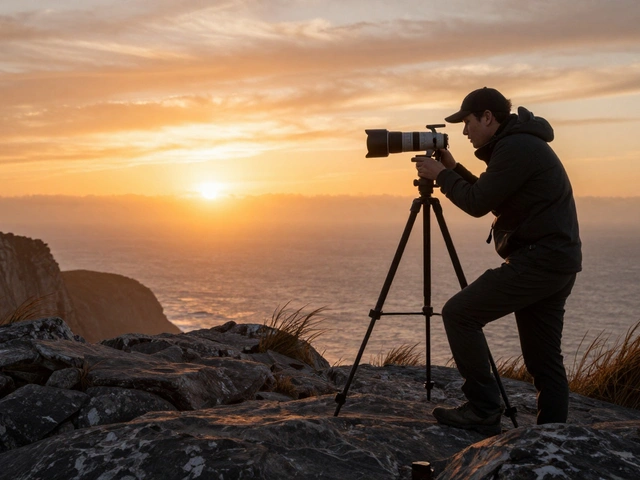
Equipment That Actually Matters (No Fluff)
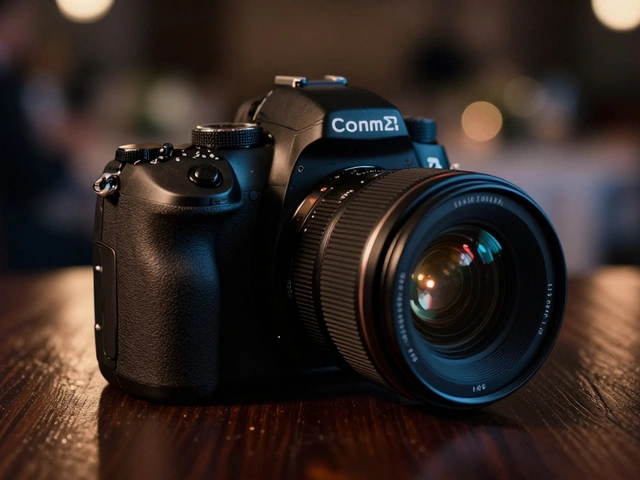
You don’t need the latest camera. You don’t need ten lenses. You need three things: a camera that lets you shoot manual, a sturdy tripod, and filters that handle light.Camera: Any DSLR or mirrorless with manual controls works. Look for good dynamic range. That means it can hold detail in bright skies and dark rocks at the same time. You don’t need 45 megapixels. You need clean shadows.
Lens: Start with a 16-35mm wide-angle. It’s your workhorse. Then add a 70-200mm or 100-400mm if you want to compress waves far out at sea or zoom in on a lone rock in the distance. Macro lenses? Only if you’re shooting tide pool life-tiny crabs, anemones, algae patterns. That’s a different game.
Tripod: Carbon fiber. Lightweight. Wind-resistant. Saltwater eats aluminum. Carbon fiber doesn’t. Make sure the legs lock tight. A ball head with a bubble level? Non-negotiable. Horizon crooked? Your whole shot fails.
Filters: Three types. Polarizer: Cuts glare. Boosts color. Makes wet sand look like a mirror. ND filter: For long exposures. 6-stop or 10-stop lets you blur waves into silk, even at noon. Graduated ND: If the sky is five times brighter than the water, this balances it. No more washed-out clouds.
And skip UV filters. They’re old-school protection. Modern lenses have coatings. A good lens hood and a filter case do more.
Protect Your Gear Like Your Life Depends on It
Salt is corrosive. Sand is abrasive. Wind is relentless. Your gear doesn’t care how much you paid for it-it just wants to die.Here’s what actually works:
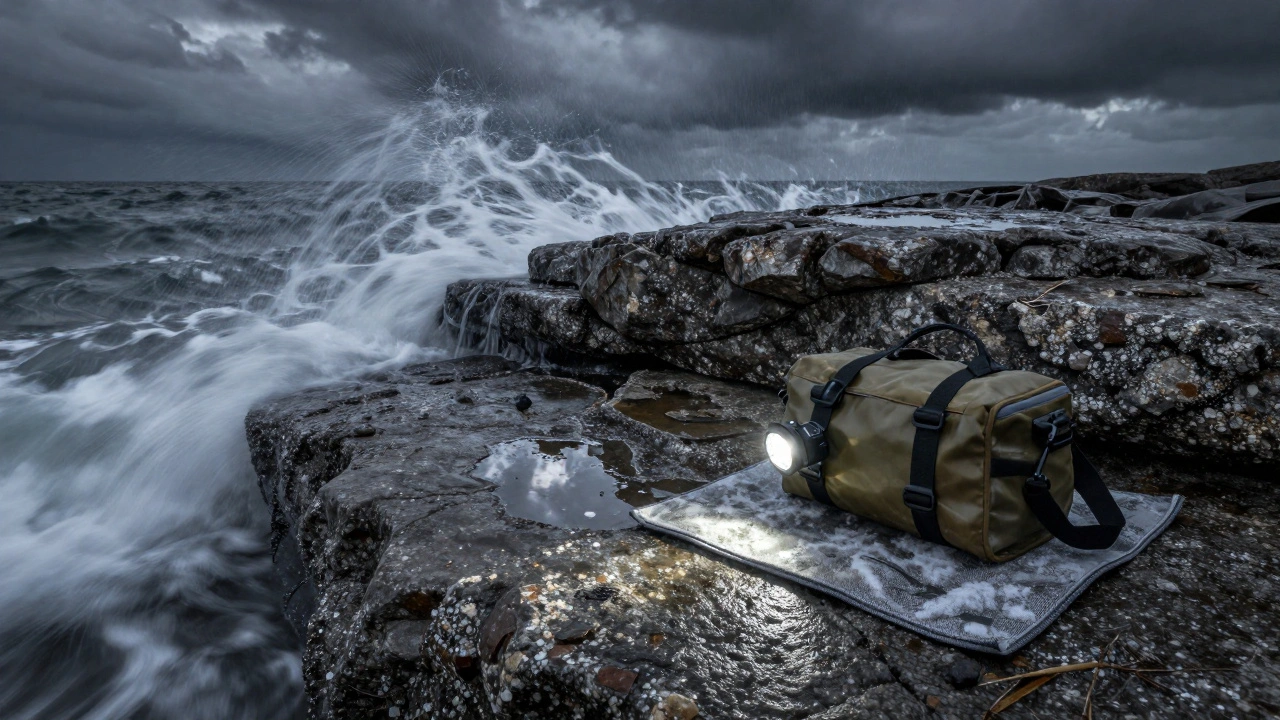
- Use a waterproof camera bag with sealed zippers. Not a regular backpack. A dedicated coastal bag with foam inserts.
- Keep your gear covered until you’re ready to shoot. Unpack only what you need.
- After every session: wipe down everything. Use a damp cloth with fresh water, then dry. Don’t just shake it off. Salt stays in the hinges, the buttons, the threads.
- Bring a headlamp. You’ll be shooting at dawn or dusk. Hands-free light saves your neck.
- Carry extra batteries. Cold air kills power. Always have two.
- Use a rain cover. Even if it’s not raining, sea spray will soak your camera. A simple plastic cover from a hardware store works fine.
And here’s the rule I live by: Never leave gear on the sand. Even for five minutes. Salt, wind, and a curious gull can ruin your day. Always use a towel or mat. Even if it’s cold. Even if you’re in a hurry.
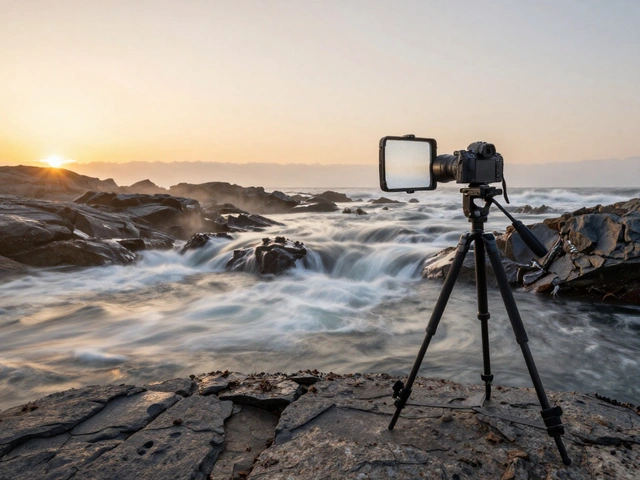
Long Exposure: Turning Chaos Into Calm
The most magical coastal shots aren’t the ones with crashing waves. They’re the ones where the sea looks like silk. Where clouds melt across the sky. Where time itself feels still.That’s long exposure. And it’s not hard. Just slow.
Set your camera to manual mode. ISO 100. Aperture f/11. Then screw on a 10-stop ND filter. Now your shutter speed? It’ll go from 1/125s to 30 seconds. Or longer. That’s when the water turns smooth. The foam becomes mist. The rocks stay sharp. The sky gets silky.
Use a remote shutter or your camera’s timer. No touching the camera. Even your breath can shake it. And yes-you need a tripod. No exceptions.
Try shooting at midday. It’s counterintuitive. But with the right filter, you can capture motion in bright light. That’s when the contrast between light and dark is strongest. The sea looks almost unreal.
When to Shoot: The Golden Hours Are Overrated
Everyone talks about golden hour. But on the coast, the best light isn’t always sunrise or sunset.Try shooting at midday on a cloudy day. Overcast skies? Perfect. No harsh shadows. Even lighting. The sea turns a deep, rich blue. The rocks pop. The spray glows.
Or shoot at twilight. After the sun’s down, but the sky’s still lit. That’s when the water reflects the last of the color. No people. No glare. Just quiet.
And don’t ignore storms. Rain. Wind. Dark clouds. That’s when the sea gets angry. That’s when the spray flies. That’s when the drama lives. Just stay safe. And keep your gear dry.
Final Rule: Shoot More Than You Think
You don’t need perfect conditions. You need consistent effort. One hour a week. One tide cycle. One rock. One wave.Go back. Same spot. Same time. Same tide. Watch how it changes. The light shifts. The water moves differently. The spray catches the sun in a new way. That’s how you learn. Not by reading gear reviews. Not by watching YouTube tutorials. But by showing up, again and again.
Coastal photography isn’t about capturing beauty. It’s about capturing change. The tide doesn’t care if you’re ready. The rocks don’t wait. The sea spray doesn’t ask permission. You have to be there. Again. And again.
What’s the best time of year to shoot coastal landscapes?
Winter and early spring are often the best. Storms churn the sea, creating powerful waves and thick spray. The light is softer, and fewer people are around. Summer brings crowds and flat light. Fall can be good too, with cooler air and clearer skies. But if you want drama, go when the ocean is angry.
Do I need a drone for coastal photography?
Not at all. Most stunning coastal shots are taken from ground level-low angles, wide lenses, careful composition. Drones can show patterns in sand or waves, but they’re not essential. If you’re just starting, focus on mastering the ground. Once you’re comfortable, a drone adds perspective, not quality.
Can I use a smartphone for coastal photography?
Yes-but with limits. Smartphones handle bright skies poorly. They can’t do long exposures well. And they’re easy to damage with salt spray. If you’re just starting out, use your phone to learn composition and timing. But if you want to capture motion, texture, and detail, a dedicated camera with manual controls is necessary.
How do I avoid blurry photos in windy conditions?
Use a heavy tripod and lock all joints. Add weight-hang your camera bag from the center column. Use a remote shutter or 2-second timer. Don’t touch the camera after pressing the button. Wind shakes the tripod, not the lens. Stability is everything.
Should I shoot in RAW or JPEG?
Always shoot in RAW. Coastal scenes have extreme contrast-bright sky, dark rocks, white foam. JPEG can’t recover blown-out highlights or crushed shadows. RAW gives you room to fix exposure later. You’ll thank yourself when editing.