Have you ever taken a photo of a subject against a bright window or a snowy landscape, only to find your main subject is a dark, featureless silhouette? It’s frustrating. You know the light was there, but your camera decided otherwise. This happens because most cameras default to metering modes that try to average out the entire scene, often failing when lighting is uneven. The solution isn't always a flash or post-processing magic; it’s often about changing how your camera sees light. Specifically, it’s about mastering spot metering.
Spot metering is a precise tool that allows you to tell your camera exactly which part of the image matters most. Instead of averaging the whole frame, it measures light from a tiny, specific area-usually just 1% to 5% of the total viewfinder. By placing this small circle on a "key tone" (a mid-tone reference point), you can force your camera to expose correctly for your critical subject, regardless of what’s happening in the background.
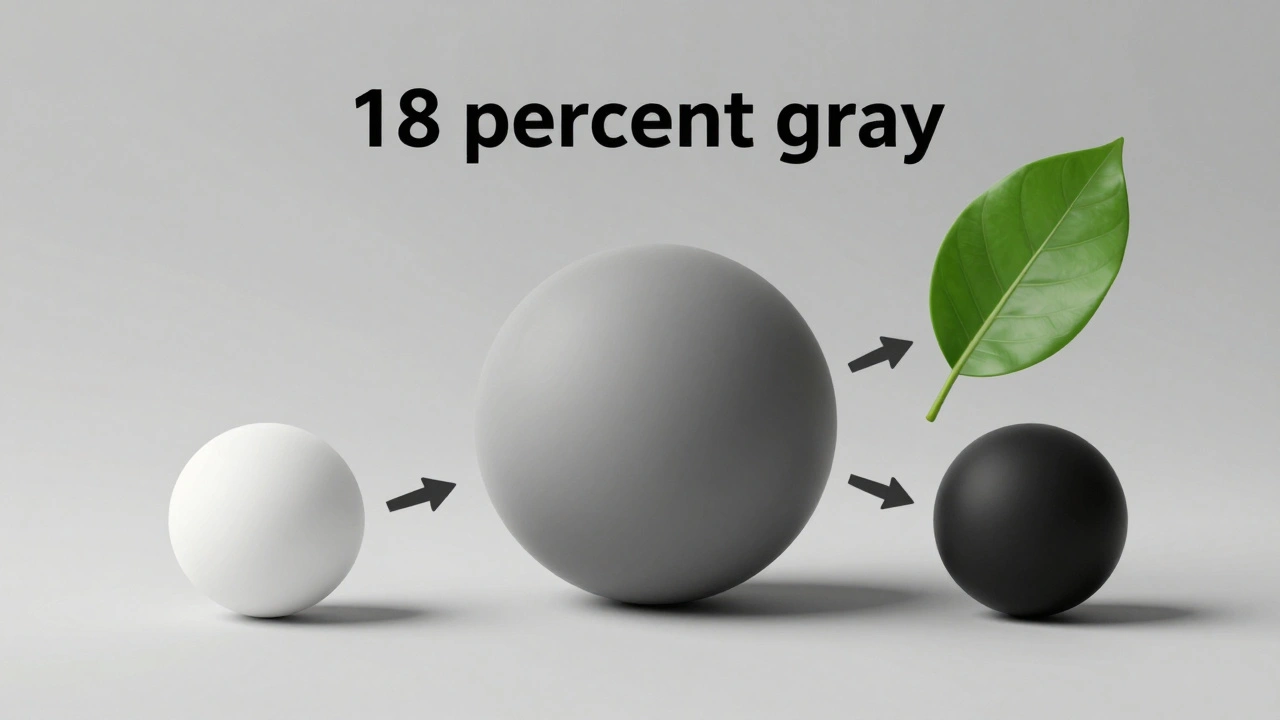
The 18 Percent Gray Rule: How Cameras "See" Light
To use spot metering effectively, you first need to understand one fundamental quirk of digital cameras: they are colorblind to context and obsessed with gray. Every modern camera meter is calibrated to render whatever falls within its measurement area as a neutral middle gray, technically known as 18 percent gray. This is the mathematical midpoint between pure black and pure white.
When you switch to spot metering, the camera looks at that tiny circle and asks, "How do I make this look like 18 percent gray?" If you place the spot on a bright white wall, the camera thinks, "This is too bright," and darkens the exposure until the wall looks gray. If you place it on a black tuxedo, the camera thinks, "This is too dark," and brightens the exposure until the fabric looks gray. This behavior is why uncorrected spot metering can lead to underexposed snowscapes or overexposed night scenes if you aren’t careful.
Understanding this bias is the key to unlocking accurate exposure. You don’t want your skin tone to be gray, nor do you want your sky to be gray. You want your camera to use that gray target as a baseline to calculate the correct exposure for the actual tones present in your scene.
Identifying Key Tones for Consistent Results
A "key tone" is a surface in your scene that reflects light neutrally. It’s not stark white, and it’s not deep black. It’s a middle value that represents the average brightness of your subject. Identifying these tones is crucial because they provide the most reliable data for your camera’s meter.
Here are common key tones you can rely on:
- Caucasian Skin Tone: In even light, human skin acts as a near-perfect key tone. Placing your spot meter on the cheek or forehead usually yields a natural exposure.
- Green Foliage: Average green leaves in sunlight reflect light similarly to middle gray. They are excellent references for outdoor portraits or wildlife shots.
- Medium-Tone Clothing: A grey shirt, blue jeans, or a brown jacket often serves as a stable reference point, especially if the subject’s face is in shadow.
- Concrete or Asphalt: In urban environments, standard concrete sidewalks or roads are consistent mid-tones.
If your subject lacks a clear key tone-for example, a bride in a pure white dress or a groom in a black suit-you must look for an adjacent object that shares the same lighting conditions. Meter off the wall behind them, or their hand, rather than the dress or suit itself.
Step-by-Step: Applying Spot Metering in the Field
Using spot metering doesn’t have to be slow or cumbersome. With practice, it becomes a reflexive part of your shooting process. Here is a practical workflow to ensure accuracy.
- Select Spot Metering Mode: Change your camera’s metering mode from Matrix/Evaluative to Spot. On many cameras, this is a quick dial turn or menu selection.
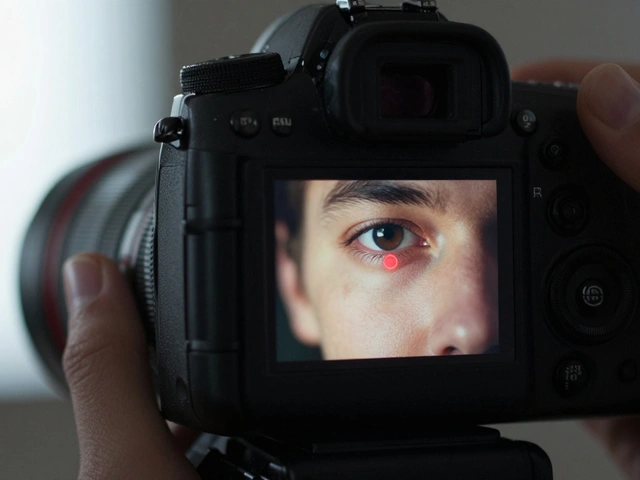
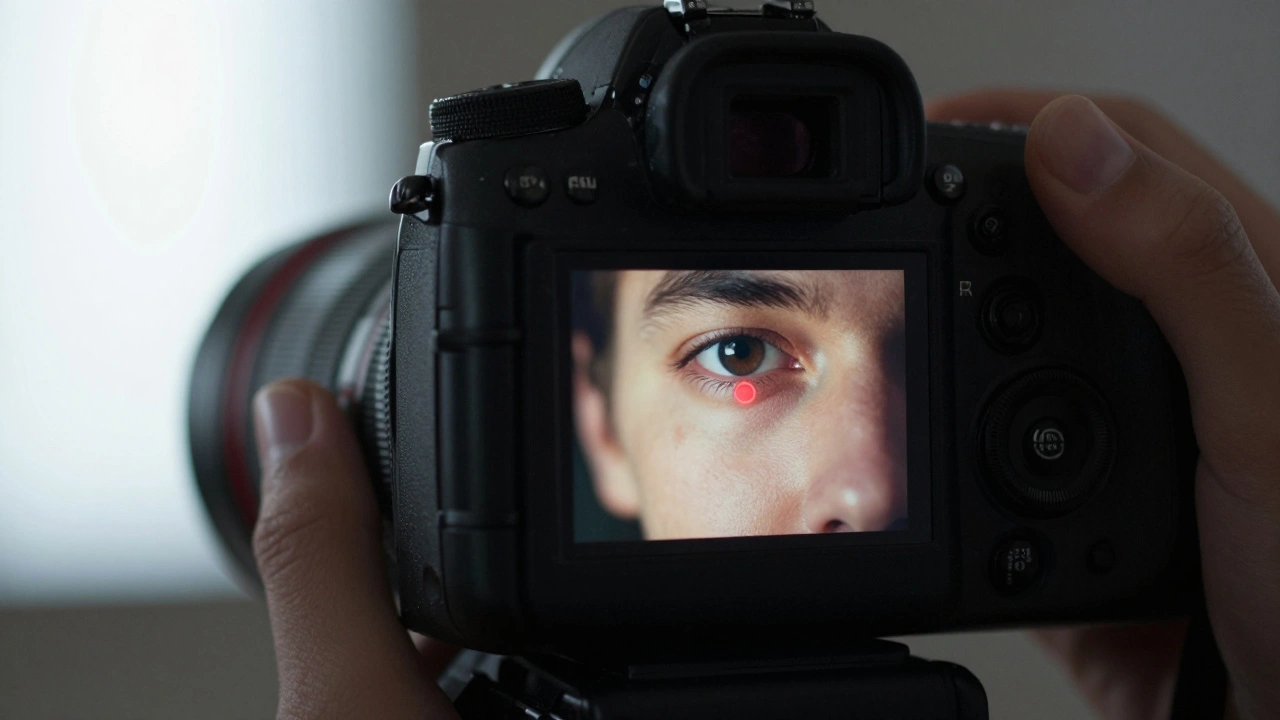
- Choose Your Focus Point: Most modern DSLRs and mirrorless cameras link the spot meter to your active focus point. Move your focus point to the key tone you identified earlier. If your camera locks the spot to the center, aim the center of your viewfinder at the key tone.
- Take the Reading: Half-press the shutter button. Watch your histogram or exposure indicator. The camera will now set the aperture, shutter speed, or ISO based solely on that small area.
- Lock the Exposure: Keep the shutter half-pressed to lock the exposure settings. This prevents the camera from recalculating if you move the focus point away from the key tone.
- Recompose and Shoot: Move your focus point back to your subject’s eyes (or desired focal point) while maintaining the locked exposure. Press the shutter fully to take the shot.
This technique ensures that the exposure is calculated based on the subject’s lighting, not the distracting background. It’s particularly effective when the subject occupies a small portion of the frame.
When to Use Spot Metering vs. Other Modes
Not every shot requires spot metering. In fact, using it incorrectly can lead to worse results than leaving your camera on Auto or Matrix mode. Knowing when to switch is half the battle.
| Metering Mode | Best For | Risks/Limitations |
|---|---|---|
| Matrix/Evaluative | General scenes, landscapes, even lighting | Fails in high contrast; may underexpose backlit subjects |
| Center-Weighted | Portraits with simple backgrounds | Ignores edges; can be fooled by bright corners |
| Spot Metering | Backlit subjects, high contrast, specific tonal control | Requires manual compensation for non-midtones; easy to misplace |
Use Matrix or Evaluative metering for everyday snapshots where the light is relatively flat. Switch to Spot Metering when you encounter specific challenges:
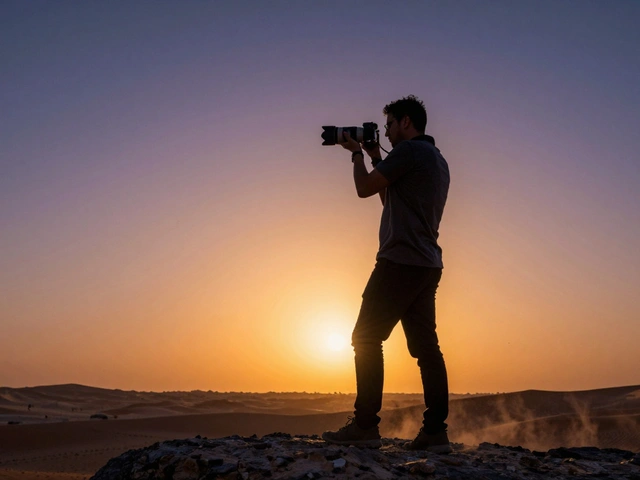
- Strong Backlighting: When the sun is directly behind your subject, Matrix mode will expose for the bright sky, turning your subject into a silhouette. Spot metering on the subject’s face forces the camera to darken the sky slightly to save the subject.
- Snowy Environments: White snow reflects massive amounts of light. Matrix mode tries to make the snow gray, resulting in dull, blue-tinted images. Spot metering on a mid-tone object (like a tree trunk) helps retain the brightness of the snow.
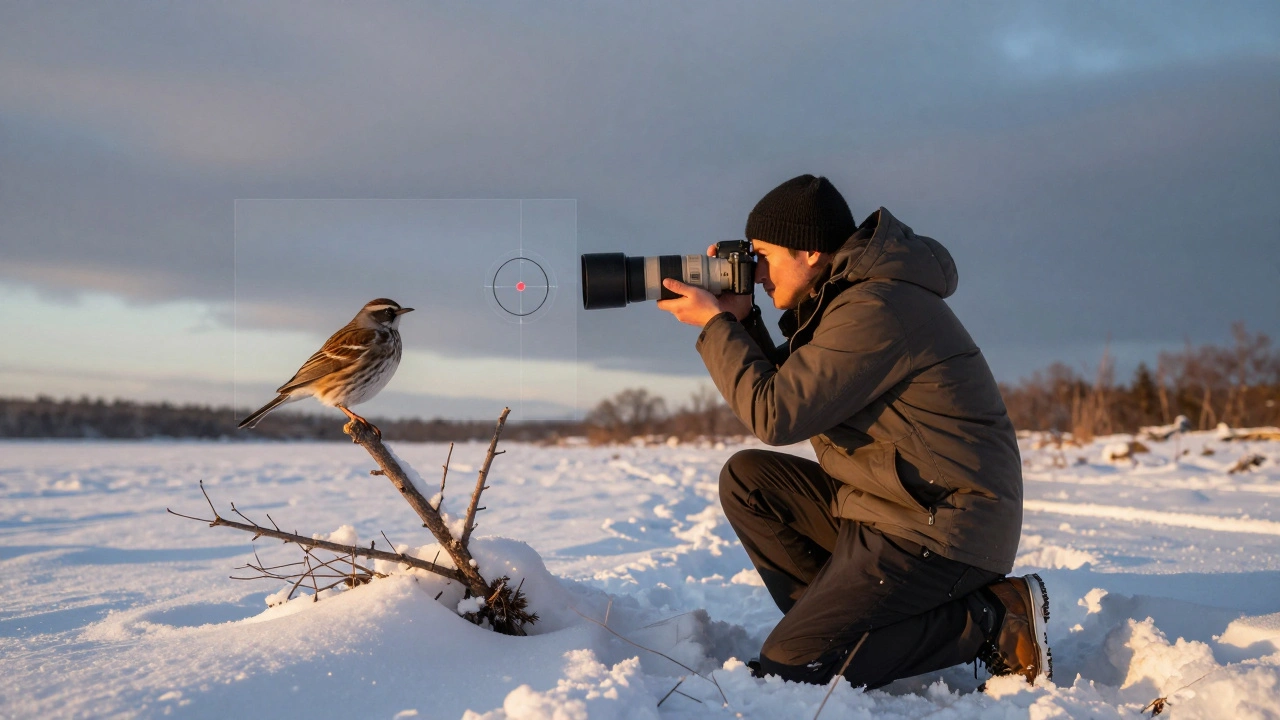
- Wildlife Photography: A bird against a bright sky is a classic spot metering scenario. Metering directly on the bird’s eye ensures detail in the feathers, even if the sky blows out.
Compensating for Non-Midtone Subjects
What if your subject *is* the extreme tone? What if you’re photographing a white wedding dress or a black cat? Since the camera wants to turn everything into 18 percent gray, you need to intervene manually. This is where exposure compensation comes into play.
If you spot meter on a white subject, the camera will underexpose it to make it gray. To counteract this, you need to add exposure. A good rule of thumb is to add +1 to +2 stops of exposure compensation. Conversely, if you meter on a black subject, the camera will overexpose it to make it gray. You need to subtract -1 to -2 stops to keep it black.
This adjustment tells the camera, "I know this is white, but please expose it as white, not gray." It’s a simple mental math exercise that separates amateur exposures from professional ones. Always check your histogram after taking the shot. If the graph is bunched up against the left side, you’ve underexposed. If it’s clipped on the right, you’ve overexposed. Aim for the data to sit comfortably within the range, preserving details in both shadows and highlights.
Technical Variations Across Camera Brands
While the principle of spot metering is universal, the implementation varies by manufacturer. It’s important to know your specific camera’s behavior.
On Canon cameras, you’ll often find two options: "Spot" and "Partial." Spot typically covers 3% to 5% of the frame, while Partial covers a larger area, around 6% to 10%. Partial metering is useful if you’re struggling to hit a tiny spot with precision, but it’s less isolated than true spot metering. Fujifilm cameras generally use a very tight spot, covering only 1% to 2% of the frame, making them ideal for precise tonal work. Nikon and Sony models usually allow you to link the spot meter to any focus point in the array, giving you maximum flexibility. Older DSLRs might lock the spot to the center, requiring the "aim, lock, recompose" technique described earlier.
To test your camera’s exact spot size, point it at a bright light source with a sharp edge, like a streetlamp at night. Slowly move the light source across the viewfinder. Notice exactly when the exposure indicator changes. That transition point marks the edge of your spot metering area. Knowing this boundary helps you avoid accidentally including a bright highlight or dark shadow in your reading.
Common Pitfalls and How to Avoid Them
Even experienced photographers can trip up with spot metering. Here are the most common mistakes and how to fix them.
Metering off mixed tones: If your spot includes both a bright highlight and a dark shadow, the camera averages them, potentially leading to a mediocre exposure for both. Ensure your spot is entirely on one uniform tone. If the spot is too large for the detail you need, switch to a smaller focus point or use a lens hood to block stray light.
Ignoring ambient light changes: Spot metering is static. If you meter on a subject in shade, then move to direct sunlight without re-metering, your subject will be severely underexposed. Always re-meter if the lighting conditions on your key tone change significantly.
Over-relying on the LCD screen: Bright screens can deceive you. A photo might look properly exposed on the back of your camera, but the histogram reveals lost detail. Trust the histogram and your meter, not just the preview image.
Mastering spot metering takes time, but the payoff is immense. You gain total control over how your subject is rendered, independent of distracting backgrounds. Whether you’re capturing the subtle textures of a portrait or the vibrant colors of wildlife, accurate exposure starts with knowing exactly what your camera is measuring.
What is the difference between spot metering and matrix metering?
Matrix (or evaluative) metering analyzes the entire scene, dividing it into zones and using algorithms to determine the best overall exposure. Spot metering ignores the rest of the scene and measures light from a very small, specific area (1-5% of the frame). Matrix is great for even lighting, while spot is essential for high-contrast situations where you need to prioritize a specific subject.
Why does my camera try to make everything 18 percent gray?
Cameras are designed to capture a wide dynamic range, and 18 percent gray is the mathematical midpoint between black and white. The meter assumes that the average scene contains a mix of lights and darks that balance out to this middle tone. This is why white subjects get underexposed and black subjects get overexposed unless you apply exposure compensation.
How do I use spot metering for backlit portraits?
Place your spot meter on the subject's face, specifically on a mid-tone area like the cheek or forehead. Lock the exposure by half-pressing the shutter. Then, recompose the shot so the subject is framed correctly, ensuring the background doesn't influence the meter. This will expose the face correctly, even if the background becomes overexposed or blown out.
Should I use spot metering for landscapes?
Generally, no. Landscapes usually contain a wide variety of tones from foreground to background. Matrix or multi-zone metering is better suited to balance these elements. However, if you have a specific element in a landscape, like a brightly lit flower against a dark forest, spot metering can help isolate that subject.
What is exposure compensation and when should I use it with spot metering?
Exposure compensation allows you to manually adjust the camera's automatic exposure calculations. Use it with spot metering when your subject is not a mid-tone. For white subjects (snow, white dresses), increase exposure (+1 to +2 stops). For black subjects (night scenes, black suits), decrease exposure (-1 to -2 stops). This prevents the camera from rendering these extremes as gray.