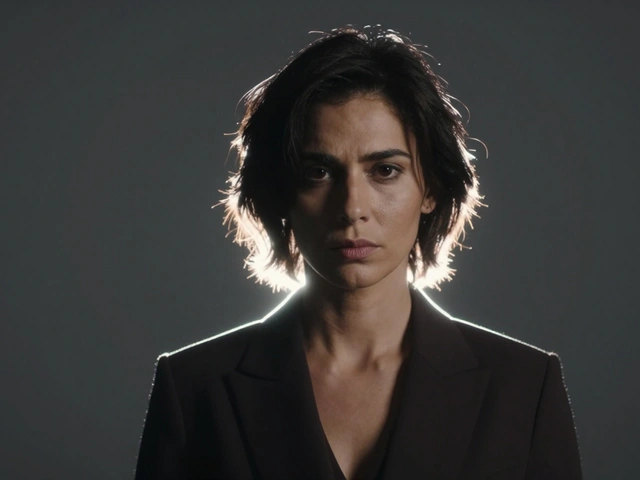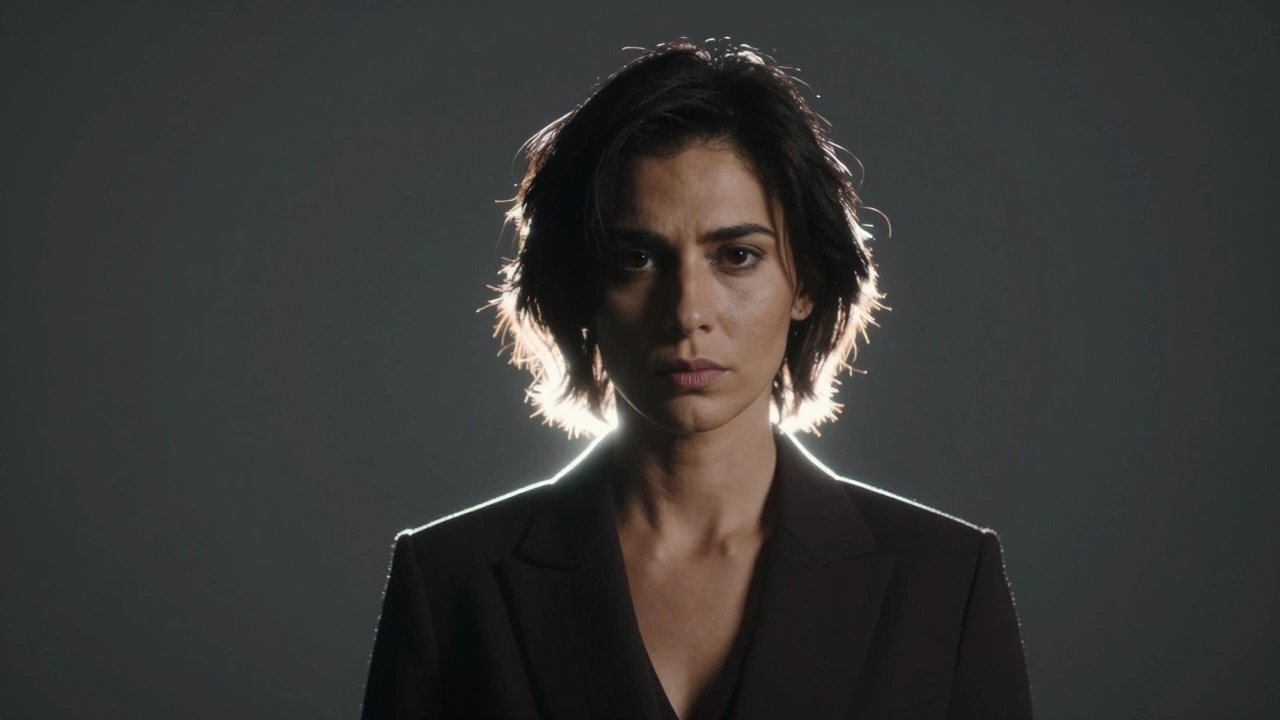
Ever take a photo where your subject just seems to melt into the background? Maybe you're shooting a person with dark hair against a dark wall, or a product that's the same color as the backdrop. It's a common frustration. You've got the pose right and the focus is sharp, but the image looks flat, like a cardboard cutout. The secret to fixing this isn't always in the camera settings-it's in how you handle the edges of your subject. By mastering rim light, you can create a distinct boundary that makes your subject pop and gives your photos a professional, three-dimensional feel.
Why Your Photos Need Subject Separation
The biggest enemy of a great portrait or product shot is a lack of contrast between the subject and the environment. When the luminosity of the subject's edges matches the background, the human eye struggles to perceive depth. This is especially true in low-light settings or when shooting subjects with dark tones.
Adding a rim of light solves this by introducing a high-contrast edge. It doesn't just stop the subject from blending in; it adds a layer of drama. Think of those cinematic movie posters where the characters have a glowing outline-that's rim lighting at work. It guides the eye and creates a clear visual hierarchy, telling the viewer exactly what is important in the frame.
Setting Up Your Rim Light: Step-by-Step
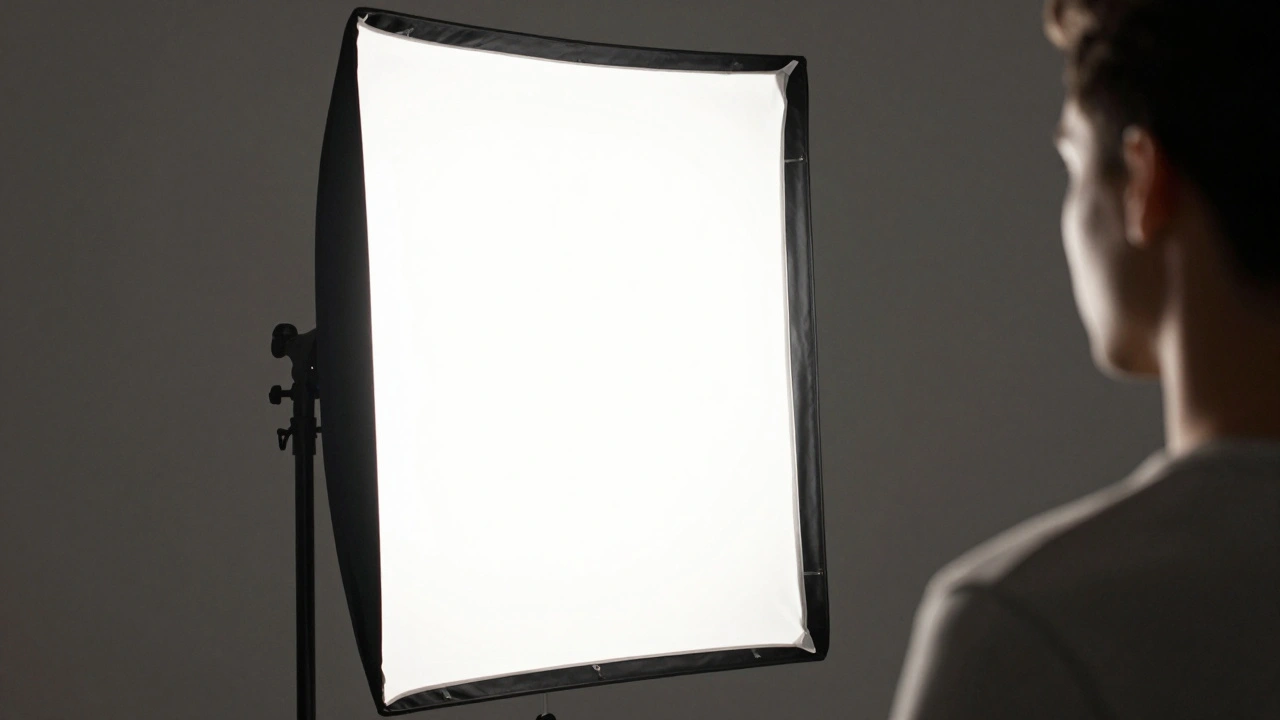
You don't need a massive studio to get this look. Whether you're using professional strobes, a continuous LED panel, or even a bright window, the physics of light remain the same. Here is how you actually execute the setup:
- Position the Light Behind the Subject: Place your light source behind the person or object, slightly to the side. You don't want it directly behind the subject's head (unless you want a full-circle halo), but rather angled toward the subject's shoulders and hair.
- Angle for the Edge: Aim the light so it hits the outer contours. If the light spills onto the face or nose, it's too far forward. You want the light to "skim" the edges.
- Control the Spill: Use Barn Doors or a grid to keep the light from hitting your camera lens, which would cause unwanted flare, or hitting your background if you want that area to stay dark.
- Adjust Intensity: Start with a lower power setting. If the rim is too bright, it will look like a neon sign and wash out the fine details (like individual hairs). If it's too dim, it won't provide enough contrast to create separation.
Choosing the Right Gear and Modifiers
Different tools give you different "flavors" of rim light. If you want a sharp, crisp line, a bare strobe or a small LED light works best. However, if you're looking for a softer, more natural glow, you'll need a modifier.
A Strip Box (a narrow rectangular softbox) is a favorite for rim lighting. Because it's narrow, it mimics the shape of a human body, allowing you to wrap light around the edges without letting it bleed into the center of the subject. If you move a strip box closer, the light becomes softer; move it further away, and you'll need to increase the power to maintain the effect, but the edge will look more defined.
| Modifier | Light Quality | Best Use Case | Control Level |
|---|---|---|---|
| Bare Strobe | Hard / Sharp | High-contrast drama | Low (spills easily) |
| Strip Box | Soft / Wrapped | Professional portraits | High (narrow beam) |
| Barn Doors | Directional | Precise edge control | Very High |
Pro Tips for Advanced Depth
Once you've mastered the basic rim, you can start layering your lights to create a truly professional look. One of the most effective combinations is pairing a rim light with a Background Light. When you light the backdrop separately, the rim light on the subject feels like a natural extension of the background light, which is visually pleasing and feels "correct" to the human eye.
A great way to test your rim light is to temporarily turn off your Key Light (your main front light). By doing this, you can see exactly where the rim light is hitting and whether it's spilling onto the nose or face. It's much easier to tweak the position when you aren't fighting the brightness of the main light.
Don't forget the Inverse Square Law. This is a fancy way of saying that light drops off quickly as you move away from the source. If your subject is very close to the rim light, the light will fall off rapidly, creating deep, moody shadows on the opposite side. If you want a more even, subtle rim, move the light further back and increase the power. This creates a more consistent line of light across the subject's silhouette.
Common Pitfalls to Avoid
The most frequent mistake beginners make is over-lighting. When the rim light is too powerful, it creates a "blown out" effect where the edges of the subject become pure white, losing all texture. This makes the photo look amateur and unnatural. Always check your histogram or use your camera's highlight alert to make sure you aren't losing detail in those bright edges.
Another mistake is neglecting the Depth of Field. While rim lighting handles the light separation, a shallow depth of field (using a wide aperture like f/1.8 or f/2.8) handles the physical separation by blurring the background. When you combine a rim light with a blurred background, you get a powerful 3D effect that makes the subject feel like they are stepping out of the photo.
Do I need a professional studio to use rim lighting?
Not at all. You can use a bright window as your light source by placing your subject between the camera and the window. Alternatively, a simple desk lamp or a cheap LED panel placed behind the subject can achieve the same effect. The key is the position of the light, not the price of the gear.
How is rim lighting different from backlighting?
Backlighting is a broad term for any light coming from behind the subject, which can often lead to a silhouette. Rim lighting is a specific type of backlighting where the light is angled to only hit the edges of the subject, keeping the rest of the subject's form defined by other light sources.
What happens if the rim light hits the subject's face?
If the light spills onto the face (like the nose), it can distract from the main lighting scheme and make the setup look messy. Use barn doors, grids, or simply move the light further to the side to ensure only the silhouette is highlighted.
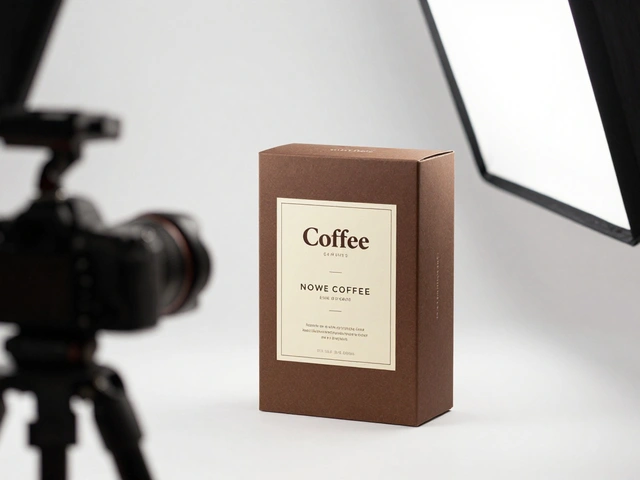
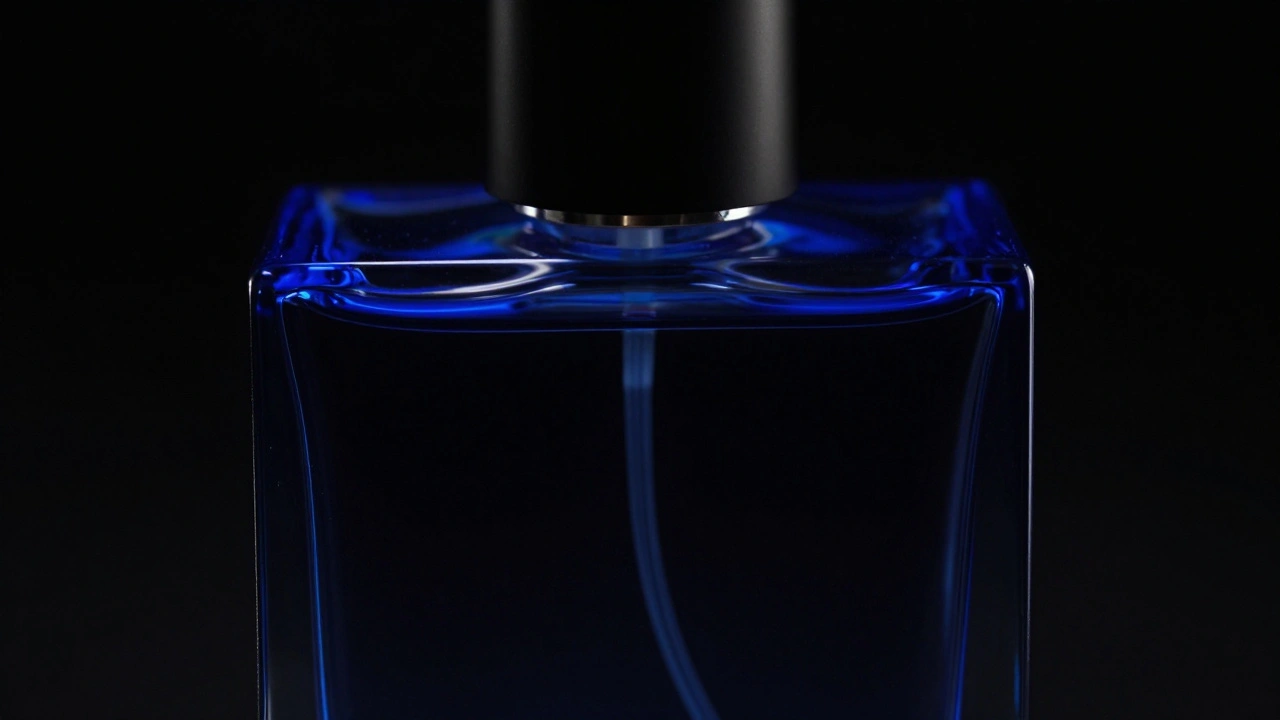
Can I use rim lighting for product photography?
Yes, it's incredibly useful for products, especially those with reflective surfaces or dark colors. A rim light helps define the shape and contours of the product, making it look more premium and preventing it from blending into a dark backdrop.
How many rim lights should I use?
One light is enough for a subtle edge. Two lights-one on each side-create a balanced, symmetrical look that is very common in high-end portraiture. Using more than two is rare and can often make the image feel over-lit and artificial.
Next Steps for Your Lighting Game
If you're just starting, try a "dark room" experiment. Turn off all the lights, set up one single light behind your subject, and take a photo. This will show you exactly how the rim light works without any interference. Once you're comfortable, add your main key light to see how they interact.
For those who want to push further, try experimenting with colors. Using a colored gel on your rim light (like a deep blue or orange) can create a mood that a white light simply can't match. This adds another layer of separation-not just in luminosity, but in color contrast-making your work stand out even more.