We have all been there. You capture a beautiful shot at the beach, but when you look at the photo later, the sky is completely white and the ocean looks gray. Or maybe you are trying to take a picture of your coffee mug in a cozy cafe, and the result looks washed out and bright. The culprit is almost always the camera itself. While smartphone cameras today are incredibly sophisticated, they still rely on an algorithm that tries to average everything out. That is where Exposure Control comes in.
You might think you need a professional DSLR camera to control the light, but that is simply not true anymore. Modern smartphones come loaded with tools that let you manually override the camera's automatic decisions. This feature gives you the power to decide exactly how much light hits the sensor, allowing you to save details in the shadows or prevent highlights from blowing out. If you are ready to stop taking generic snapshots and start making photographs, mastering exposure is the first step.
Understanding Exposure in Plain English
Before we get into the buttons and gestures, we need to understand what we are actually changing. In simple terms, exposure is the amount of light that enters the camera lens and hits the Camera Sensor. It determines whether your image ends up looking too dark (underexposed) or too bright (overexposed)..
Think of the camera sensor like a bucket sitting outside in the rain. If you leave the lid open for a short time, you catch a little water. Leave it open longer, and you fill the bucket. If the rain is pouring hard, even a short burst fills it up quickly. Your phone tries to guess how long to leave the "lid" open automatically. Sometimes it guesses right, but often it gets fooled. For instance, if you point your camera at snow, the phone thinks the scene is way too bright and reduces the light to balance it. This makes the snow look gray instead of white. Conversely, pointing it at a dark tunnel makes the phone try to flood it with light, creating noisy, grainy images.
This balancing act involves three main settings, though on phones you usually control them together:
- Aperture: How wide the lens opens (usually fixed on most phones, but variable on newer pro models).
- Shutter Speed: How long the sensor is exposed to light.
- ISO: How sensitive the sensor is to that light.
When you slide your finger to adjust exposure, you are telling these components to work differently than the factory setting decided. Understanding this helps you realize that the "default" image is rarely the "perfect" image.
Finding the Slider on iPhone
If you own an Apple iPhone, the interface has remained consistent for years because it works well. You do not need to hunt through deep menus. The adjustment happens directly on the live viewfinder.
Here is the workflow:
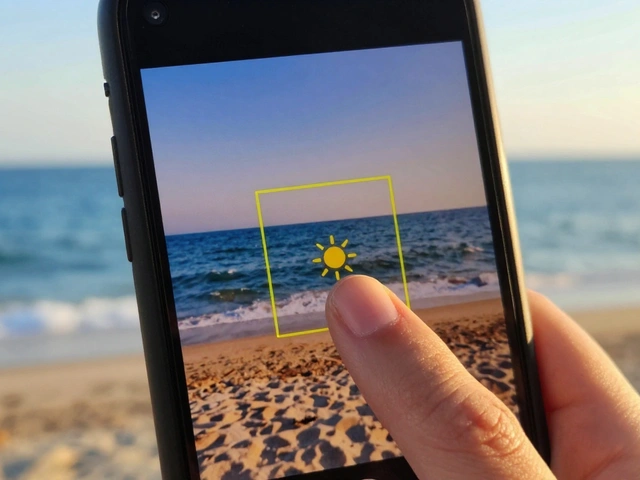
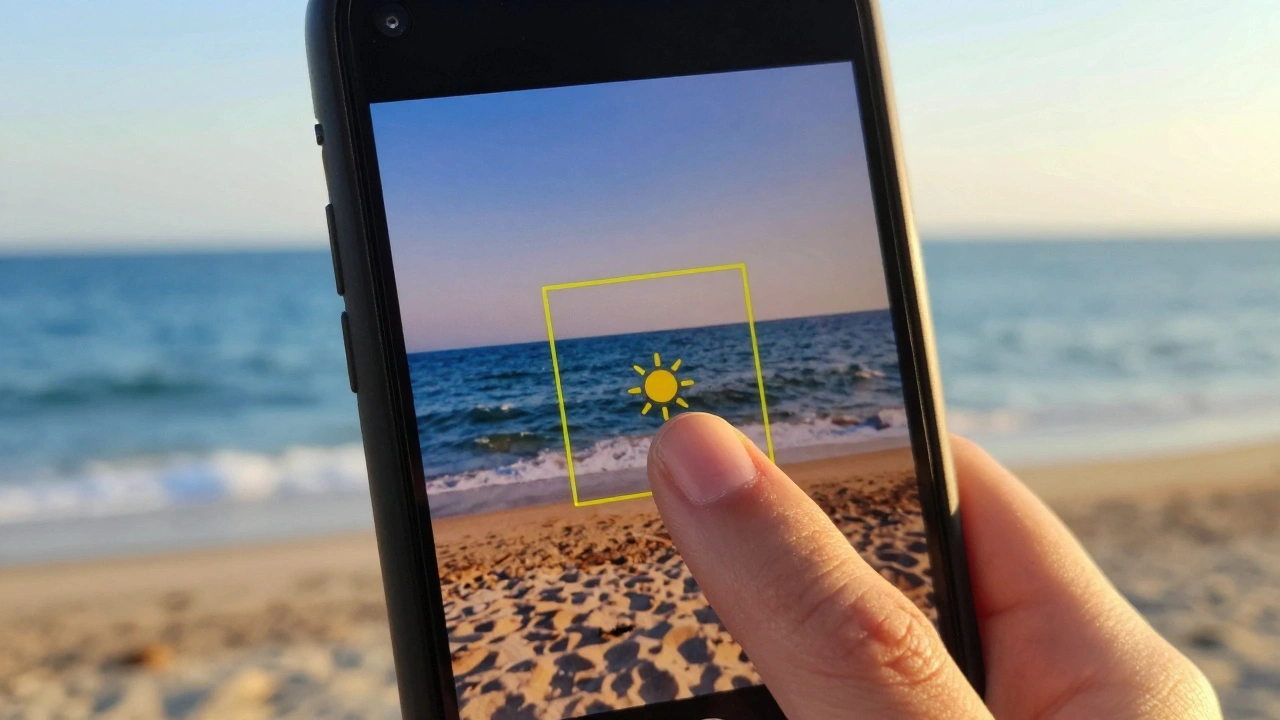
- Tap to Focus: Tap anywhere on the screen. A yellow box appears. This locks the focus distance.
- Locate the Sun Icon: Right next to the yellow box, you will see a small sun icon with arrows pointing up and down.
- Drag to Adjust: Slide your finger up to brighten the image or down to darken it.
You will notice numbers appearing briefly, like +0.3 or -1.0. These represent stops of light. A change of +1.0 means you are doubling the light hitting the sensor; -1.0 cuts it in half.
A crucial trick here is the AE/AF Lockfeature that prevents the camera from changing your exposure settings while you shoot.. When you slide your finger up or down on the focus box for a second, it says "AE/AF Locked." Now, even if you move your hand to frame the shot, the brightness won't shift back to default. This is vital for video or taking a series of photos where lighting changes slightly as you move around.
Adjusting Light on Android Devices
The Android System landscape is broader since different manufacturers design their own camera apps. However, the logic remains largely similar across brands like Samsung, Google Pixel, and Motorola.
Typically, you tap the screen to bring up the focus point. On many devices, a sunlight icon appears below the focus marker, very similar to iOS. Dragging this icon adjusts the exposure compensation. Some older interfaces place a gear icon or a settings button in the top corner that reveals exposure sliders.
If you cannot find the sun icon, look for a slider labeled "Exposure" in the manual settings menu, often accessed by tapping "More" or switching to Pro Mode. Pro Mode on Android often gives you separate controls for Shutter Speed and ISO. While sliding the sun icon is faster for quick shots, manual Pro Mode allows precise control for tricky situations like star trails or panning sports shots.
Regardless of the brand, the goal is the same: find the icon that looks like a sun or a slider bar near your focal point. Once located, treat it like a volume knob. Turn it up until details appear in the shadows, or turn it down until the bright parts stop fading to white.

Real World Scenarios Where You Need Control
Knowing where the button is is easy. Knowing when to use it takes practice. Here are four specific situations where letting your phone "auto-correct" will ruin the shot, and how to fix it.
The Snow Problem
Snow is the ultimate enemy of automatic metering. Because snow reflects massive amounts of light, your phone assumes the scene is blindingly bright and underexposes the photo. The result is a flat, gray landscape.
The Fix: Tap the snowy ground. Then, drag your exposure slider UP (+1.0 or more) until the snow pops back to a crisp, vibrant white. Trust your eyes, not the preview screen. If it looks white to you, it will likely look white in the final photo.
Backlit Subjects and Silhouettes
Have you tried to photograph a person standing against a sunset? Most likely, the face came out as a black shape. The camera saw the bright background and set the exposure for the sky, leaving the foreground in darkness.
The Fix: Tap specifically on the subject's face, not the sky. Drag the exposure slider up until you can see skin tones clearly. If the sky blows out (becomes pure white), don't worry about that. A portrait with a slightly bright sky but visible face is better than a dramatic sky with an invisible person.
Preserving the Night Sky
Night photography often leads to blurry photos because the phone keeps the shutter open too long to gather light. Moving your hand shakes the image.
The Fix: Lower the exposure slightly (-0.3 to -0.7). This forces the camera to increase ISO sensitivity rather than using a slower shutter speed. It might look a bit darker initially, but it freezes motion. If you are shooting stars, lower the exposure significantly to avoid capturing airplane trails or light pollution glare.
Creating Mood
Sometimes you want a photo to feel mysterious. A dark room with a candle looks creepy and atmospheric at its natural dim level. The phone will try to lighten the candle so you can see everything in the corner of the room, killing the mood.
The Fix: Underexpose the image intentionally. Pull the slider down until the shadows swallow the edges of the frame. Keep the light source sharp and bright, and let the rest fade into darkness. This technique creates drama that auto-modes never achieve.
The Difference Between Screen and Reality
There is a trick of the trade that few people talk about: screen brightness versus actual image data. Smartphones now use OLED and AMOLED displays that can shine incredibly brightly. A photo displayed at full brightness might look perfect on your phone outdoors.
However, when you view that same file on a laptop monitor, or worse, send it to a lab for printing, it will look darker. Paper does not emit its own light; it relies on reflection. What looks balanced on your glowing screen is often significantly underexposed when put to paper.
To mitigate this, check your exposure in two environments. First, look at the photo on your phone screen. Then, transfer the image to a computer or a tablet with known display calibration to see how it really renders. Many photographers habitually shoot slightly brighter (+0.3 exposure) on the phone to compensate for the viewing environment difference, knowing they can darken a photo later, but they cannot recover detail from a shadow that has crushed to absolute black.

Troubleshooting Common Issues
Even with manual control, things can go wrong. Here are a few pitfalls to avoid when adjusting your settings.
| Issue vs. Solution | |
|---|---|
| Noisy/Dusty Images | Happens when you push exposure too high (+1.5+) in low light. Reduce ISO or use a tripod. |
| Lost Highlight Detail | Bright areas look blown out. Lower exposure until color returns to clouds/sky. |
| Focus Hunting | Phone struggles to lock focus on low contrast. Tap firmly to set AF lock before adjusting exposure. |
| Video Flickering | Caused by artificial lights and slow shutter speeds. Manually set exposure to match the light frequency. |
If your photos look grainy, especially in the corners, you have likely pushed the digital gain too high. This occurs when you drag the exposure up beyond what the sensor physically captured. Digital amplification adds noise. Try moving closer to your subject so the sensor can capture enough natural light, or enable Night Mode which takes multiple frames to reduce this graininess naturally.
Mastering the Manual Workflow
Finally, treat this as a muscle memory exercise. Every time you raise your phone, ask yourself: "Is the automatic setting working?" Look at the brightest part of the scene (the highlight). Is it pure white with no texture? Look at the darkest part (the shadow). Is it pitch black?
If either is true, tap and drag. You will notice that after a week of this, you will start doing it subconsciously. You will stop accepting "okay" photos and start producing images that match exactly what you see in real life.
Your smartphone is capable of incredible imagery. But it is still a machine. It needs direction. By controlling exposure, you stop the machine from deciding for you and begin directing the narrative of the light yourself. This small gesture separates hobbyists from creators.
Can I change exposure after I take the photo?
You can brighten or darken an image in editing apps, but this is limited. If the original photo was taken with improper exposure, you often lose data permanently. Overexposed highlights (pure white) cannot be recovered. Underexposed shadows become extremely grainy when boosted. It is always better to set the exposure correctly before pressing the shutter button.
What does AE/AF Lock mean on my iPhone?
AE stands for Auto Exposure and AF stands for Auto Focus. When these are locked (usually indicated by text on the screen), the camera will maintain the brightness and focus distance you selected, even if you move the phone or the subject moves slightly. This ensures consistency across multiple shots or during video recording.
Why does my exposure slider disappear sometimes?
The slider appears after you tap the screen to set a focus point. If you haven't tapped the screen recently, or if you are in specific modes like "Live Photo" on some updates, it might behave differently. Tapping firmly usually resets the control points.
Does lowering exposure help battery life?
Indirectly, yes. By lowering exposure, you shorten the time the shutter stays open. Shorter shutter speeds process images faster, which can reduce the workload on the processor and potentially extend battery life during bursts of heavy photography, though the impact is minimal per shot.
Should I use HDR along with manual exposure?
Smartphones use Smart HDR automatically to blend shadows and highlights. Generally, it is best left on, as it provides a base layer of protection against extreme lighting. However, manual exposure adjustments will still work on top of HDR processing to fine-tune the final brightness to your preference.