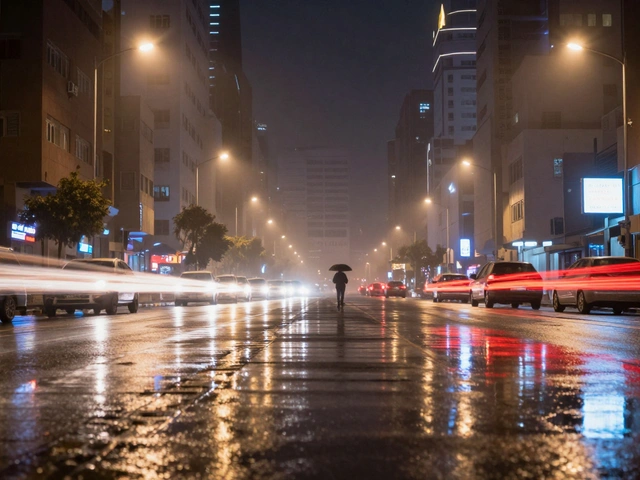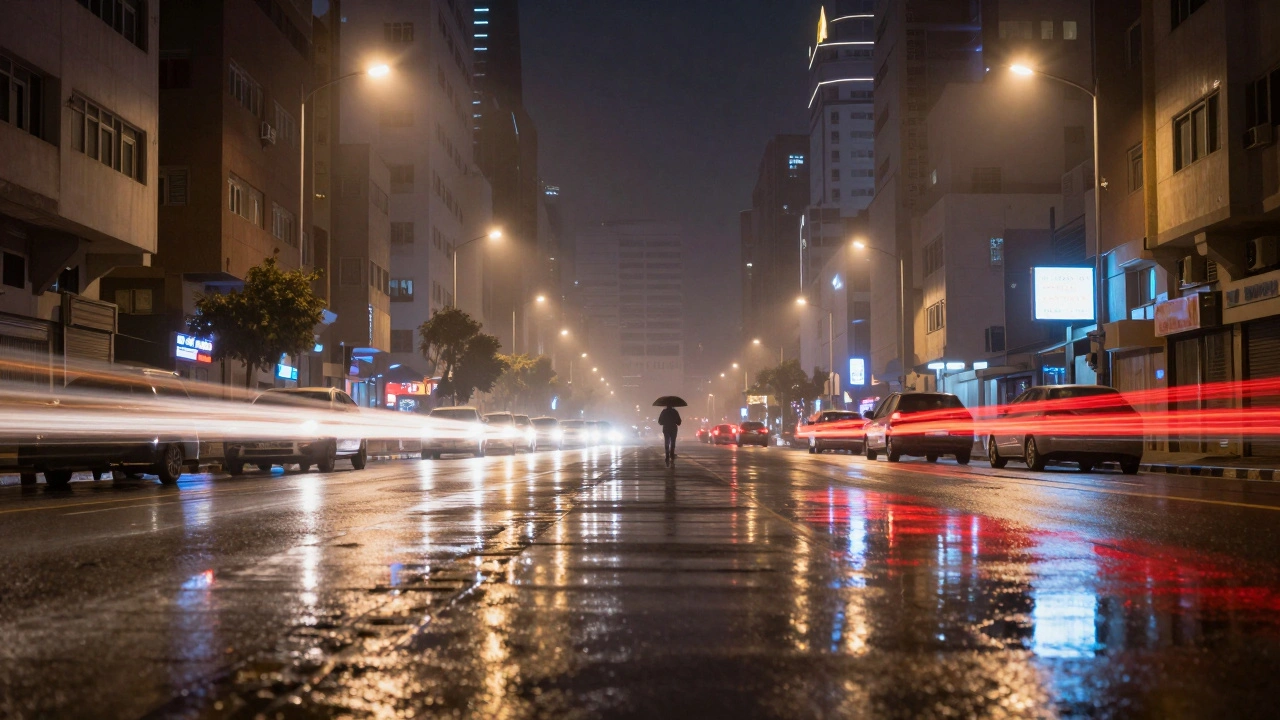
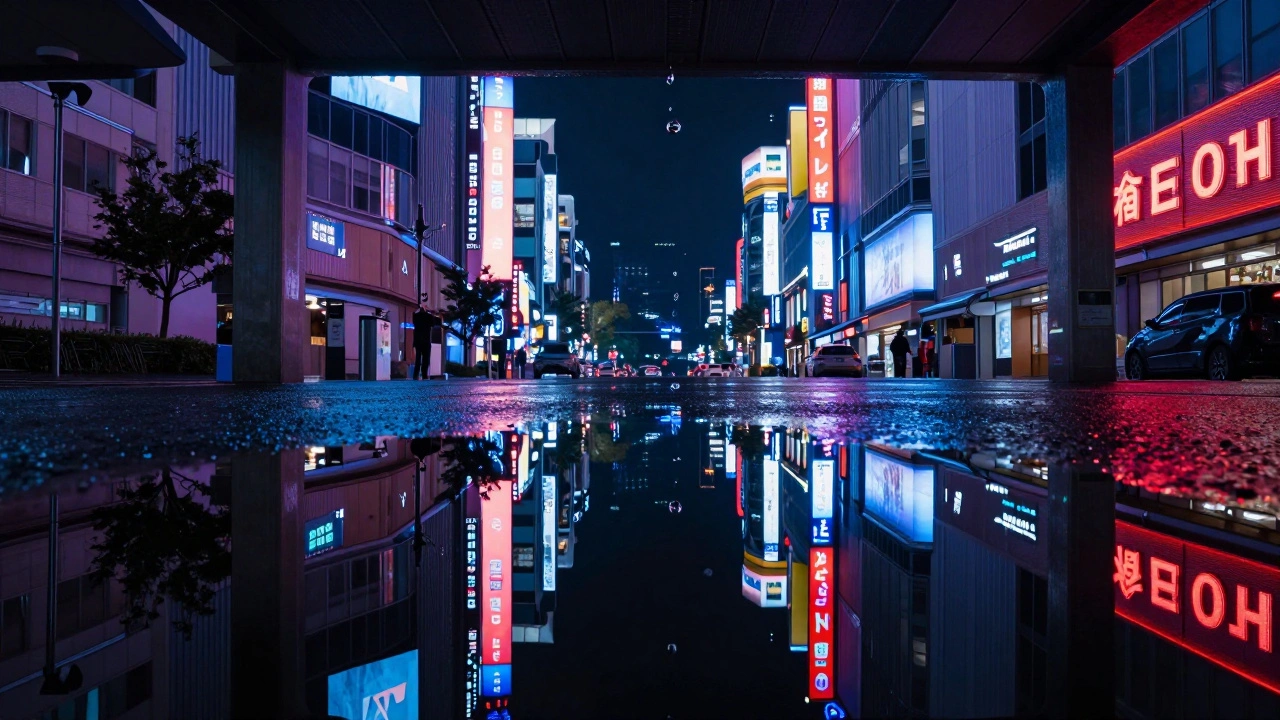
There’s something magical about walking through a city after it rains at night. The streets glisten under streetlights, neon signs stretch into liquid ribbons, and car headlights blur into glowing trails. It’s not just a pretty scene-it’s a photographic goldmine. Wet streets turn ordinary cityscapes into mirror worlds, doubling the color, depth, and drama of urban light. If you’ve ever stood there, camera in hand, wondering why your night shots look flat compared to those you see online, the answer is often simple: you’re shooting on dry pavement.
Why Wet Streets Change Everything
Dry asphalt absorbs light. It’s dark, dull, and unresponsive. But when rain hits the street, it creates a thin, smooth layer of water that acts like a giant, natural mirror. This isn’t just about reflections-it’s about light redirection. City lights that normally hit the ground and disappear are now bounced upward, illuminating the air around buildings, softening shadows, and adding glow to the sky. That’s why photos taken after rain feel more alive. The light doesn’t just sit on the surface; it dances.
Think about it: a single streetlamp doesn’t look impressive on its own. But when its reflection stretches across a puddle, connecting to another reflection down the block, you get a leading line that pulls the viewer’s eye through the frame. Neon signs from a bar or a theater don’t just glow-they ripple, stretch, and pulse in the water. Vehicle headlights become flowing rivers of white and red. The city stops being a collection of buildings and becomes a living, breathing canvas.
Camera Settings That Actually Work
Setting your camera to Auto at night on a wet street is a recipe for noise, blur, or blown-out highlights. You need control. Here’s what works:
- Use manual mode. Auto ISO will spike to 6400 or higher, turning your image into grainy mush. Stick to ISO 100-200. You’ll need longer exposures to compensate, and that’s fine.
- Aperture: f/8 to f/16. Narrower apertures help keep more of the scene sharp, especially when raindrops cling to the pavement. They also create those beautiful starburst effects around streetlights if you use a lens with good aperture blades.
- Shutter speed: 5 to 30 seconds. This lets enough light in without turning moving cars into smears. Try 10 seconds for a balance of motion blur and clarity. Longer than 30? Use a neutral density filter.
- Shoot in RAW. Night images have extreme contrast. Highlights from signs can be 10x brighter than shadows in puddles. RAW files hold the data you need to recover details later.
Don’t trust the LCD screen. It lies in low light. Use the histogram instead. If the graph is crushed against the left, you’re underexposed. If it’s piled up on the right, you’ve lost your highlights. Aim for a balanced peak that doesn’t hit the edges.
Focus: Let Go of Autofocus
Autofocus fails at night. Period. It hunts. It clicks. It gives up. Switch to manual focus. Here’s how:
- Use live view and zoom in on a bright reflection-a streetlight, a sign, or even a car’s taillight.
- Turn the focus ring until that reflection looks razor-sharp.
- Lock it. Don’t touch it again.
If your lens has distance markings, set it to infinity if you’re shooting a wide scene. But don’t assume infinity is correct-lens calibration varies. Always check.
Equipment: Protect Your Gear
Rain isn’t just a mood enhancer-it’s a threat. Water on your lens? Blurry spots. Water inside your camera? Expensive repairs. You need to be prepared.
- Use a lens hood. It keeps raindrops off the front element.
- Carry a microfiber cloth. Wipe your lens every 10-15 minutes. Even one droplet at f/16 can ruin a shot.
- Use a rain cover. A simple plastic bag with a rubber band around the lens works. Or invest in a dedicated camera rain sleeve.
- Bring a small umbrella. Hold it over your head and camera, angled so it doesn’t show up in the frame. A helper helps, but you can do it solo with practice.
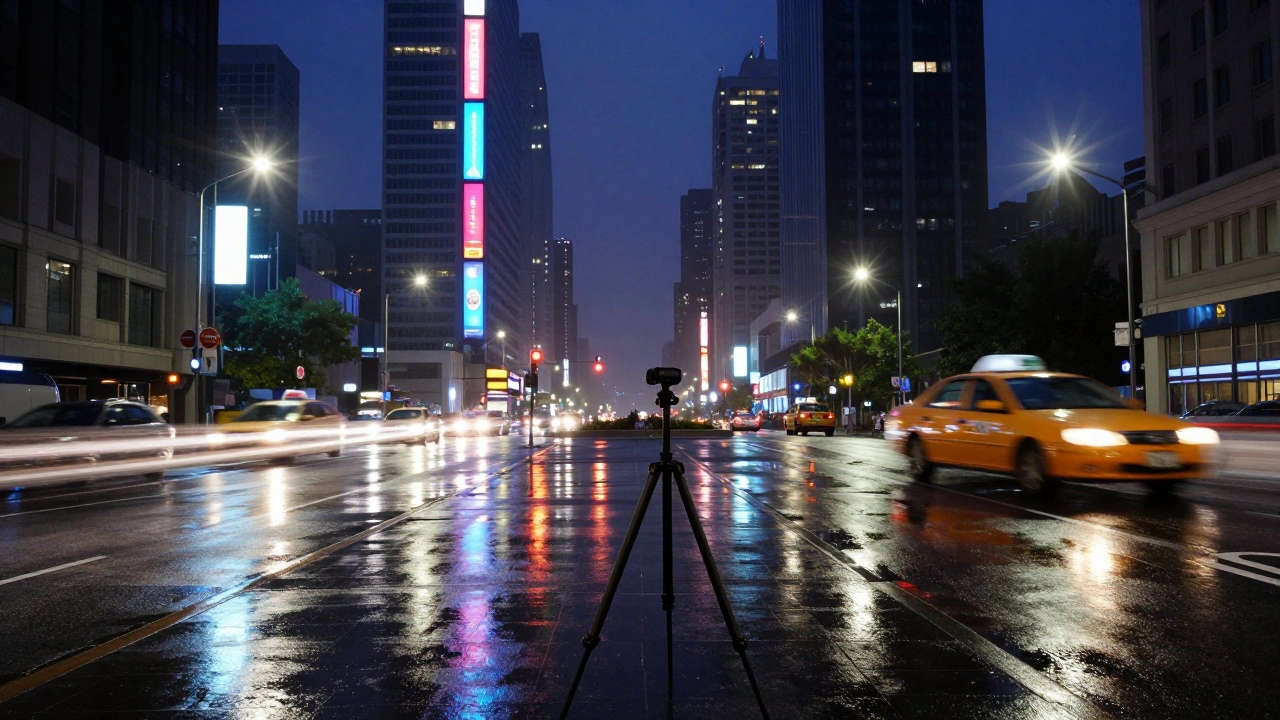
Don’t forget your tripod. A shaky camera at 15 seconds? You’ll get motion blur everywhere-even the reflections will smear. A sturdy tripod with a ball head is non-negotiable. If you’re on uneven ground, extend the center column and use a hook to hang your camera bag for extra stability.
Composition: Find the Reflection
Reflections aren’t just pretty-they’re compositional tools. Here’s how to use them:
- Get low. Shoot from knee height or lower. This makes puddles dominate the frame and creates a sense of immersion.
- Look for symmetry. A building and its reflection create a natural balance. Frame it centered for maximum impact.
- Use leading lines. Wet streets naturally draw the eye. Position yourself so reflections lead toward a light source, a bridge, or a skyline.
- Include foreground interest. A lone umbrella, a bike leaning against a wall, or a shadowy figure walking through a puddle adds life. Without it, the image can feel empty.
- Shoot near neon. Red, blue, and purple signs reflect with intense saturation. They pop against black asphalt and create mood you can’t replicate in post.
Don’t just take one shot. Move. Crouch. Step left. Step right. Walk 20 feet down the sidewalk. The same scene can look completely different from a few inches away. Reflections shift with your angle. What looked like a blur might become a perfect mirror.
Creative Tricks: Starbursts and Multiple Exposures
Want to go beyond basic reflections? Try these techniques:
- Starburst filters. Attach a cross filter or use a narrow aperture (f/11 or higher) to turn streetlights into sparkling stars. Works best on bright, point-source lights like LEDs or halogen lamps.
- Multiple exposures. Many modern cameras let you combine two or more shots in-camera. Try layering a long exposure of reflections with a shorter one of a person walking through the frame. The result? A ghostly figure emerging from the glow.
- Long exposure motion. Let a 30-second exposure capture the trails of car lights. They become glowing rivers flowing through the city. Combine that with a still reflection of a building, and you’ve got motion and stillness in one frame.
When to Shoot: Timing Is Everything
The best time? Right after the rain stops. Not during. Not an hour later. When the water is fresh, the streets are still wet, and the air is clear. That’s when reflections are sharpest and most vibrant.
Cloudy nights? Great. Soft, even lighting reduces harsh contrasts. Clear nights? Also fine-but watch for overexposed highlights. Winter rain? Even better. Cold air keeps the moisture from evaporating too fast, and snow-dusted streets add texture.
Scout locations during the day. Know where the best puddles form. In Portland, the waterfront near Tom McCall Waterfront Park, or the intersection of SW 3rd and Morrison, becomes a photographer’s dream after rain. In New York, the view of the Chrysler Building from 42nd Street is legendary. Don’t wait for perfect weather. Wait for the right moment.
Final Thought: Embrace the Rain
Most people run inside when it rains. Photographers? They grab their gear and head out. Because the city doesn’t look the same after dark when it’s dry. It looks ordinary. But when the streets are wet? It transforms. The lights breathe. The reflections sing. The city becomes something deeper, more emotional.
You don’t need expensive gear. You don’t need to travel to Tokyo or Paris. You just need to be there, patient, prepared, and willing to get a little wet. The best cityscapes aren’t taken on clear, dry nights. They’re taken when the world is quiet, the streets are glassy, and the light is dancing just beneath your feet.
Do I need a tripod for wet street reflections?
Yes. Long exposures (5-30 seconds) are essential to capture clean reflections without motion blur. Even the slightest camera shake will ruin the sharpness of water reflections. A sturdy tripod is non-negotiable.
Can I shoot wet street reflections with a phone camera?
You can, but it’s limited. Most phones use short exposures and high ISO, which creates noise and loses detail in shadows. Use Night Mode if available, lock focus on a reflection, and steady the phone on a surface or small tripod. Don’t expect professional results, but you can still capture compelling mood.
Why do my reflections look blurry?
Blurry reflections usually come from three things: water droplets on the lens, autofocus failure, or too fast a shutter speed. Clean your lens before each shot, switch to manual focus, and use a shutter speed of at least 5 seconds. Also, avoid shooting in heavy rain-dripping water distorts the surface.
Should I shoot in RAW or JPEG?
Always shoot in RAW. Night scenes have extreme contrast-bright lights next to deep shadows. RAW files retain 10-14 bits of data per pixel, giving you room to recover highlights and shadows in editing. JPEGs flatten this information and can’t be fixed later.
What’s the best time of year for wet street photography?
Late fall through early spring. That’s when rain is frequent, temperatures are cool (so water doesn’t evaporate fast), and streetlights are more prominent against darker skies. Winter snow adds texture, but be ready for cold hands and fogged lenses.
Can I use a polarizing filter for reflections?
No. Polarizers reduce reflections-which is the exact opposite of what you want. You’re trying to enhance the mirror-like quality of wet streets. A polarizer will kill the effect. Skip it.