When a buyer clicks on a real estate listing, the first thing they see is the exterior photo. That single image decides whether they keep scrolling or stop to learn more. A blurry shot of a muddy driveway or a washed-out front facade won’t just turn people away-it’ll make them assume the inside is just as neglected. But a well-shot exterior? It doesn’t just show a house. It sells a lifestyle.
Professional exterior real estate photography isn’t about snapping a quick picture with your phone. It’s a blend of timing, technique, and preparation that turns ordinary homes into irresistible listings. And the difference isn’t subtle. Studies show that properties with twilight-enhanced exterior shots get up to 300% more clicks than those shot in plain daylight. That’s not magic. That’s science.
Why the Front View Matters More Than Anything Else
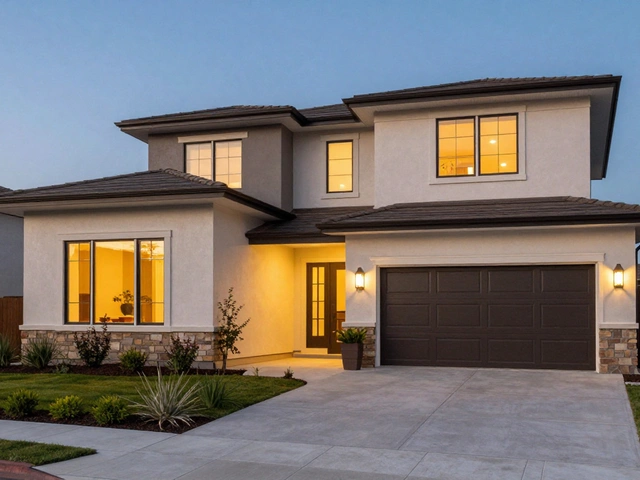
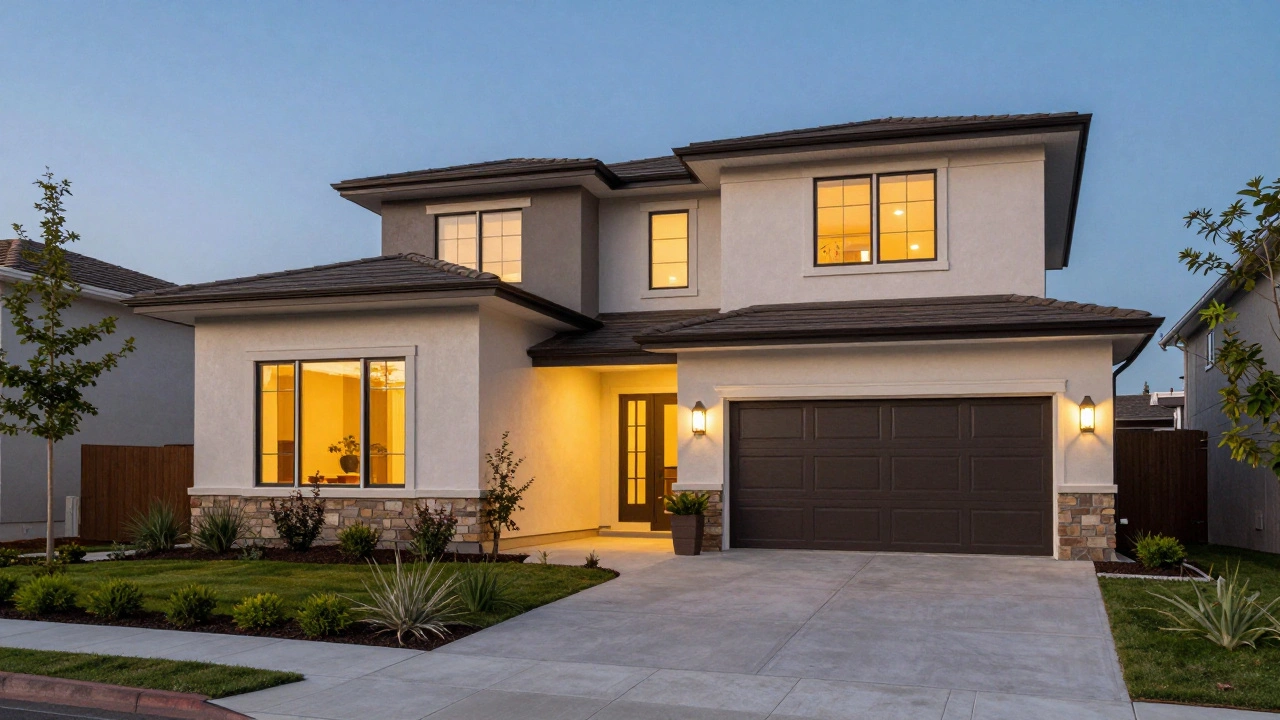
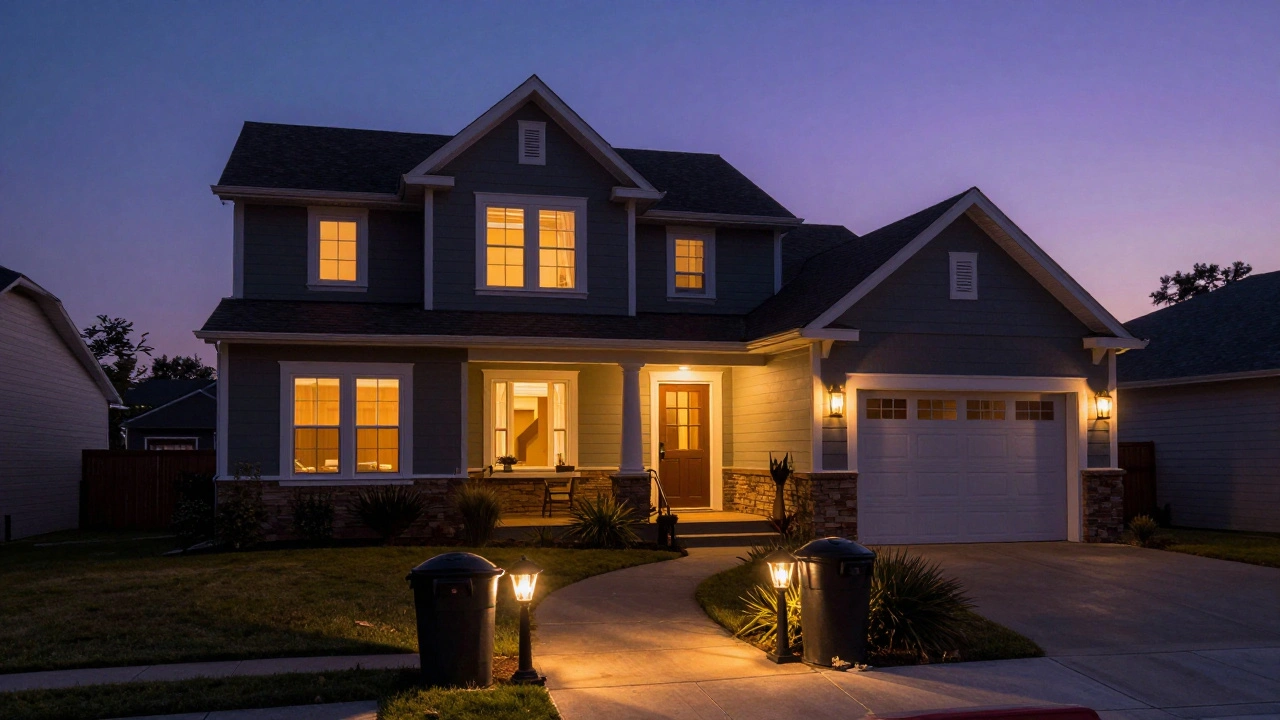
The front of the house is the handshake. It’s the first impression. Buyers form opinions about a property in under five seconds-and that opinion is built on that one front-facing photo. A clean, well-lit facade with balanced landscaping tells buyers: this home is cared for. A cluttered yard, a dark garage door, or a skewed angle tells them: this might be a mess.
Don’t stand dead center in front of the house. That’s amateur. Instead, position yourself at one of the front corners, ideally opposite the driveway. This gives you room to capture the walkway, the front porch, the landscaping, and the architectural details-while pushing the garage door and side access out of the frame. Keep your camera level. Tilting it up or down distorts the lines of the house and makes it look like it’s leaning. You want the house to look solid, grounded, inviting.
Lighting: The Goldilocks Zone of Real Estate Photography
Lighting is everything. Too much sun? Harsh shadows carve out ugly holes under eaves and windows. Too cloudy? Everything looks flat and lifeless. The sweet spot? Golden hour-roughly one to two hours after sunrise and one to two hours before sunset.
Morning light is soft, even, and cool-toned. It’s perfect for highlighting textures in brick, stone, or wood without blowing out highlights. If you’re shooting in the middle of the day, find open shade-like under a tree or near a porch overhang. Use a diffuser if you’ve got one. It scatters the light and cuts down on contrast.
But the real game-changer? Virtual dusk. This isn’t just shooting at night. It’s shooting right after sunset, when the sky still has a hint of blue, and turning on every single light-inside and out. The interior glow peeks through windows. The pathway lights and porch lamps add warmth. The sky stays dark enough to contrast with the house. The result? A photo that feels alive, cozy, and premium. And yes, homes with this treatment get 300% more attention.
What You Need to Shoot Like a Pro
You don’t need a $10,000 setup, but you do need the right tools:
- Wide-angle lens (10-24mm on full-frame): Lets you capture the whole house from a distance without making it look stretched or warped.
- Tripod: Non-negotiable. Especially for dusk shots or HDR. Even the slightest shake ruins the detail.
- Remote shutter release: Avoids camera shake when pressing the button.
- Polarizing filter: Cuts glare on windows and water features. Essential for homes with lakes, pools, or big windows facing the sun.
- Diffuser or reflector: Helps soften harsh midday light.
- HDR mode or exposure bracketing: Captures detail in both bright skies and dark shadows. You can’t rely on auto mode.
And don’t forget the backup gear. Batteries die. Memory cards fill up. Have extras. Always.
Shooting the Backyard and Side Yards: Go Beyond the Basics
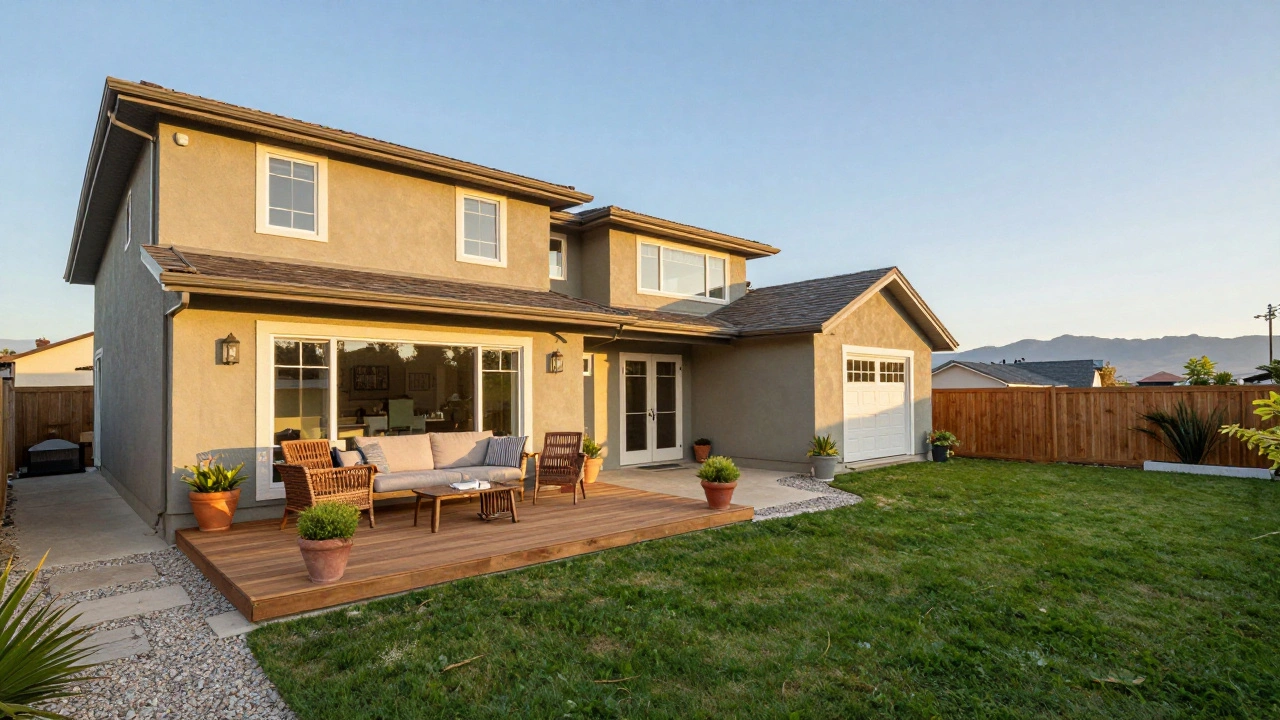
Most photographers shoot the front, maybe the backyard, and call it done. But buyers care about more than just the front door. They want to know how the space flows.
For backyards, shoot from multiple angles:
- From the deck or patio: Use two-point perspective to show how the house connects to the yard. Make sure the furniture looks lived-in, not staged.
- From the corner of the yard: Get the whole house in frame, but keep an eye on the sun. You don’t want one side of the house in shadow.
- From the far end of the yard: Capture the full length. Show how the house sits on the lot. Is there room for a garden? A play area? A fire pit?
Use leading lines-paths, driveways, fences-to guide the eye toward the house. Include foreground elements (a potted plant, a bench, a stone path) to add depth. A wide shot shows scale. A tighter shot of a pergola or outdoor kitchen shows quality.
And if there’s a view? A lake, a mountain, a city skyline? Use HDR. Shoot multiple exposures-one for the sky, one for the house, one for the foreground-and blend them. Don’t just rely on in-camera HDR. Manual blending gives you control.
Prep Work: The Secret Ingredient Nobody Talks About
You can have the best camera, the perfect light, and the sharpest lens-but if the yard looks like a junkyard, your photos will still suck.
Before you even pick up your camera, walk the property with the agent. Look for:
- Dying grass or muddy patches
- Overgrown hedges or tree branches blocking windows
- Trash cans, bikes, or toys left out
- Cluttered patios or stacked firewood
- Neighboring homes with peeling paint or construction sites visible
Some things you can fix: mow the lawn, trim bushes, remove clutter. Others? You work around them. Angle your shot so the neighbor’s ugly shed is behind a tree. Use a wide lens to crop out the dumpster. A little creativity goes a long way.
Also, check the weather forecast. If rain’s coming, reschedule. Wet grass reflects light unevenly. Puddles turn into dark blobs in photos. And don’t shoot on windy days-trees move. Blurry leaves ruin the illusion of calm.
HDR and Virtual Dusk: The Tools That Make Listings Stand Out
HDR (High Dynamic Range) isn’t just a filter. It’s a technique. You take three to five shots at different exposures-one for the shadows, one for the midtones, one for the highlights-and merge them. The result? A photo that looks like what your eyes saw, not what the camera saw.
Virtual dusk is the next level. It’s not about shooting after dark. It’s about timing it right: shoot as the sun dips below the horizon, turn on all the lights, then wait 10-15 minutes until the sky is deep blue. The interior lights glow warmly. The exterior lights create pools of color. The house looks like it’s alive.
Some photographers even replace the sky in post-processing. If the original sky is gray or boring, swap it for a crisp blue one with soft clouds. It’s ethical-as long as you’re not adding trees or pools that aren’t there. The goal isn’t to fake the property. It’s to show its best self.
When to Shoot: The Daily Schedule That Works
Don’t just show up at 10 a.m. and hope for the best. Plan your shoot like a pro.
- Early morning (6-8 a.m.): Best for front shots. Soft light, no shadows, calm streets.
- Midday (11 a.m.-2 p.m.): Use this for side yards or backyards if the sun is behind you. Use diffusers. Check your histogram-don’t let highlights blow out.
- Golden hour (4-6 p.m.): Ideal for backyards and side views. Warm tones, long shadows that add depth.
- Dusk (after sunset): Save this for the final shots. Turn on lights. Wait. Shoot.
If you’re shooting both interior and exterior, do the exterior first. Then move inside during the late afternoon. The lower outdoor light makes it easier to balance window exposure with interior lighting.
What Not to Do
Here’s what kills exterior photos:
- Using zoom lenses too close-makes the house look small and cramped.
- Shooting into the sun-creates lens flare and washes out the facade.
- Forgetting to clean the lens-smudges look like dirt on the house.
- Ignoring the sky-gray clouds make everything look dull. Replace them if needed.
- Using auto white balance-let it go too warm or too cool. Set it manually to match the light.
And never, ever shoot in rain or fog unless the property is a lakeside cabin and the mood is intentional. Most buyers want clean, bright, inviting homes-not moody mystery houses.
Final Thought: It’s Not About the Camera. It’s About the Story.
A great exterior photo doesn’t just show a house. It shows a future. A family on the porch. A garden blooming. A sunset over the backyard. The best photos don’t just capture what’s there-they make you feel what it’s like to live there.
So don’t just take pictures. Tell stories. Use light. Use angles. Use prep. Use patience. And remember: the house that looks like it’s waiting for someone to walk through the door? That’s the one that sells.
What’s the best time of day to shoot exterior real estate photos?
The best time is golden hour-about one to two hours after sunrise or before sunset. The light is soft, warm, and even, making the house look inviting without harsh shadows. For properties with strong architectural features or outdoor lighting, virtual dusk (just after sunset) works even better, often boosting click-through rates by up to 300%.
Do I need a tripod for exterior real estate photography?
Yes. A tripod is essential, especially for HDR shots, dusk photography, or any time you’re using slow shutter speeds. Even a slight camera shake can blur details in brick, windows, or landscaping. A sturdy tripod also lets you take multiple exposures without moving the camera, which is critical for blending images in post-processing.
What lens should I use for shooting home exteriors?
A wide-angle lens between 10mm and 24mm (on full-frame cameras) is ideal. It lets you step back far enough to capture the entire facade without distorting the shape of the house. Avoid zooming in too close-it makes the house look smaller. Always shoot from a corner to include landscaping and driveway while minimizing unattractive elements like garages.
Can I use my smartphone to shoot exterior real estate photos?
You can, but it won’t compete with professional results. Smartphones struggle with dynamic range, low-light performance, and consistent exposure across large scenes. They also lack manual controls for shutter speed, ISO, and focus. For listings, you need HDR, manual white balance, and tripod stability-things most phones can’t deliver reliably. Use a DSLR or mirrorless camera for serious real estate work.
How do I handle bright windows in exterior shots?
Use HDR or exposure bracketing. Take three shots: one exposed for the sky, one for the house, and one for the windows. Blend them in editing software like Lightroom or Photoshop. You can also use a polarizing filter to reduce glare. If the view outside is stunning (like a lake or city skyline), make sure the windows aren’t blown out-you want to see the landscape clearly, not just a white blur.
Should I clean up the yard before shooting?
Absolutely. Buyers judge the house by its surroundings. Mow the lawn, trim hedges, remove trash, and move outdoor furniture that’s cluttering the view. If a neighbor’s tree casts a dark shadow on the house, try adjusting your angle. You can’t always fix everything, but you can frame shots to minimize distractions. A clean yard makes the house look cared for-and that’s what sells.
Is sky replacement ethical in real estate photography?
Yes, if done responsibly. Replacing a gray, dull sky with a soft blue one with light clouds is standard practice. It’s not misleading-it’s enhancing. But never add elements that aren’t there: trees, pools, or mountains that don’t exist. The goal is to show the property at its best, not to create a fantasy. Buyers expect realism. A beautiful sky is fine. A fake lake is not.