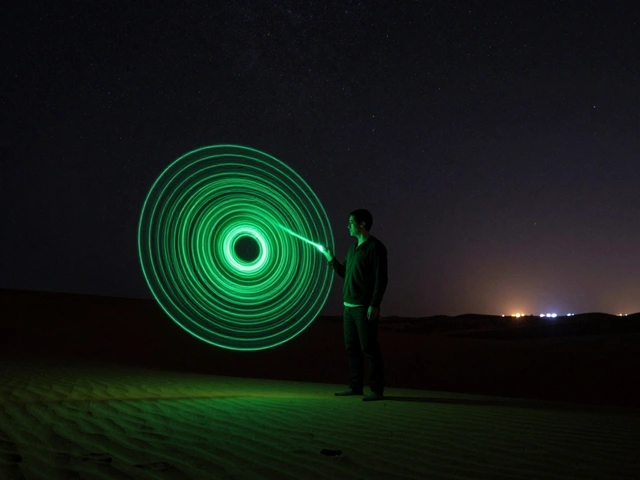
Have you ever seen a photo where light swirls like a glowing river through the dark, or words float in midair like magic? That’s not Photoshop. That’s light painting photography-a technique where you use moving light to draw in the air while the camera’s shutter stays open. No filters. No edits. Just you, a flashlight, and a dark night.
What Exactly Is Light Painting?
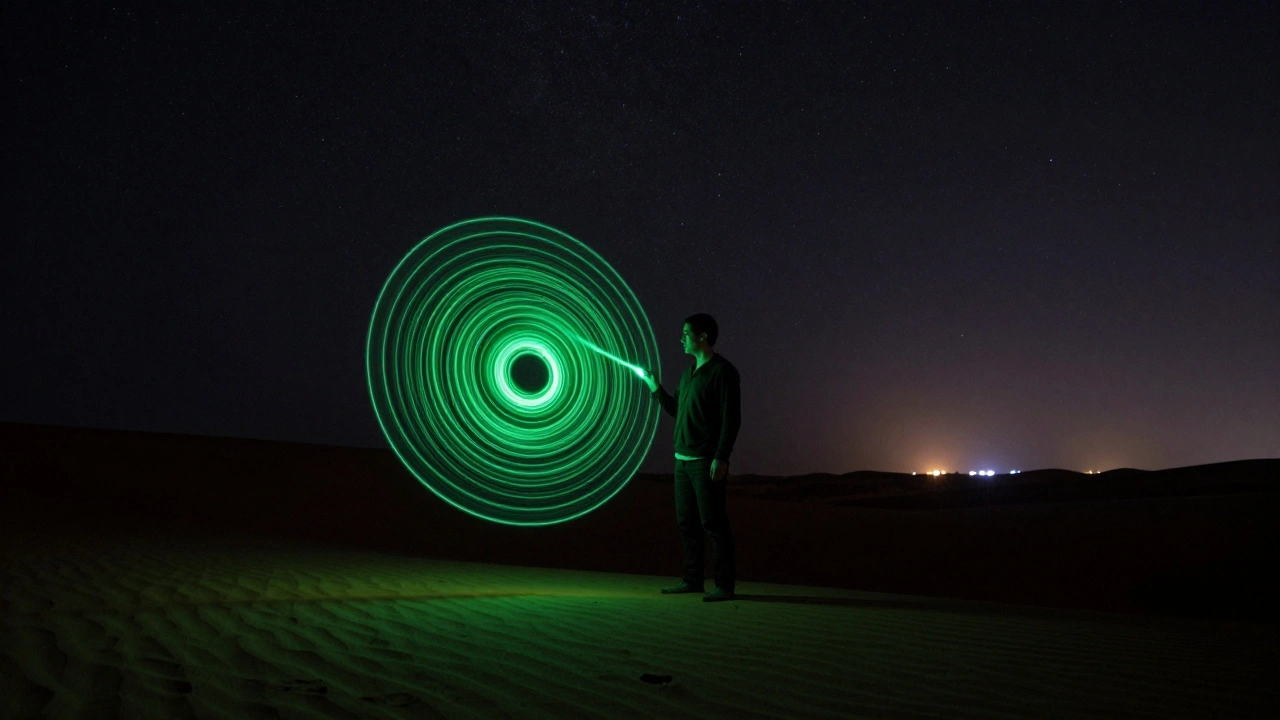
Light painting isn’t just about waving a light around. It’s about using time as your brush. When you leave your camera’s shutter open for seconds-or even minutes-you’re capturing every movement of light as it travels. The result? Trails, shapes, patterns, or even full portraits lit by hand-held sources. The camera doesn’t see motion the way your eyes do. It sees duration. So if you move a light in a circle, it records a perfect ring. If you write your name in the dark, it shows up as glowing text.This isn’t new. Artists have been doing this since the 1880s. Pablo Picasso famously made light drawings in 1949 with a small bulb, and his photos were published in Life magazine. But today, you don’t need a famous name or studio gear to try it. All you need is a camera, a dark space, and something that emits light.
The Three Main Types of Light Painting
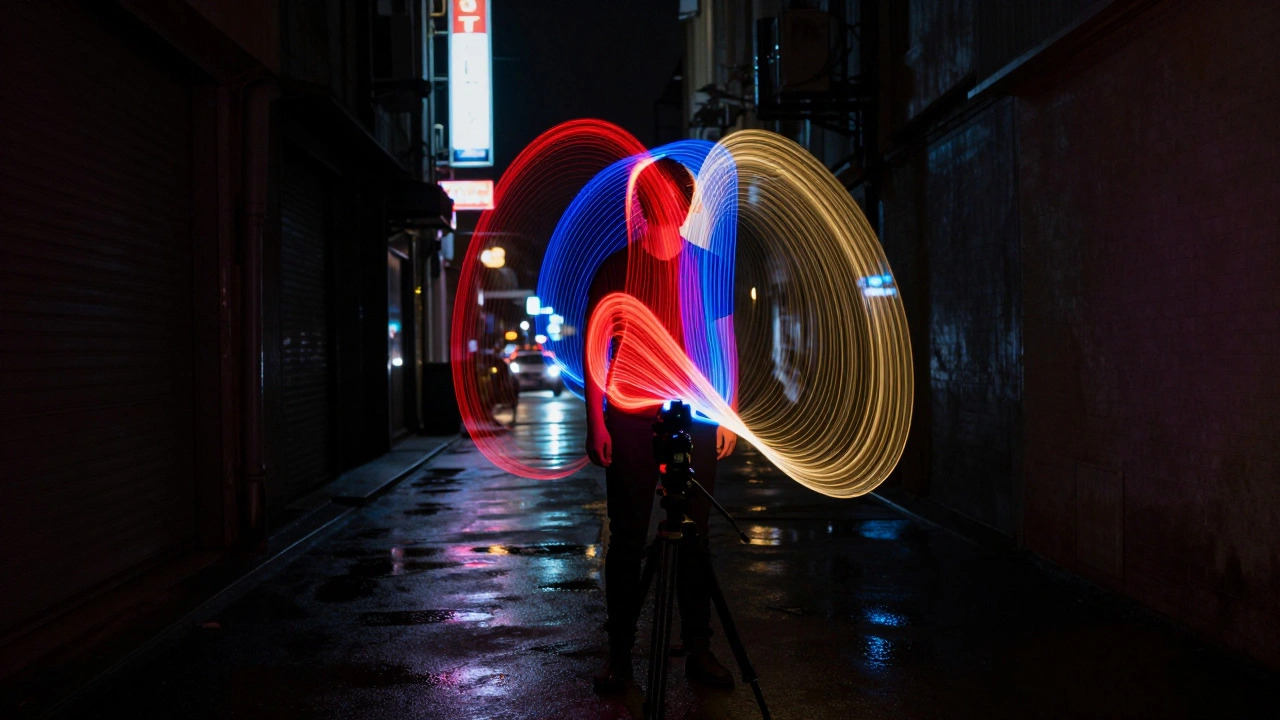
There are three ways to create light trails, and each gives you a totally different result.- Light Drawing: This is the classic version. You hold a light source-like an LED wand, flashlight, or even a sparkler-and move it in front of the camera. The light itself shows up in the photo. Think swirling stars, spirals, or glowing letters. You’re the artist, and the light is your paint.
- Light Painting (on subjects): Here, you don’t show the light source. Instead, you use it to illuminate something else-a person, a tree, a building. Imagine shining a colored light on someone’s face during a long exposure. Their skin glows red, blue, or gold while the background stays dark. It’s like painting with shadows and highlights.
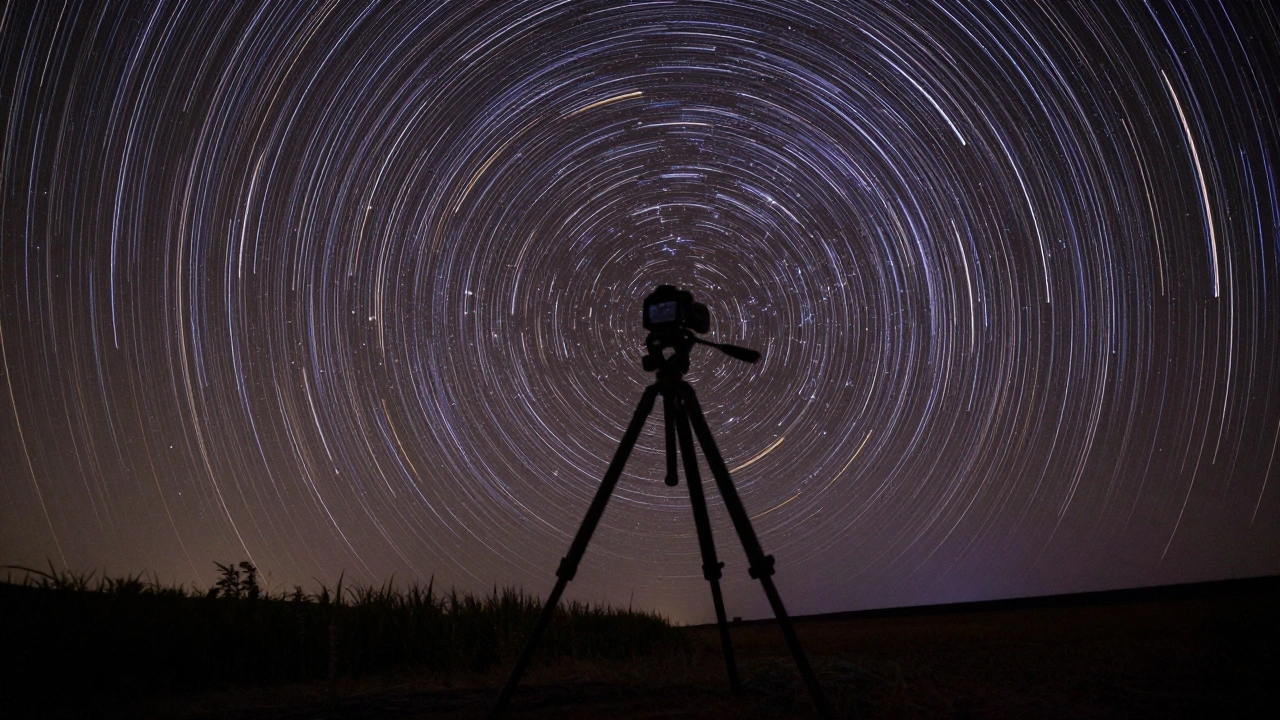
- Kinetic Light Painting: This one’s wild. You move the camera instead of the light. Mount your camera on a tripod, set it to a slow shutter, then pick it up and swing it through a scene of city lights or stars. The stationary lights blur into streaks, and the camera becomes the brush. It’s how you get those dreamy, starry sky swirls or neon highway rivers.
Each method requires a different mindset. Light drawing is about precision. Light painting on subjects is about control. Kinetic painting is about surrender-you let motion do the work.
Essential Gear for Light Painting
You don’t need expensive gear, but some tools make a huge difference.- Camera with manual mode: You need to control shutter speed, aperture, and ISO. DSLRs and mirrorless cameras work best, but even some smartphones now have long-exposure modes via third-party apps.
- Sturdy tripod: For light drawing and subject painting, you need the camera locked in place. A shaky tripod means blurry chaos.
- Light sources: Start simple. A cheap LED flashlight works. Try colored gels, glow sticks, or even a smartphone screen with a bright white background. For advanced work, use programmable LED strips or RGB wands that let you change colors on the fly.
- Remote shutter release: This lets you trigger the exposure without touching the camera. A 10-second delay helps avoid shake.
- Dark clothing: If you’re holding a light in front of the camera, wear black. Even a gray sleeve can show up as a ghostly blur.
- Red flashlight: Use this to check your setup without ruining your night vision or affecting the exposure. Red light doesn’t register as strongly on camera sensors.
Pro tip: Don’t use flash. You want continuous light, not bursts. A strobe freezes motion. You want motion to be visible.
Camera Settings That Actually Work
Forget auto mode. Light painting lives in manual settings.- Shutter speed: Start at 10 seconds. If you’re doing complex patterns, go for 30 seconds or even 2 minutes. The longer the exposure, the more room you have to draw.
- Aperture: Use f/8 to f/16. Too wide (like f/2.8) and the light will overexpose. Too narrow (f/22) and you’ll need way more light. f/11 is a sweet spot for most setups.
- ISO: Keep it low-100 or 200. Higher ISO adds noise, and you don’t need sensitivity here. You’re adding light, not hunting for it.
- Focus: Manually focus on where the light will move. Autofocus will hunt and fail in the dark. Use live view, zoom in on a bright spot, and lock focus.
- White balance: Set it to tungsten or custom if you’re using colored lights. Or shoot in RAW so you can fix it later.
Test shot: Do a 10-second test with your light source. Look at the histogram. If it’s slammed to the right, your exposure is too long. If it’s flat, you need more time or brighter light.
Where to Shoot
Light painting needs darkness. Not just “dim.” Total darkness.- Urban nights: City parks, empty parking lots, or alleyways with distant streetlights. The ambient glow adds depth. Avoid places with too much light pollution-your trails will get washed out.
- Indoor studios: A blacked-out room with a single light source on the ceiling works great. You can paint with multiple colors without interference.
- Forests or open fields: At night, with no moon, you get pure black. Perfect for star trails or glowing spirals.
- Beaches: The water reflects light. You can paint over sand and water at the same time for surreal effects.
Check the weather. Wind can blow your light source. Rain can ruin your gear. And always scout the location during the day. Know where the power outlets are, where trash cans are, and where you can safely set up.
Techniques That Turn Good Into Great
Once you’ve got the basics down, here’s how to level up.- Multiple exposures: Take several shots and layer them. Do one pass with red light, another with blue. Combine them in-camera if your camera supports it, or merge them in post.
- Reflective surfaces: Use mirrors, glass, or water to bounce light. You can create infinite loops or double the pattern without moving twice.
- Painting with color: Use colored gels over your light. Red, blue, and green are the most dramatic. Try mixing them as you move-like painting with a rainbow.
- Human subjects: Have a friend stand still while you paint light around them. You can outline their shape, create halos, or even write their name in the air around their head.
- Stop-and-go motion: Don’t move the light the whole time. Pause for a second to create a dot. Move fast for a thin line. Slow down for a thick glow. It’s all about rhythm.
One of my favorite tricks in Portland: I’ll stand on the Hawthorne Bridge at night, point a green LED down at the river, and slowly sweep it side to side. The water catches the light and turns it into a glowing ribbon. No one else is there. The city lights are far away. And the image? Pure magic.
Common Mistakes (And How to Fix Them)
Even experienced photographers mess this up.- Too much ambient light: If you can see your hand in front of you, it’s too bright. Wait for full darkness.
- Shaky camera: Even a tiny bump ruins the shot. Use a heavy tripod. Put your bag on it for extra weight.
- Moving too fast: If your trail looks broken or jagged, you’re moving too quickly. Slow down. Let the light linger.
- Not checking the histogram: You can’t rely on the LCD screen. It lies in the dark. Use the histogram to see if you’re clipping highlights.
- Wearing bright clothes: Black is non-negotiable. Even a white sneaker will show up as a ghost.
Why This Technique Still Matters
In a world of filters and AI-generated images, light painting is one of the last truly analog art forms. You can’t fake it. You can’t edit it. You have to be there. You have to move. You have to feel the rhythm of the exposure. It’s performance. It’s science. It’s art.Every image is unique. No two hands move the same. No two nights are identical. The wind shifts. A car drives by. A dog barks. You adjust. You adapt. And then-click-you’ve captured something no algorithm could ever replicate.
Light painting doesn’t need a gallery. It doesn’t need fame. It just needs a dark place, a patient mind, and a light you can hold. And if you try it once? You’ll be hooked.
Do I need a special camera for light painting?
No. Any camera with manual controls will work. DSLRs and mirrorless cameras give you the most flexibility, but even some smartphones now have long-exposure modes through apps like Slow Shutter Cam or ProCam. The key is being able to set shutter speed to 1 second or longer. If your camera can do that, you’re ready.
Can I do light painting during the day?
Not really. Daylight is too bright. Even with a fast shutter speed, ambient light will overpower your light trails. You need darkness. If you want to try something similar during the day, you’d need a neutral density (ND) filter to cut down incoming light-but that’s a whole other level. Stick to night for best results.
How long should my exposure be?
Start with 10 to 30 seconds. That’s enough time to draw simple shapes without overexposing. For complex patterns, like writing names or painting full-body silhouettes, go up to 2 minutes. You can always take multiple shots and combine them later. Longer isn’t always better-it just gives you more room to move.
What’s the best light source for beginners?
A simple LED flashlight is perfect. Look for one with a steady beam-not flickering. You can buy colored gels (plastic sheets) for under $5 to change the hue. Glow sticks work too, but they’re single-use. For more control, try a programmable LED wand or even a smartphone screen set to full white.
Can I use flashlights with batteries that die quickly?
Yes, but plan ahead. A flashlight that dims after 5 minutes will ruin your shot. Use rechargeable batteries, or bring extras. Some photographers use power banks with USB-powered LED strips to keep the light steady for minutes at a time. Test your gear before the shoot.
Next Steps
Start tonight. Find a dark spot. Set your camera on a tripod. Use a 10-second exposure. Turn on a flashlight. Draw a circle. Take the shot. Look at it. Then try again. Do it five times. Each time, change something-speed, color, path. You’ll learn more in 10 minutes than you would reading a tutorial for an hour.Light painting isn’t about getting it right. It’s about seeing what happens when you play with time. And once you do, you’ll never look at a photograph the same way again.