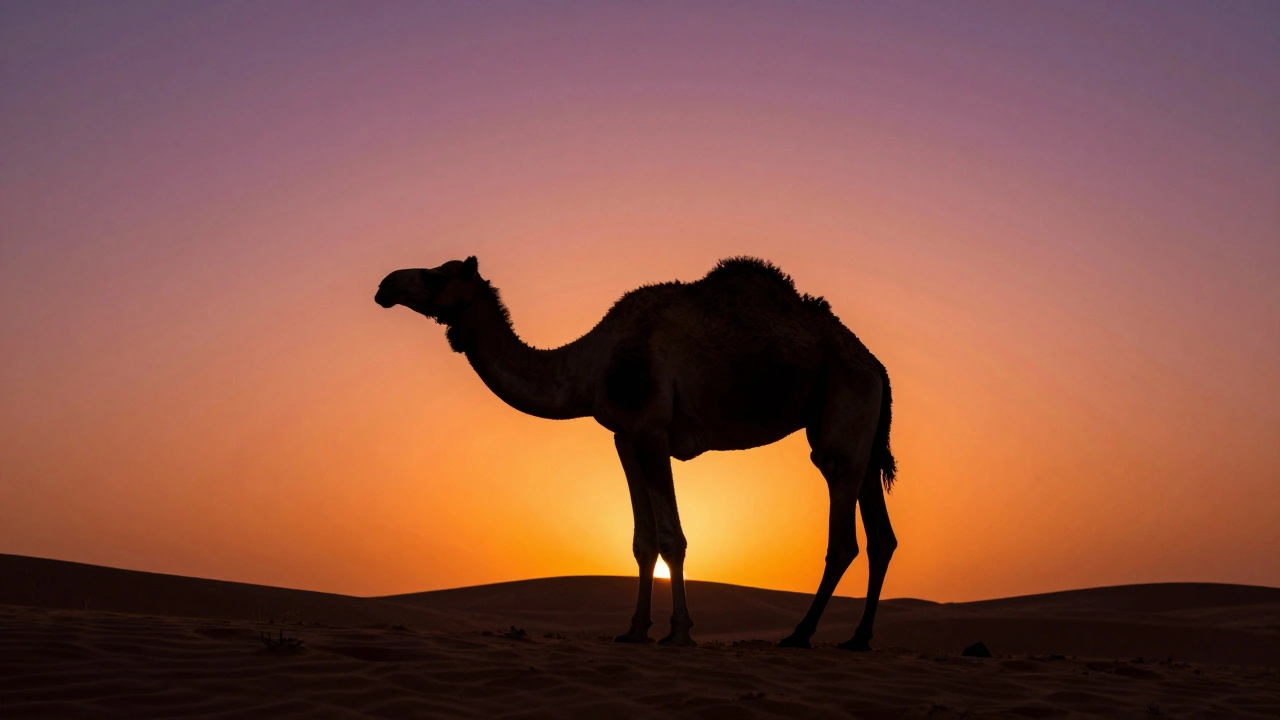
Most photographers fight hard to keep their subjects bright and detailed. Silhouette lighting does the exact opposite. It turns your subject into a dark, graphic shape against a luminous backdrop. The secret isn't magic-it's metering. You have to expose for the background glow, not the person or object in front of it.
This technique strips away texture, color, and detail from the foreground, leaving only the outline. When done right, it creates images that are bold, mysterious, and instantly recognizable. Whether you are shooting a sunset on the street or a single strobe in a small studio, the core principle remains the same: let the background shine and let the subject fall into shadow.
The Core Principle: Exposing for the Background
To create a true silhouette, you need high contrast between your subject and what is behind them. In technical terms, this means the background should be significantly brighter than the subject-usually by at least two to three stops of light. If your camera’s meter says the sky needs an exposure of 1/500s at f/8, ISO 100, you set your camera to those exact settings. You do not adjust for the person standing in front of the sun.
If you use automatic modes, your camera will try to help you. It detects faces and lifts the shadows to make sure the subject is visible. This destroys the silhouette effect. To stop this, switch to Manual mode or Aperture Priority with negative exposure compensation. A good rule of thumb is to dial in -1 to -3 EV (Exposure Value) from what your camera suggests. Check your histogram. You want the highlights (the right side of the graph) to be full but not clipped, while the shadows (the left side) crash down near zero.
Natural Light: Timing and Positioning
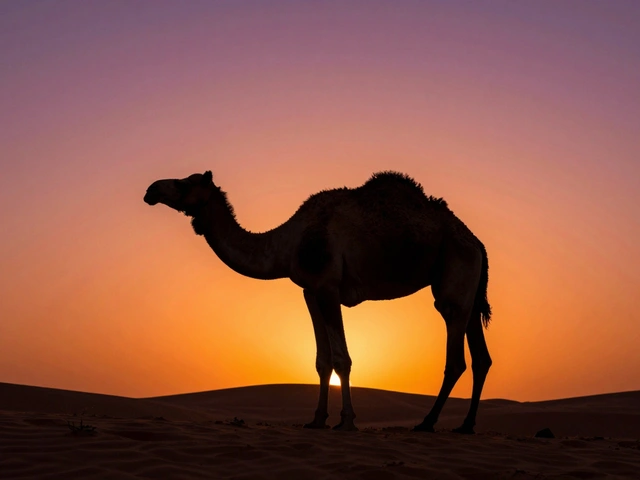
Shooting silhouettes outdoors relies heavily on timing. The best windows are during the "golden hour," roughly 60 minutes after sunrise or before sunset. During these times, the sun is low on the horizon, providing a strong, directional light source that creates long shadows and vibrant colors in the sky.
In mid-latitudes, winter offers unique opportunities. Because the sun stays lower in the sky throughout the day from November to February, you get stronger contrast for longer periods. Look for scenes where the subject is clearly separated from the background. A lone tree on a ridge, a bird on a bare branch, or a person walking across a sunlit field works well. Avoid cluttered backgrounds like tangled branches or busy city streets unless the chaos adds to the composition.
- Position the subject: Place your subject directly between you and the light source.
- Ensure separation: Make sure there is no physical connection between the subject and the background so they don't merge visually.
- Meter the sky: Point your spot meter at the brightest part of the sky and lock that exposure.
- Check the shape: Step back and look at the LCD screen. Does the outline read clearly? Is the nose distinct from the cheek?
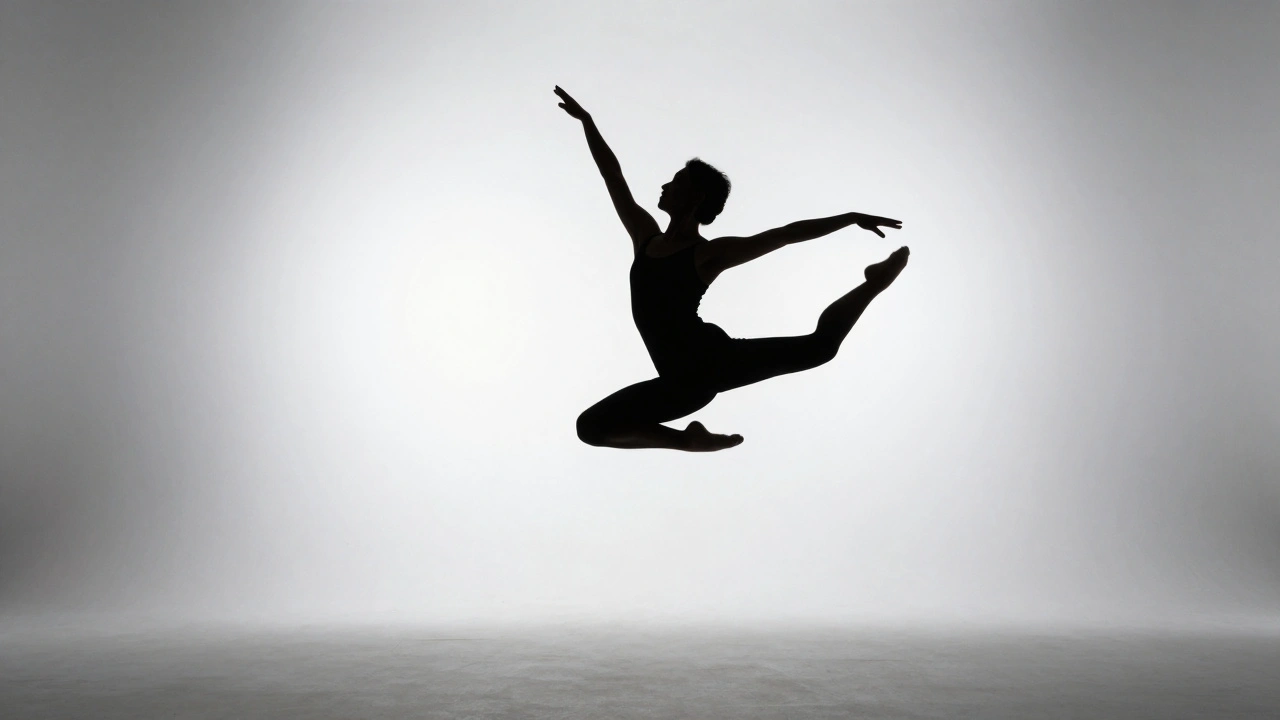
Studio Setup: Creating Artificial Glow
You don’t need a big budget to shoot silhouettes indoors. In fact, some of the cleanest examples come from simple one-light setups. Photographer Lindsay Adler demonstrates that you can achieve professional results with just one strobe and a white V-Flat or softbox.
| Component | Budget Option | Pro Option |
|---|---|---|
| Light Source | Manual Speedlight (~$80-$120) | Profoto D2 Strobe (~$1,995) |
| Background Modifier | White Seamless Paper (~$40) | V-Flats (~$200/pair) |
| Stand | Basic Light Stand (~$30-$60) | Heavy Duty Boom Stand (~$150+) |
For the setup, place your light source behind the subject, pointing directly at the background material. If you are using a V-Flat, position it about 1 to 2 meters behind the subject. Turn up the power until the V-Flat looks bright and even. Your camera settings might look something like f/8, ISO 100, and 1/200s. The key is that the subject receives almost no light from the front. They block the light, creating a sharp edge.
A common mistake in studio work is lens flare. If the light hits your lens directly, it washes out the image and kills the contrast. To prevent this, ensure the subject’s body blocks the center of the light source. You can also angle the camera slightly so the brightest part of the background is hidden behind the subject’s head or shoulders. Adding a second layer of diffusion fabric inside your softbox can also soften the glare without losing intensity.
Composition: Making the Shape Read
When you remove color and texture, the shape becomes everything. A messy silhouette looks like a blob. A clear silhouette tells a story. Pay attention to the pose. If you are photographing a person, ask them to spread their arms, turn their profile to the side, or lift a leg. These actions create negative space within the black shape, making it easier for the eye to understand the gesture.
Even small adjustments matter. Tilting a subject’s head by just 5 to 10 degrees can separate the nose from the cheek line. Without this separation, the face can look flat and indistinct. In wildlife photography, waiting for the animal to lift its head or stretch provides that crucial definition. Always look for clean edges against the glowing background.

Post-Processing: Crushing the Shadows
Sometimes the in-camera exposure isn’t perfect. Maybe the subject still has too much detail, or the background isn’t glowing enough. Shooting in RAW format gives you the flexibility to fix this in post-processing. Programs like Adobe Lightroom allow you to manipulate shadows and blacks independently.
To strengthen a weak silhouette, follow this workflow:
- Increase Contrast: Boost global contrast to deepen the difference between light and dark.
- Lower Shadows: Drag the Shadows slider down significantly (e.g., -60).
- Crush Blacks: Lower the Blacks slider (e.g., -40) to ensure the darkest parts of the subject become pure black.
- Protect Highlights: Use the Highlight recovery tool if the background started to clip, ensuring the "glow" remains smooth rather than blown out.
This process transforms a standard backlit photo into a striking graphic image. Just remember that you cannot recover detail that wasn’t captured in the first place, so getting the exposure right in-camera is still the most important step.
Common Mistakes to Avoid
New shooters often struggle because their cameras are fighting them. Auto-exposure algorithms are designed to produce balanced images, which is the enemy of silhouettes. Another frequent error is choosing a background that is too similar in tone to the subject. An overcast white sky behind a pale building won’t provide enough contrast for a clear silhouette.
Lens flare is another silent killer. If you see rainbow artifacts or a haze over your image, move your position or use a lens hood. Finally, don’t ignore the foreground. Even though the subject is dark, the ground or surface they stand on should ideally blend into the darkness or be unobtrusive. A bright floor can distract from the main shape.
What camera mode is best for silhouette photography?
Manual mode is the most reliable because it prevents the camera from adjusting exposure based on the subject. Alternatively, use Aperture Priority with negative exposure compensation (-1 to -3 EV) to force the background to be brighter than the subject.
How do I stop my camera from brightening the subject?
Use spot metering on the bright background instead of the subject. If your camera has face detection, try to disable it or meter outside the detected area. Manually lowering the exposure ensures the subject remains underexposed.
Can I take silhouette photos with a smartphone?
Yes. Tap on the brightest part of the background (like the sky) to set the focus and exposure, then drag the sun icon down to darken the image. This overrides the phone’s HDR processing and allows for a darker foreground.
Why is my silhouette blurry or hazy?
This is likely caused by lens flare. Light hitting the front element of your lens scatters and reduces contrast. Move your camera angle slightly so the subject blocks more of the direct light, or use a lens hood.
Do I need expensive studio lights for indoor silhouettes?
No. A single speedlight or even a continuous LED panel aimed at a white wall or sheet of paper can create a perfect background glow. The key is the ratio of light between the background and the subject, not the wattage of the bulb.