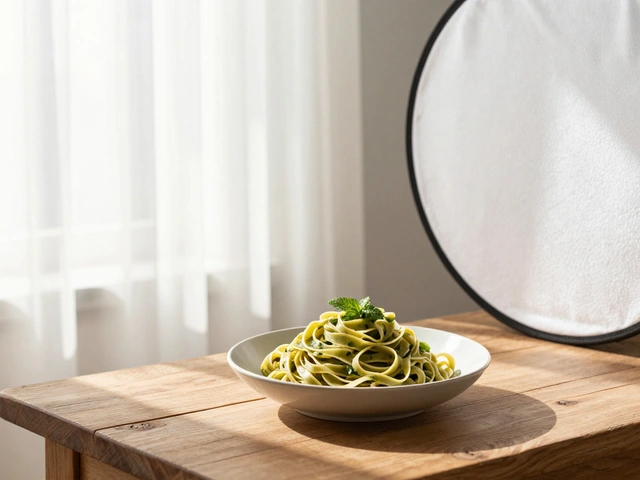
Ever stared at a perfectly styled bowl of pasta, only to have the final photo look flat, muddy, or strangely lit? You aren't alone. The biggest variable in food photography isn't your camera lens or your plating skills-it's the light hitting the plate. For years, there was an unspoken rule in the industry: use natural window light if you want your food to look appetizing and authentic, and avoid flash unless you are shooting high-end commercial ads. But that rule is changing.
In 2026, the line between "natural" and "artificial" has blurred significantly. Modern strobes can mimic the softness of a cloudy day, while smart LED panels offer consistency without the harshness of old-school speedlights. So, which one should you actually use? The answer depends entirely on what you are trying to achieve, where you are shooting, and how much control you need over the final image.
The Case for Natural Light: Soft, Organic, and Free
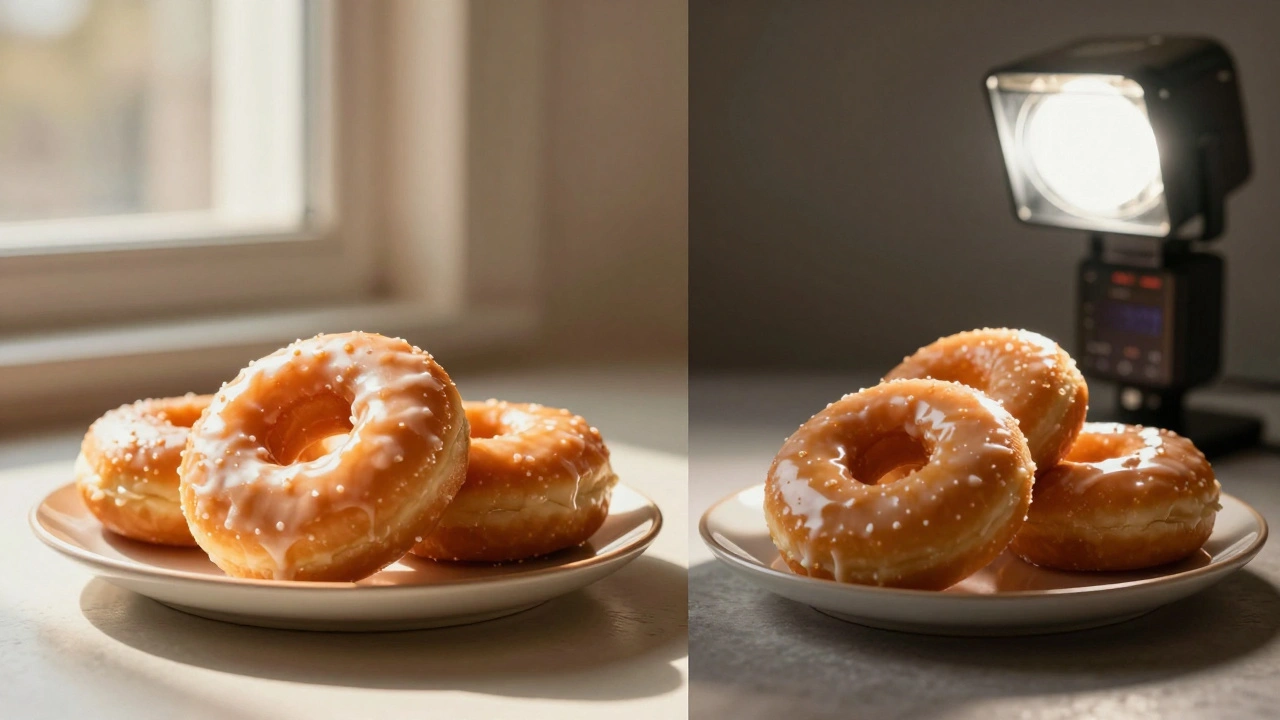
When we talk about natural light in this context, we usually mean sunlight streaming through a window. It is the default choice for home cooks, bloggers, and lifestyle editors because it feels familiar. Our brains associate daylight with freshness. A salad shot in bright morning sun looks crisp; a stew photographed in the warm glow of late afternoon feels comforting.
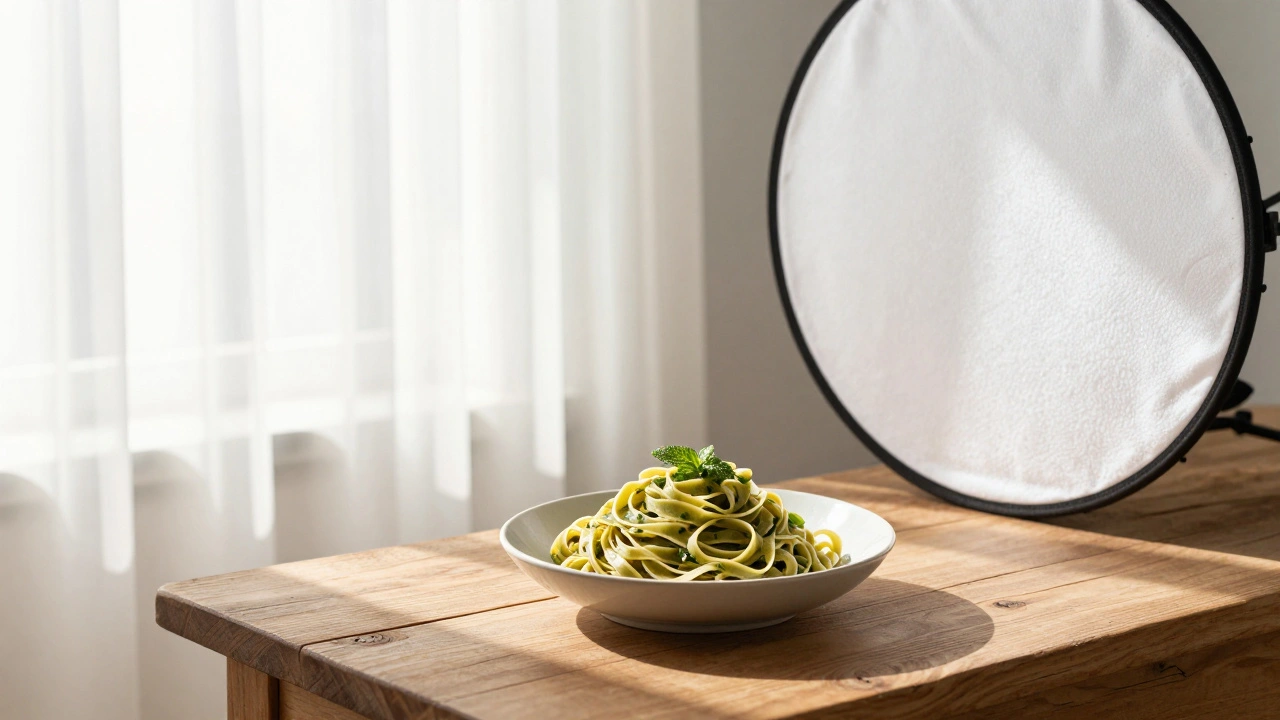
The primary advantage here is cost and accessibility. You don't need to buy expensive gear. All you really need is a window, a piece of white foam board (to bounce light back into shadows), and maybe a sheer curtain or diffusion fabric to soften harsh midday beams. This setup creates what photographers call "soft light." Soft light wraps around the subject, creating gentle gradients rather than hard, distracting shadows. It makes textures-like the crust of bread or the glaze on a donut-look inviting rather than stark.
However, natural light comes with a major catch: it is uncontrollable. If clouds roll in, your exposure changes. If the sun moves behind a building, your scene goes dark. As professional food photographer Regan Baroni points out, natural light means your source is the sun, and the sun does not care about your deadline. You have to adapt your shoot to the weather and time of day. This makes it less ideal for strict commercial deadlines but perfect for creative exploration.
The Power of Flash: Precision and Consistency
Flash photography, specifically using off-camera strobes or speedlights, offers something natural light cannot: total control. With flash, you decide the direction, intensity, color temperature, and quality of the light. You can shoot at noon on a sunny day or at midnight in a windowless studio, and the light on your burger will look exactly the same.
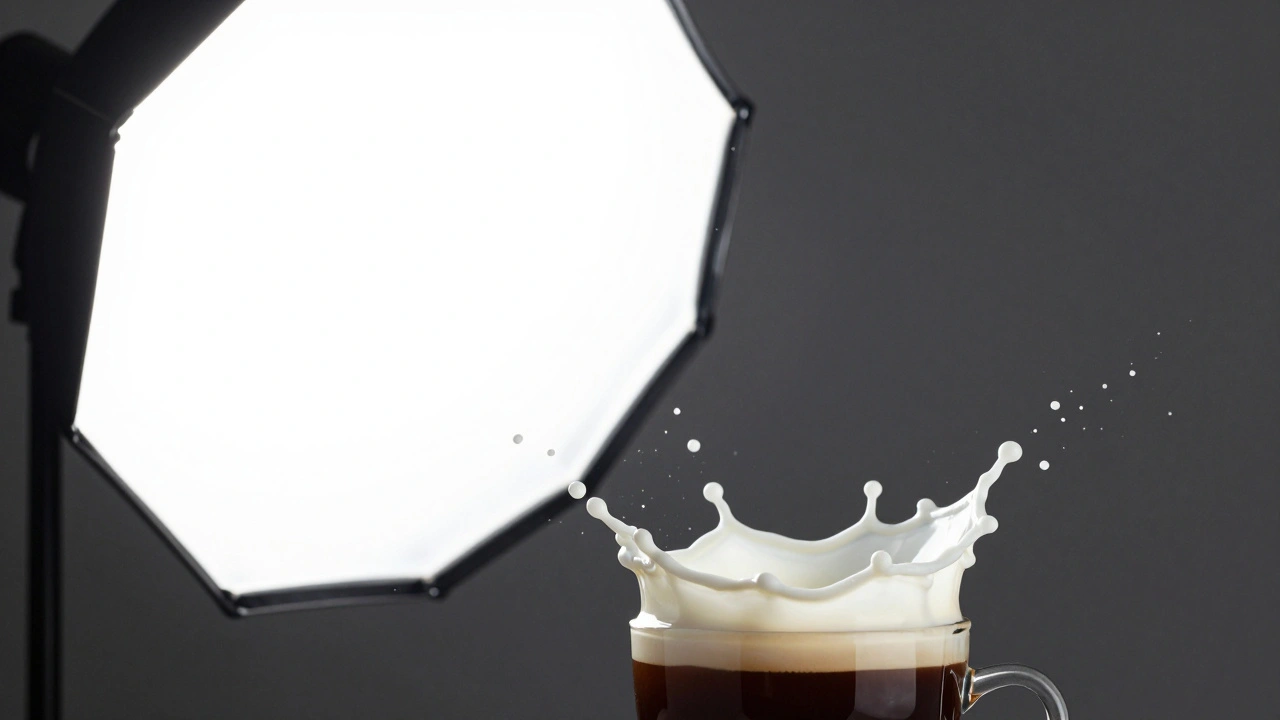
This consistency is why agencies and brands love flash. If a client needs ten images of their new snack bar for a social media campaign, they expect those images to match perfectly. Natural light might shift slightly between shots as clouds pass, causing subtle color variations. Flash eliminates that risk. Furthermore, modern flash units are incredibly powerful. They allow you to freeze motion-think of milk splashing into coffee or flour dusting off a rolling pin-at shutter speeds that would otherwise result in blur.
There is a myth that flash always looks "harsh" or "fake." That was true in the era of on-camera pop-up flashes. Today, when paired with large modifiers like softboxes or umbrellas, flash can replicate the look of natural window light almost indistinguishably. The key is diffusion. By spreading the light source over a larger area, you create those same soft, romantic shadows associated with daylight.
Visual Qualities: What Does Each Look Like?
To choose the right tool, you need to understand the visual language each light source speaks.
Natural light tends to produce images that feel organic, airy, and sometimes romantic. On an overcast day, north-facing windows provide large, diffused sources of light that are low-contrast and flattering for most foods. However, direct sunlight can be tricky. It creates strong, directional shadows and high contrast, which can make some foods look overly dramatic or hide details in the darker areas. The color temperature also shifts throughout the day, ranging from cool blue tones (around 6000-7000 Kelvin) in open shade to warm golden hues (3000-4000 Kelvin) during sunrise and sunset.
Flash, on the other hand, allows you to sculpt the subject. Without large diffusion, flash can create sharp, defined highlights and deep shadows, giving food a three-dimensional, editorial look. This style works well for high-end restaurant menus or product packaging where clarity and impact are paramount. Because flash duration is extremely short (often between 1/1000th and 1/8000th of a second), it freezes movement instantly. This is crucial for action shots, such as pouring syrup or cracking an egg, where even a slight shake would ruin the image.
Technical Considerations: CRI and Color Accuracy
If you decide to move away from the sun, you must pay attention to technical specifications, particularly Color Rendering Index (CRI). CRI measures how accurately a light source reveals the true colors of objects compared to natural sunlight. A CRI of 100 is perfect daylight. For food photography, experts recommend lights with a CRI of 90 or higher. Lower-quality lights can shift colors, making red meat look brown or greens look dull, which kills appetite appeal.
Power matters too. While small speedlights work for close-ups, professional setups often use studio strobes with at least 200 watts of power. This ensures enough brightness to fill a scene, especially when using large modifiers that spread the light out. Additionally, look for bi-color capabilities, allowing you to adjust the light from cooler (blue) to warmer (yellow) to match ambient conditions or stylistic goals. Most pro-grade lights use a Bowens mount, a standard connector that lets you swap between various softboxes, reflectors, and snoots easily.
| Feature | Natural Light (Window) | Artificial Flash/Strobe |
|---|---|---|
| Cost | Free (plus basic modifiers) | High ($100 - $1000+ for gear) |
| Consistency | Low (changes with weather/time) | High (repeatable every time) |
| Learning Curve | Low (intuitive) | Medium/High (requires technique) |
| Motion Freezing | Poor (requires fast shutter/low ISO) | Excellent (freezes splash/pour) |
| Best For | Blogs, cookbooks, lifestyle edits | Commercial ads, restaurants, night shoots |
| Setup Time | Fast (minutes) | Slower (setup/teardown takes time) |
When to Choose Natural Light
You should stick with natural light if you are just starting out. It is the best teacher. By observing how light changes hour by hour, you learn how shadows fall and how texture is revealed. Two Loves Studio recommends setting an hourly alarm and walking through your home to see how different rooms change throughout the day. This builds intuition that no manual can teach.
Natural light is also superior for certain types of subjects. Highly reflective surfaces, like glossy sauces, metallic cutlery, or glassware, often look better under the broad, soft source of a window. Small flash heads can create multiple, distracting specular reflections (bright white spots) on these surfaces, whereas a large window provides a single, pleasing highlight. Additionally, if you are shooting in a home kitchen or dining room during the day, fighting against existing ambient light with flash can be complicated. Embracing the available light keeps the process simple and efficient.
When to Choose Flash
Switch to flash when you need reliability. If you are shooting for a client who demands consistent branding across dozens of images, natural light is a liability. Cloud cover can ruin a whole day's work. Flash ensures that Image #1 and Image #50 look identical in tone and exposure.
Flash is also essential for low-light environments. Restaurants rarely have ideal lighting; they are often dimly lit with mixed color temperatures (warm tungsten bulbs mixed with cool neon signs). Trying to balance your camera settings for this mess is frustrating. Instead, professionals use flash as the "key light" to overpower the ambient noise, while perhaps using a bit of window light as "fill" to maintain dimension. This technique, used by photographers like Jonathan Thompson, allows for clean, professional results regardless of the venue's interior design.
Finally, choose flash for action. If your brief involves pouring liquids, sprinkling spices, or breaking cookies, flash is non-negotiable. Its short burst duration freezes motion that natural light would blur, even at high shutter speeds.
Hybrid Approaches: Getting the Best of Both Worlds
You don't have to pick just one side. Many modern food photographers use a hybrid approach. For example, you might use a strobe as your main light source to control the shape and intensity, but leave a window open to provide subtle fill light. This adds depth and prevents the image from looking too sterile or "studio-like."
Another trend is the rise of high-power continuous LED lights. These stay on constantly, allowing you to see exactly how shadows fall before you take the shot. This bridges the gap between the intuitiveness of natural light and the control of artificial light. While not technically "flash," LEDs are becoming a popular alternative for beginners who find strobes intimidating but need more power than a window provides.
Practical Tips for Beginners
- Start with Side Lighting: Whether using a window or a flash, place your light source to the side of the food, not directly in front. This creates shadows that reveal texture and volume.
- Use Diffusion: Harsh light is rarely appetizing. Use a sheer curtain for windows or a softbox for flash to soften the light.
- Add Fill Light: Shadows can get too dark. Use a white foam board or a reflector opposite your light source to bounce light back into the shadows.
- Watch Your White Balance: Natural light changes color temperature throughout the day. Set your white balance manually or shoot in RAW to correct it later. With flash, ensure your light matches the desired mood (warm for comfort, cool for freshness).
- Practice Blocking Light: Sometimes you have too much light. Use black foam boards (flags) to block unwanted light from spilling onto parts of the scene you want to keep dark.
Conclusion: It’s About Intent, Not Dogma
The debate between natural light and flash is not about which is objectively better. It is about which tool solves your specific problem. If you value spontaneity, low cost, and organic aesthetics, natural light is your friend. If you demand precision, consistency, and the ability to shoot anytime, anywhere, flash is indispensable.
As technology advances, the barriers to entry for artificial lighting are dropping. High-CRI, affordable strobes and LEDs are making it easier than ever to achieve professional results. Don't be afraid to experiment. Try shooting the same dish with window light in the morning and then again with a strobe in the evening. Compare the results. Over time, you will develop a personal style that leverages the strengths of both worlds.
Is natural light always better for food photography?
No. While natural light is great for organic, lifestyle images, it lacks consistency and control. For commercial work, low-light environments, or freezing motion, flash is often superior. The "best" light depends on your specific project goals.
What is the best type of window for food photography?
North-facing windows are traditionally preferred because they provide consistent, indirect light throughout the day without harsh direct sunlight. South-facing windows can be used but require diffusion (like curtains) to soften the intense midday sun.
Do I need expensive flash gear to start?
You don't need top-tier studio strobes immediately. A single speedlight (hot-shoe flash) with a small diffuser dome or umbrella can be a great starting point. Focus on learning light direction and modification before investing in high-powered systems.
Can flash look like natural light?
Yes. By using large modifiers like softboxes or umbrellas and positioning the flash at the same angle and distance as a window, you can replicate the soft, directional qualities of natural light almost perfectly.
What is CRI and why does it matter for food?
CRI (Color Rendering Index) measures how accurately a light source shows true colors. For food, a CRI of 90 or higher is recommended to ensure ingredients look vibrant and appetizing, rather than dull or discolored.