Ever look at a photo you took and feel like something is just... off? Maybe the subject is dead center and the image feels static, or perhaps the eye just wanders around the frame without knowing where to land. Most of the time, the difference between a snapshot and a piece of art isn't the gear or the lighting-it's the composition. composition exercises are the fastest way to move from guessing where things should go to intentionally directing your viewer's gaze.
The goal isn't to follow a set of rigid laws, but to understand how the human eye perceives space. When you master the interplay of grids, lines, and weight, you stop taking pictures and start building images. Here is how to break down these concepts into practical drills you can actually use.
The Rule of Thirds: Beyond the Grid
Most cameras and smartphones have a grid overlay for a reason. The Rule of Thirds is a compositional guideline that divides an image into nine equal parts using two horizontal and two vertical lines. The magic happens at the four points where these lines intersect, often called "power points."
Why does this work? Centering a subject often feels like a target-it's direct, but it's also a bit boring. By placing your focal point on a third, you create an asymmetrical balance that feels more natural and dynamic. It gives the subject room to "breathe" and suggests a relationship between the subject and its environment.
For landscapes, the horizon is your biggest lever. If you place the horizon on the bottom third line, you emphasize a dramatic sky. If you push it to the top third, you bring the viewer's attention down to the textures of the earth or water in the foreground. It's a simple shift that completely changes the mood of the scene.
Using Lines to Guide the Eye
If the Rule of Thirds is about where to put things, Leading Lines are about how to get the viewer there. These are linear elements within a scene-like a road, a fence, or a shoreline-that act as visual pathways.
Lines aren't just straight edges. A curved path (an S-curve) creates a slower, more graceful movement through the image, while sharp diagonals create tension and energy. When you combine leading lines with the Rule of Thirds, you create a powerful one-two punch: the line pulls the eye into the frame, and the power point holds the attention.
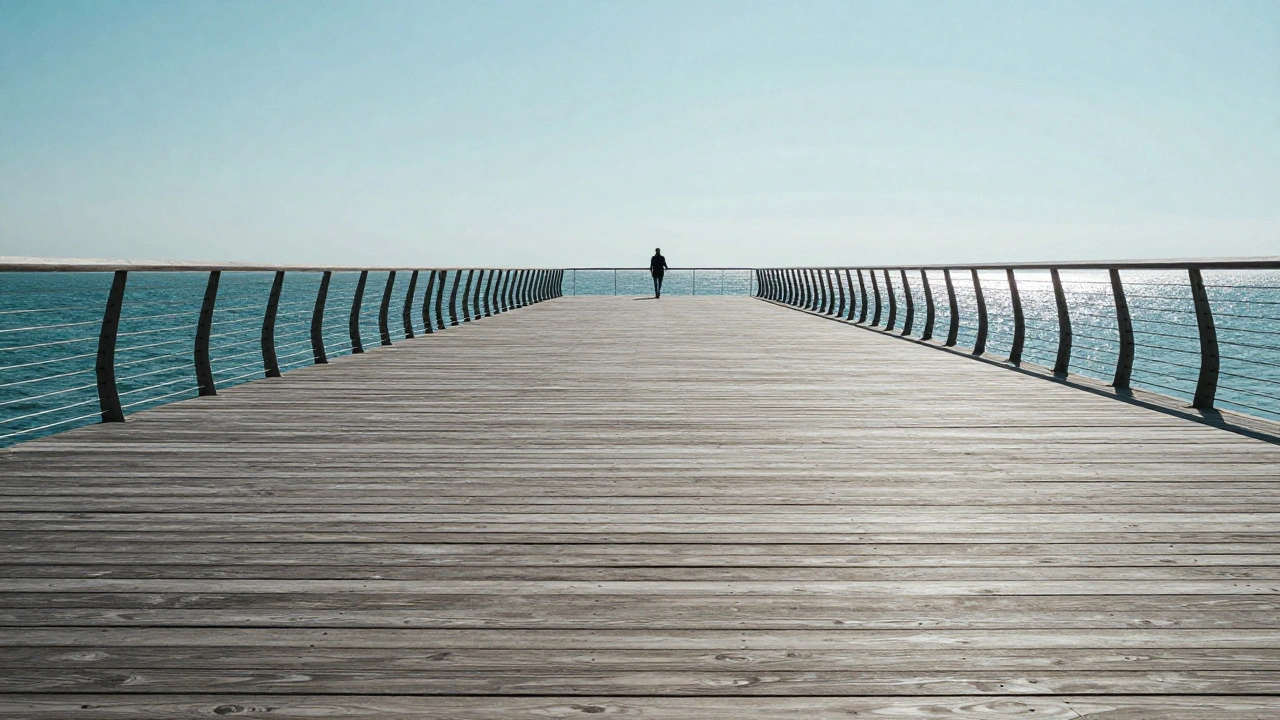
Think about a shot of a pier. The wooden planks of the pier act as leading lines that converge toward the horizon. If you place a person standing at the end of that pier on one of the vertical third lines, you've created a professional, balanced composition that feels inevitable rather than accidental.
The Art of Visual Balance and Space
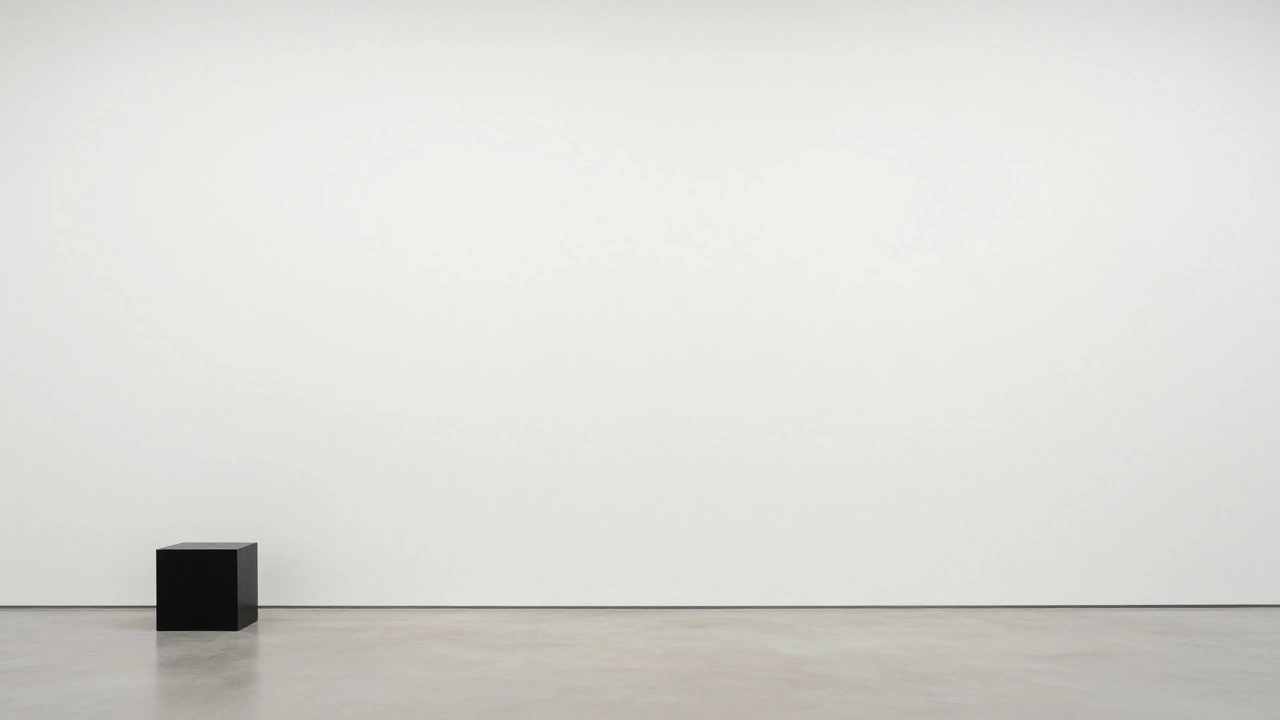
Balance isn't always about symmetry. In fact, too much symmetry can make an image feel stiff. Instead, think about Visual Weight, which is the perceived heaviness of an object based on its size, color, contrast, or detail.
A large, dark object on one side of the frame creates a lot of visual weight. To balance this, you don't necessarily need another large object on the opposite side. You can balance a "heavy" subject with Negative Space-the empty areas around your subject. A tiny subject surrounded by a vast amount of negative space can evoke feelings of loneliness, scale, or peace.
| Element | Primary Function | Emotional Effect | Best Use Case |
|---|---|---|---|
| Rule of Thirds | Placement | Harmony & Interest | Portraits, Landscapes |
| Leading Lines | Direction | Movement & Depth | Architecture, Roads |
| Negative Space | Contrast | Minimalism & Isolation | Fine Art, Product shots |
Practical Exercises to Build Your Eye
Reading about composition is one thing; training your brain to see it is another. The key is to isolate these variables. If you try to master thirds, lines, and balance all in one shot, you'll likely ignore all of them. Try these targeted drills:
- The Single-Rule Sprint: Set a timer for 30 minutes. During this window, you are only allowed to take photos that strictly adhere to the Rule of Thirds. Ignore everything else. This forces you to scan your environment specifically for grid-aligned opportunities.
- The 10-Angle Challenge: Pick one boring object-a coffee mug, a fire hydrant, a chair. Take 10 different photos of it. Change your height, your distance, and your angle. This breaks the habit of shooting from eye level and helps you find hidden leading lines.
- The Frame-in-Frame Hunt: Look for natural borders-overhanging branches, a doorway, or a gap in a fence. Use these to create a secondary frame around your subject. This adds an immediate sense of depth and layers to the image.
- The Weight Shift: Take a photo with a subject dead center. Now, move the subject to the far left third and fill the right two-thirds with negative space. Note how the "story" of the photo changes from a simple portrait to a study of environment.
Knowing When to Break the Rules
Once you've spent enough time with the grid, you'll realize it's a guideline, not a law. There are moments where breaking the rule is the only way to get the shot right. Centering a subject can be incredibly powerful when you want to emphasize absolute symmetry, such as in a reflection in a still lake or the facade of a grand building.
The goal of these exercises is to move from conscious effort to intuitive execution. You want to reach a point where you don't see the grid lines in your mind, but you feel the balance of the frame. When you intentionally break a rule, you do it because the symmetry or the tension serves the story better than the grid would.
Does the Rule of Thirds work for every type of photo?
It works for the vast majority of images, but not all. For example, in high-fashion photography or architectural shots, perfect symmetry (centering the subject) is often used to create a sense of formality or power. The rule is a great starting point, but the subject's needs should always come first.
How do I find leading lines if I'm in a flat area?
Look for "implied" lines. This could be a row of plants, the edge of a shadow, or even the direction a person is looking. Your eye will naturally follow these paths even if there isn't a physical line like a road or a rail.
What is the difference between positive and negative space?
Positive space is the actual subject of your photo-the person, the tree, the building. Negative space is everything else-the sky, a blank wall, or a blurred background. Balance is achieved by managing the ratio between the two so the image doesn't feel too cluttered or too empty.
Can I use the Rule of Thirds in digital art or painting?
Absolutely. These principles are rooted in visual perception, not just camera technology. Whether you're painting a canvas or designing a website layout, placing your focal point on a third helps the viewer navigate the piece more naturally.
How often should I do these exercises?
The best approach is to pick one exercise per week. For example, spend all of Monday practicing leading lines. By focusing on one element for a few days, you build the "muscle memory" required to see these patterns in the real world without thinking about it.
Next Steps for Your Growth
If you've mastered the basics, start experimenting with visual hierarchy. Try to arrange three different objects in one frame, each with a different visual weight, and see how you can lead the eye from the most important to the least important element. If you find yourself struggling with balance, try converting your photos to black and white; this removes the distraction of color and lets you see the pure shapes, lines, and weights of your composition.