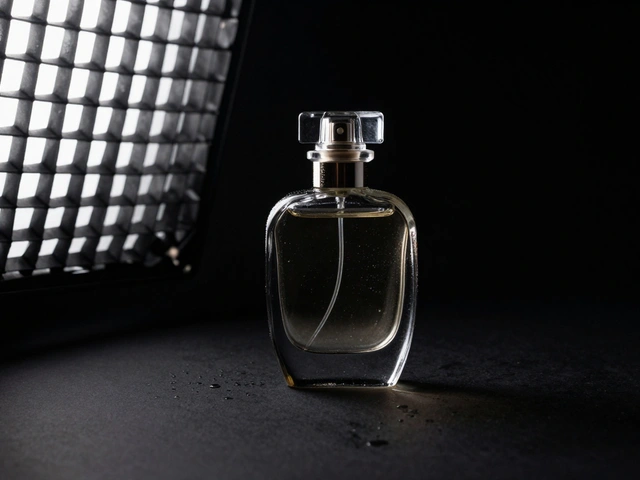
There is a specific reason why your favorite perfume brand or high-end watchmaker doesn’t just put their product on a white background. White backgrounds scream "utility." They tell you what the item looks like, but they don’t tell you how it feels. When you want to sell exclusivity, mystery, and premium quality, you need shadows. You need low-key product photography, which is a dramatic lighting style characterized by high contrast, deep shadows, and predominantly dark tones used to create mood and a premium brand aesthetic. This technique turns a simple object into a character in a story, guiding the viewer’s eye exactly where you want it-usually right onto the logo or the most intricate detail of the craftsmanship.
If you’ve ever looked at a campaign for Rolex or Dior, you’ve seen this. The frame is mostly black. The product glows from within. It’s not an accident; it’s a calculated visual language rooted in centuries of art history. In this guide, we’ll break down how to achieve that look, whether you’re shooting a glass bottle, a metallic watch, or a textured leather bag.
The Psychology of Darkness in Luxury Branding
Before we touch a light stand, let’s talk about why low-key works so well for luxury. Human brains associate darkness with scarcity and value. Think about where we find precious things: deep oceans, night skies, secure vaults. Brightness is associated with accessibility and mass production. By using low-key lighting, you are subconsciously signaling to the consumer that this product is rare, expensive, and serious.
This style relies on chiaroscuro, a term derived from Italian meaning 'light-dark,' referring to the strong contrast between light and shadow to model three-dimensional forms. Artists like Caravaggio used this in the 16th century to create emotional intensity. Modern advertising borrowed this from film noir in the 1940s, where shadows hid secrets and added tension. Today, brands use it to hide clutter and focus attention. If you sell a $5 kitchen gadget, you need bright, clear images. If you sell a $500 mechanical watch, you need drama. Low-key photography creates a "premium code" that justifies higher price points by making the product feel exclusive rather than utilitarian.
Essential Gear for Low-Key Setups
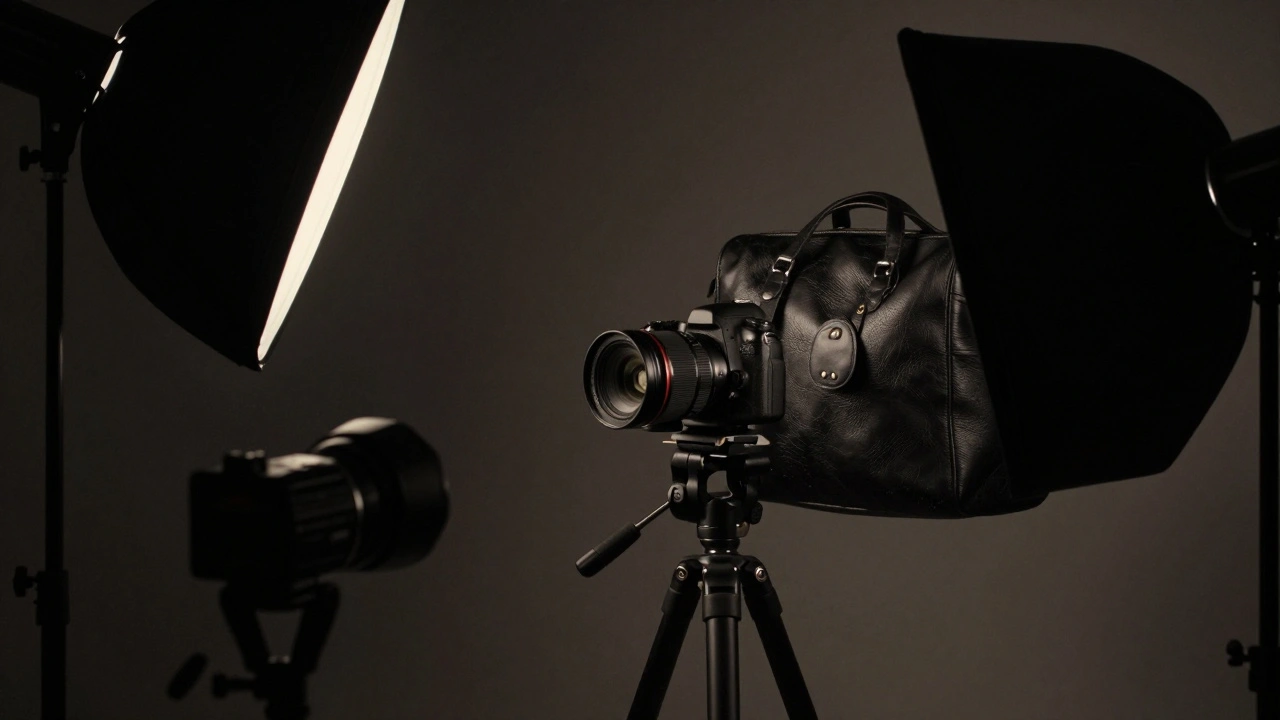
You don’t need a million-dollar studio to get started. However, you do need control. Low-key photography is less about adding light and more about subtracting it. Here is the core toolkit you’ll need:
- Camera: Any DSLR or mirrorless camera that allows full manual exposure. You need to lock in ISO, aperture, and shutter speed.
- Lens: A macro lens (like a 100mm f/2.8) is ideal for small products because it lets you get close without distorting the shape. A prime lens with a wide aperture helps isolate the subject further.
- Light Source: At least one speedlight or studio strobe. Power ranges from 60Ws to 600Ws are common. Continuous LED lights work too, especially if you have a Color Rendering Index (CRI) of 95+ for accurate color representation.
- Modifiers: Strip softboxes are your best friend. They create long, thin highlights perfect for outlining curves. Honeycomb grids attach to these modifiers to narrow the beam of light, preventing spill onto the background.
- Negative Fill: Black foam core boards. These are crucial. They absorb stray light and deepen shadows, giving you control over the contrast ratio.
- Background: Black seamless paper, black velvet, or matte black acrylic. Avoid glossy black surfaces unless you specifically want reflections, as they can pick up unwanted glare from the room.
A note on budget: You can build a capable kit for under $500. A used speedlight might cost $100, a strip softbox $50, and foam core boards a few dollars each. The rest is creativity.
Setting the Stage: Camera Settings and Exposure
The biggest mistake beginners make is trying to fix darkness in post-production. You cannot pull detail out of pure black noise. You must expose correctly in-camera. The goal is to keep your histogram concentrated in the lower 0-30% luminance range, with only small spikes in the highlights.
Start by turning off all ambient lights in your room. Close the curtains. Your environment should be pitch black. Then, set your camera to manual mode:
- ISO: Set to base ISO (usually 100). This ensures the cleanest image with the least amount of digital noise.
- Aperture: Use f/8 to f/11. This gives you enough depth of field to keep the entire product sharp while maintaining good lens performance.
- Shutter Speed: Set to your flash sync speed, typically 1/160s or 1/200s. This prevents ambient light from creeping into the shot.
Take a test shot without any flash. The image should be completely black. If you see gray or details of the room, your shutter speed is too slow or your ISO is too high. Once the canvas is black, you can start painting with light.
Lighting Techniques: Single vs. Multi-Light
You can achieve stunning results with a single light, but multi-light setups offer more control over complex shapes. Let’s look at both approaches.
The One-Light Setup
This is the best way to learn. Place your product on a black surface. Position a single speedlight with a strip softbox to the side, about 30-60 degrees from the camera axis. Aim it so the light grazes the surface of the product. This grazing angle reveals texture-perfect for leather, fabric, or embossed metal.
Use black foam core boards on the opposite side of the light to block any spill. Move the board closer to the product to deepen the shadow. The result is a stark, high-contrast image where the light defines the form and the shadow hides everything else. This is often called "rim lighting" when placed behind the subject, creating a glowing edge that separates the product from the dark background.
The Two-Light Setup
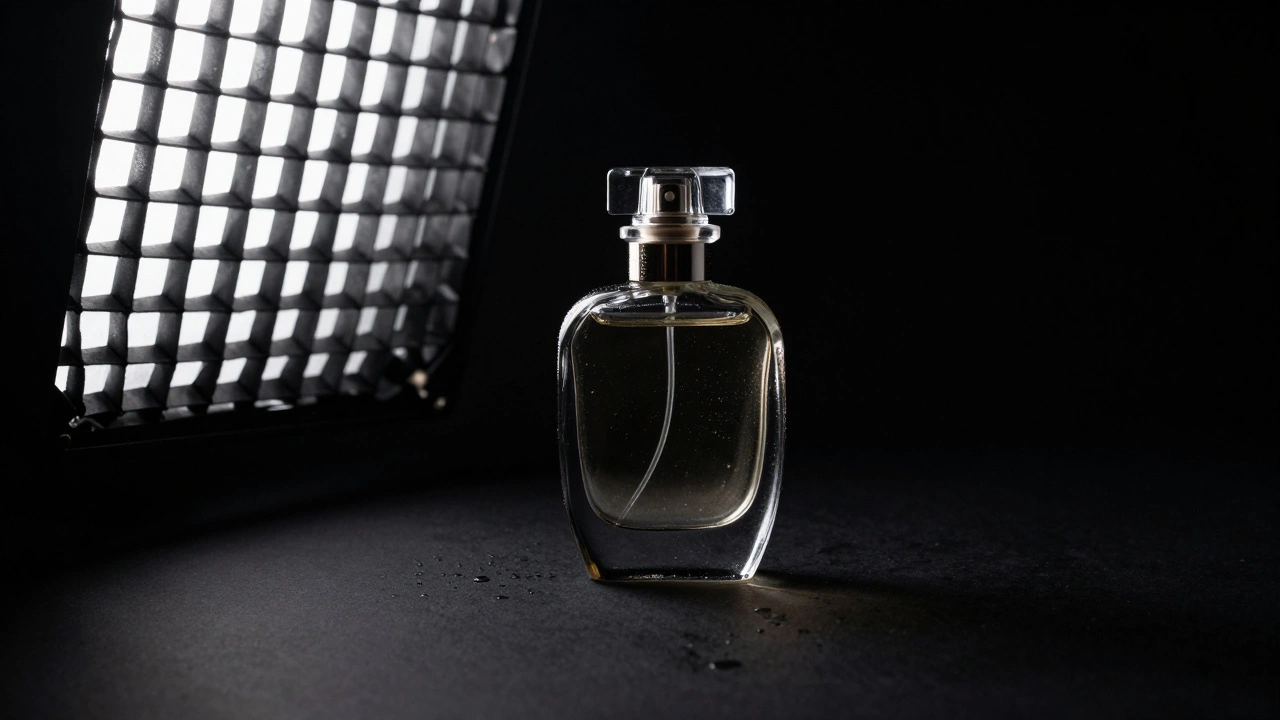
For more complex items like watches or perfume bottles, you may need two lights. The first light acts as the key, providing the main illumination. The second light is usually a rim light or an accent light.
Place the key light slightly above and to the side. Use a grid to keep the light tight. Then, place a second light behind the product, aimed at the edges. This backlight creates a silhouette effect, highlighting the transparency of glass or the polish of metal. You can also use a small optical snoot-a modifier with a tiny hole-to place a pinpoint highlight on a logo or a gemstone. This draws the eye directly to the brand identifier.
| Feature | High-Key | Low-Key |
|---|---|---|
| Background | Bright white (RGB 240-255) | Deep black or dark neutral |
| Contrast | Low to medium | High (ratios of 4:1 to 8:1+) |
| Mood | Cheerful, accessible, clean | Dramatic, mysterious, luxurious |
| Best For | E-commerce listings, cosmetics, food | Luxury watches, jewelry, spirits, tech |
| Shadow Detail | Minimal shadows | Intentional, deep shadows |
Handling Reflective Surfaces
Shooting reflective materials like chrome, glass, or polished metal is the hardest part of low-key photography. These surfaces act like mirrors. If you’re not careful, you’ll see a reflection of your camera, your face, or the studio lights. This breaks the illusion of luxury and looks amateurish.
To solve this, you need to control what the product sees. Use large sheets of black foam core or black velvet around the product. These act as "negative fill," absorbing light and creating smooth, dark reflections. If you want a specific reflection, such as a window-like gradient on a perfume bottle, place a white card or a piece of tracing paper in front of the light source. The product will reflect that white shape instead of the harsh bulb.
Polarizing filters can also help reduce unwanted glare on non-metallic surfaces like glass or plastic. Rotate the filter on your lens until the reflection disappears. For metals, polarizers don’t work, so you must rely entirely on controlling the environment with flags and reflectors.
Post-Processing: Refining the Drama
Your RAW file is just the starting point. Post-processing is where you refine the mood and ensure technical perfection. Open your image in Adobe Lightroom or Capture One.
First, check your blacks. Drag the "Blacks" slider down until the darkest areas hit zero. This removes any gray haze and makes the shadows truly black. Next, increase clarity or texture slightly to enhance the micro-contrast on the product’s surface. This makes leather grain look richer and metal look sharper.
Be careful with highlights. You want them to pop, but not clip. Keep the brightest pixels below 100% brightness to retain detail. If you have dust spots on the black background, use the healing brush to remove them. Dust is very visible against dark backgrounds, so cleanliness is key. Finally, adjust the white balance to ensure the colors of the product are accurate. Gold should look warm, silver cool, and red vibrant. Do not oversaturate; subtlety sells luxury.
Common Pitfalls to Avoid
Even experienced photographers make mistakes when switching to low-key styles. Here are the most common issues:
- Underexposing too much: If your entire image is crushed to black, you lose detail. Ensure your highlights are properly exposed. The shadows should be dark, but not devoid of information if you plan to lift them later.
- Ignoring the background: Wrinkles in black seamless paper are highly visible. Iron your backdrop or use a rigid surface like slate or acrylic.
- Using too many lights: More lights don’t mean better photos. Start with one. Add more only if you need to reveal a specific feature. Complexity often leads to confusion.
- Forgetting negative space: Leave room in the composition for text or logos. Low-key images often serve as hero shots for websites or ads, so empty dark space is valuable real estate.
Can I use natural light for low-key product photography?
It is difficult. Natural light is hard to control and often too diffuse. To get true low-key results, you need to block almost all ambient light. While you can shoot near a window in a darkened room, using artificial strobes or continuous LEDs gives you consistent, repeatable results. Natural light changes throughout the day, making it unreliable for commercial work.
What is the difference between low-key and high-key photography?
High-key photography uses bright, even lighting with minimal shadows, typically on a white background. It feels open, clean, and accessible, ideal for e-commerce listings. Low-key photography uses high contrast, deep shadows, and dark backgrounds to create drama, mystery, and a sense of luxury. High-key shows utility; low-key shows emotion.
How do I prevent unwanted reflections on shiny products?
Use black foam core boards or black velvet to surround the product. These materials absorb light and create dark, smooth reflections. Position yourself carefully to avoid reflecting your camera. For glass, use polarization filters. For metals, control the environment strictly with flags and reflectors to shape the highlights manually.
Is low-key photography suitable for all products?
No. It works best for luxury items like watches, jewelry, perfumes, spirits, and high-end electronics. It is less suitable for budget-friendly goods, food, or products where clarity and visibility of all features are critical, such as tools or household appliances. Marketplaces like Amazon also require white backgrounds for primary listings, so low-key is better for marketing campaigns than basic catalog shots.
What camera settings should I use for low-key photography?
Start with ISO 100, aperture f/8 to f/11, and shutter speed at your flash sync limit (e.g., 1/160s). Ensure the ambient exposure is completely black before firing your flash. This isolates the product and eliminates background distractions. Adjust the power of your flash to expose the highlights correctly while letting the shadows fall naturally.