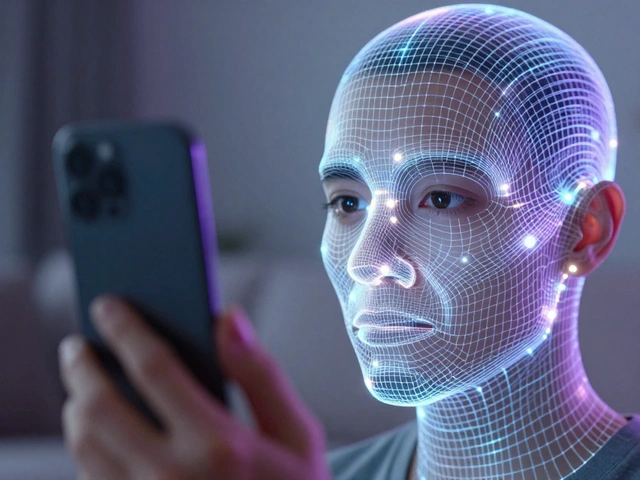
Ever wonder why some people's social media profile pictures look like they were shot in a high-end studio while they're clearly just standing in their living room? It's not magic, and they probably aren't carrying around a set of softboxes and reflectors. They're using Portrait Lighting Effects is a suite of computational photography tools that use machine learning to simulate professional studio lighting on a mobile device. By analyzing the geometry of a face and the existing light in a room, your phone can basically "fake" a professional lighting rig after the photo is already taken.
The Secret Sauce: How Your Phone Fakes the Light
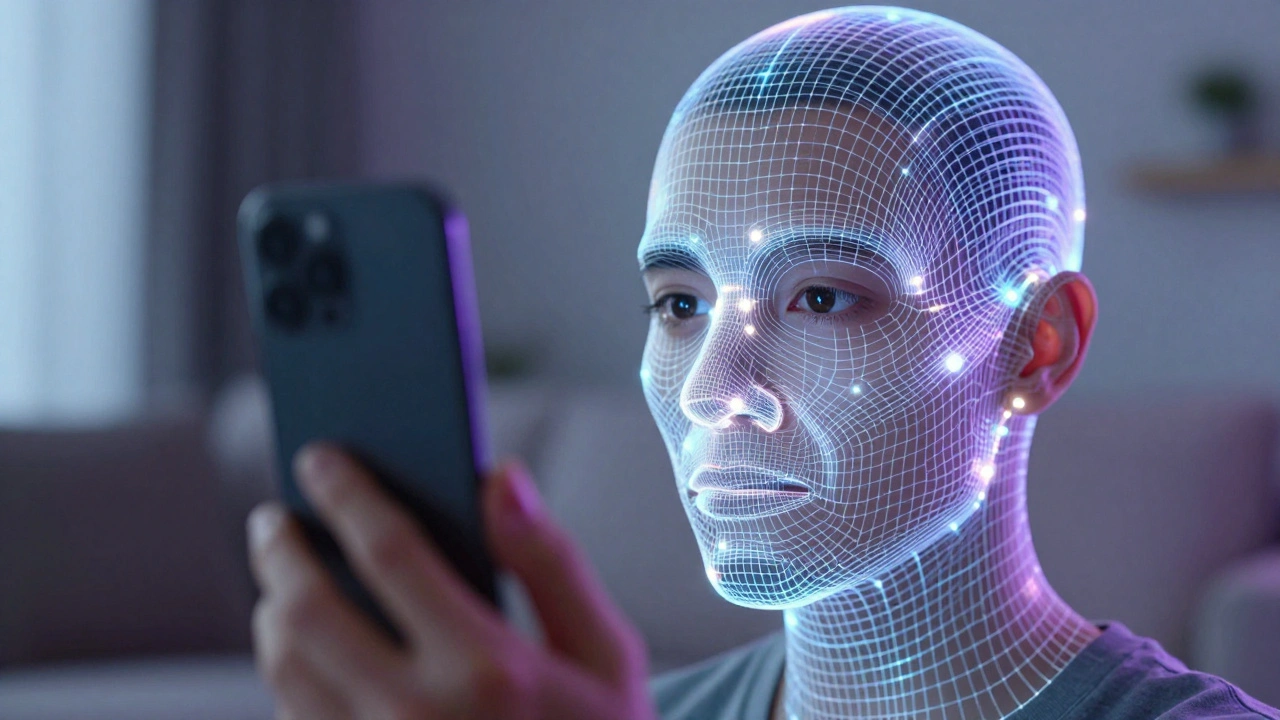
Traditional studio lighting relies on the physical placement of lamps to create shadows and highlights that define a person's face. Your phone doesn't have those lamps, so it uses Computational Photography the use of digital processing and algorithms to enhance or create image elements that a standard lens and sensor cannot capture on their own. Instead of just slapping a filter over the image, the phone's processor creates a 3D map of the subject's face.
For instance, Google uses a system called MediaPipe Face Mesh a framework that provides real-time face landmark detection and geometry tracking to understand exactly where the nose, cheekbones, and jawline are. Once the phone knows the 3D shape of the face, it can calculate where a "virtual" light source would cast a shadow. It's essentially treating the face as a light probe to estimate the environment's illumination and then adding a synthetic "key light" to make the image pop.
Mastering the iPhone's Lighting Carousel
If you're using an iPhone, you've probably seen the lighting options in the Portrait mode menu. These aren't just brightness adjustments; they are specific simulations of different studio setups. To get the most out of them, you need to know which one to pick for your specific vibe:
- Studio Lighting: This is your "safe" bet. It optimizes the light on the face for a clean, balanced look, similar to a standard beauty shot.
- Contour Lighting: This adds more contrast to the edges of the face, which is great if you want to emphasize a strong jawline or a specific facial structure.
- Stage Lighting: This is the most dramatic. It wipes out the background entirely and puts the subject in a spotlight. It works best when there's a clear contrast between the person and the wall behind them.
- Natural Light: This is best for outdoor shots or when you're near a window, as it mimics the soft, diffused glow of daylight.
The cool part about the Apple ecosystem is that these changes aren't permanent. You can snap a photo and then decide later in the Photos app that the "Studio" look was too harsh and switch it to "Natural."
The Google Pixel Approach: Virtual Relighting
Google takes a slightly different path with Portrait Light a Pixel-exclusive feature that allows users to reposition a virtual light source after a photo has been captured. While Apple gives you a set of presets, Google lets you actually move the light around the subject.
Imagine you took a photo where the sun was behind the person, leaving their face slightly dark. With Portrait Light, you can literally drag a virtual light source in the Google Photos app to illuminate the face from the front. This is powered by models trained on the "Light Stage" system, which is a professional setup that captures how light hits a face from every possible angle. Because of this, the shadows created by the virtual light look surprisingly authentic rather than like a digital smudge.
| Feature | Apple Portrait Lighting | Google Portrait Light |
|---|---|---|
| Control Method | Preset styles (Studio, Contour, etc.) | Manual repositioning of light source |
| Primary Goal | Atmospheric mood and style | Correcting exposure and adding depth |
| Background Handling | Can isolate subject (Stage Light) | Focuses on subject relighting |
| Edit Timing | Preview or post-capture | Primarily post-capture editing |
Pro Tips for Better Virtual Lighting
Even though the AI is doing the heavy lifting, you can still mess up a shot. The software isn't perfect, and "digital artifacts" (weird glitches around the hair or ears) can happen if the conditions are bad. Here is how to get the cleanest results:
- Avoid "Busy" Backgrounds: If you have a bookshelf or a cluttered room behind you, the AI might struggle to separate your hair from the background, making the lighting look patchy. Stand in front of a plain wall if possible.
- Start with Decent Base Light: The AI can't create light out of total darkness. You'll get the best results if you have some soft, ambient light-like a window-to start with. The software then enhances that base.
- Mind the Distance: Don't stand too close to the camera. If your face fills the entire frame, the depth sensors might struggle to map your features accurately, leading to distorted shadows.
- Check Your Angles: Turn your head slightly. Lighting looks most "professional" when it's coming from a 30 to 60-degree angle rather than hitting you straight-on, as this creates a natural sense of depth.
Beyond the Big Two: Third-Party Alternatives
You don't necessarily need a Pixel or an iPhone to get these looks. There are apps that use similar, though often less integrated, techniques. Snapseed a free professional photo editing app by Google that offers advanced tools like selective editing and portrait enhancement allows you to use the "Portrait" tool to brighten the face and smooth the skin manually.
For those who want to learn the actual science of lighting before they shoot, tools like Set.a.Light 3D a virtual lighting simulator that allows photographers to plan their shoots in a 3D environment are fantastic. While not a "one-click" fix on your phone, they help you understand where a real key light should go so you can mimic it using a simple desk lamp or a piece of white cardboard as a reflector.
Does simulated lighting look the same as real studio lights?
For social media and casual viewing, yes. However, professional photographers can often tell the difference because AI lighting can sometimes lack the subtle "wrap" that real light has around a subject's features. It's a great simulation, but not a perfect replacement for physical gear.
Why does the lighting look weird around my hair?
This usually happens because of "edge detection" failure. The AI struggles to tell where a stray hair ends and the background begins. To fix this, try to increase the contrast between your hair color and the background color.
Can I use these effects on a photo I took years ago?
On Google Pixel devices, you can apply Portrait Light to many existing photos in your library, even if they weren't taken in Portrait Mode, provided the AI can clearly identify a human face.
Do I need a dual-camera system for this to work?
Most of the time, yes. These effects rely on depth data. While some new phones use AI to guess depth from a single lens, having a second lens or a LiDAR sensor makes the lighting effects look much more realistic.
What is the best lighting mode for a professional headshot?
Stick with "Studio Lighting." It provides the most neutral and flattering look. Avoid "Stage Light" for professional headshots as the pitch-black background often looks too artificial for a LinkedIn profile or resume.
Troubleshooting Common Issues
If your virtual lighting looks like a smudge or isn't applying correctly, check these three things first. First, clean your camera lenses; a fingerprint smudge can confuse the depth sensors. Second, make sure you aren't in a place with extreme backlighting (like standing directly in front of a bright window), as this can blow out the sensor and make the AI mapping fail. Third, if the subject is wearing a hat or glasses, the AI might miscalculate the face mesh-try tilting the head slightly to help the software "see" the eyes and nose better.